

This post is a public service announcement. To all you Sewists out there - I Want You to Dye.
Fabric. That is. I want you to dye fabric. Not just flat colors, either (though that's an acceptable place to start) but crazily unique and fabulous prints that come out of your own gooey head!
As you guys probably know already, I kind of have a thing about hand painting/dyeing fabric. And while I'd love for you all to think that I have been entrusted with some mysterious artistic knowledge (the kind that is passed down by word of mouth in hushed voices during clandestine initiations performed to a full moon wearing all white... so you can dye it... obvs.) that would just be a darn lie. Dyeing fabric is easy. And I'd like to share my secrets with you.
So why dye your own fabric?
Do I have you convinced? Good! Then let's do this thing! This is bound to be an extra long post, so feel free to bookmark it for later, or go ahead and make yourself some tea and grab a snack. I'll wait here....
Back? Okay! Then let's just jump in... The first thing I want to tell you about dyeing your own fabric is:
So why dye your own fabric?

- You know how awesome it feels when someone is like, "Omigod where did you get that??" and you get to be all like, "Ohgeethanks I made it!" and they're all like "Whhhaaattt??? Girl. No you di'int." ? Yeah, now imagine adding in "And I made the fabric too." Minds. Blown.
- It's like wearing a painting - except not weird.
- After the initial cost, it's cheap! And even the initial cost isn't too bad compared to what you'd be spending at the fabric store. (This is not to say that this should replace your fabric buying addiction. Ohhh hoho no! I'm all about enabling. Consider this more as a little eccentric jewel in your handmade wardrobe.)
- It's analogue. I'm going to reveal something about myself here. For someone my age, and a blogger to boot, I'm utter crap with technology. I've tried, but I just can't wrangle Illustrator into doing what I want. I'm far more at ease working with my hands. I can't be the only one, right?
- You get to feel like a crazy mad-scientist mixing up your concoctions in your kitchen sink. And who doesn't love a little bit of role-playing, right?
- The results are awesome. Nuff said.
 |
| My second attempt at dyeing - post here. Also, I always think this picture looks like I'm trying to grow a unicorn horn! |
 |
| Third dyeing project, and one of my favorites. See posts here and here. |
 |
| And this little number is for a secret special project that I won't reveal just yet. |
Back? Okay! Then let's just jump in... The first thing I want to tell you about dyeing your own fabric is:
It's unpredictable. Perhaps this is where fabric dyeing gets it's intimidating reputation...? But I don't really see this as an obstacle. I'm putting it out there in the beginning because I think it's a good reminder of what sort of head-space you should try to be in when you embark on your dyeing experiment. There's always a little bit about the dye process that is out of your control, and that's the fun part. You can't totally predict how a color will turn out once you wash it out, or get the full picture of how a pattern will look repeated over 4 yards of fabric, and most likely you won't be able to get your pattern to look perfect. But remember, you're dyeing by hand, it's not supposed to look manufactured! Oftentimes I'll begin painting my fabric with one idea, only for it to slowly shift as I work down the yardage, and I might have to go back and add little bits to create a more cohesive overall look, but I'm okay with that, it's part of the process. Also, some of those little unpredictable quirks (the subtle shift of a color once it dries, an unexpected texture, color bleed, lack of symmetry...) can be the things that make your fabric extra cool.
Supplies:
Now, let's look at what you need to dye. I'm going to say right off the bat that my main source for dye supplies, including fabric, is Dharma Trading Co. They have a great, informative website, and their products are really quality. But you'll need other odds and ends too, many of which you may already have laying around the house. I've broken this into categories based on where you're most likely to find these things.
A word about Dye & Fabric
These instructions are only for procion dyes - which come in powder pigment form and are great for dyeing all natural (cellulose and protein) fibers - that means cottons, rayons, hemp, silks, linens and wools. You can use any white, natural fibered, fabric for your project - but, as I said, I recommend the ones offered from Dharma because they are meant to be dyed, and they're a decent price.

Hardware Store Stuff
- A large bucket (I highly recommend one with measurements along the side, it makes knowing when you've got a gallon of water soooo much easier!)
- A few smaller buckets for mixing dyes (optional - you can also reuse glass jars, yogurt containers, etc.)
- Dust masks (dyes are loose chemical pigment, which are harmful to breathe in).
- Large sheets of plastic for protecting the floor and for rolling up wet fabric in to let cure

Household items / Grocery store stuff
- Plastic measuring cups and spoons (I recommend not using the same stuff you use to cook, buy a separate set just for dyeing)
- Long plastic gloves
- Empty jars (optional - can also use small buckets - see above)
- Blue Dawn (or synthrapol, but this is cheaper and works just fine)
- Tea kettle or some other container for heating up water
- Regular old kitchen salt
- A variety of medium to small paint brushes. Realistically, I only use about three.


- Procion Dyes (you can start with any colors that tickle your fancy, but if you're looking to build a "palette" of mixable colors, you'll want 2 shades (warm & cool) of your primary colors: red, yellow, and blue, as well as a few secondary colors like a good purple, green and orange, and maybe some neutrals like black, brown and tan. Although, really, I just bought the colors I liked.
- Soda Ash fixative - this is a necessary chemical to get the dyes to "fix" or become permanent.
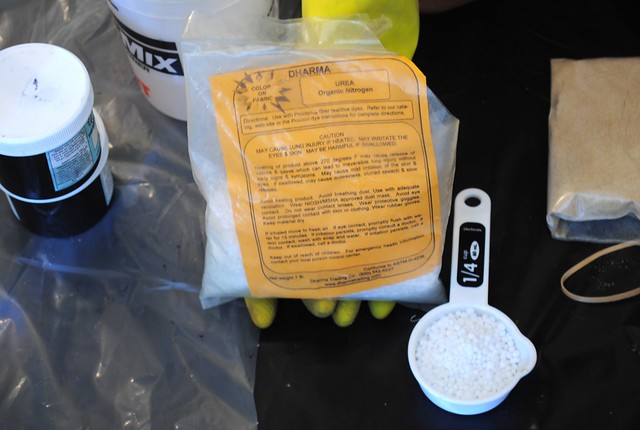
- Urea - this is an optional additive, but I like to use it when I paint fabric because it keeps the fabric moist, and since it is important for the dye to stay wet in order to "set", and painting fabric can take awhile, I think this is an important additive for the process I'm going to show you in this post.
- Sodium alginate - totally optional. This is a thickening agent that can be added to dye to make it more 'paint'-like and reduces the watercolor-y, bleeding effect of the dye.
- Fabric - cotton, rayon, hemp, silk or wool. I recommend working on continuous yardage - although you can dye a finished garment (just remember that the polyester thread will not take the procion dye). I do not recommend cutting out your pattern pieces and then dyeing, because you will be handling the pieces alot, and quite roughly, and they're bound to stretch and warp in the process.
Getting Started:
Pre-wash and dry your fabric. Even though you may have bought fabric that is good for dyeing, it's always a good idea to wash your fabric with a little bit of blue Dawn (or synthrapol if you prefer) first to get off any residue or oils that may be stuck to it.

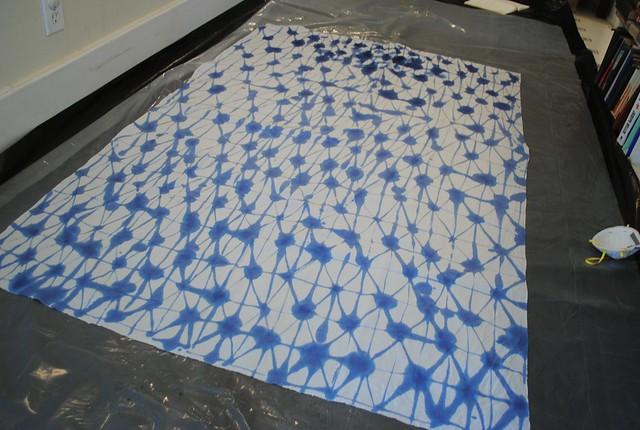
Protect your work surface. Even if you are going to be dyeing fabric in your garage, or on the roof of your building or something, it's a good idea to lay down some plastic first. This will protect your floors (and keep your landlord happy) and also protect your fabric from any dirt that may be on your floor (although I always recommend a quick vacuum before starting, but this could just be because I have two constantly shedding animals in my house). I like to lay down a thinner piece of plastic on top of this one, and then lay down my dry fabric. Then once my fabric is painted I'll roll it up in the thinner plastic and let it "cure" for awhile.
Mixing the Chemical Water:
Chemical Water just describes your water all prepped for dye. We'll use this as the base to mix our dyes.
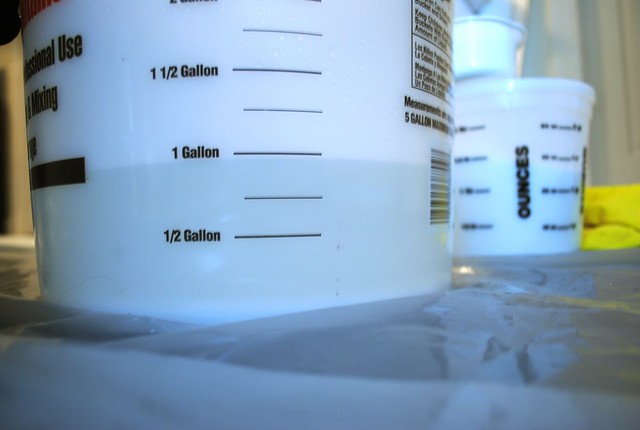

- Put the kettle on to boil. These instructions will make a gallon of chemical water, which is what I make every time. (If you are good at the maths then you can adjust these water/chemical ratios to make smaller or larger batches of chemical water.)
- Pour the boiling water into your large bucket. Then double the amount of water with warm water from the tap. You want to end up with a gallon of hot, but not scalding, water.
- To the hot water add: 1/2 cup of salt & 1/3 cup of soda ash. Important! Do not put the soda ash in the bucket, then add water, it forms a solid rock at the bottom of your bucket!
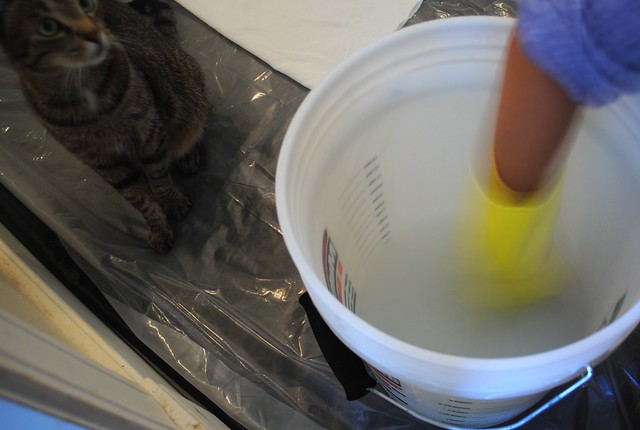
- Mix with your begloved hand. Watch out for sneaky photobombing kitties.
Mixing Your Dyes:
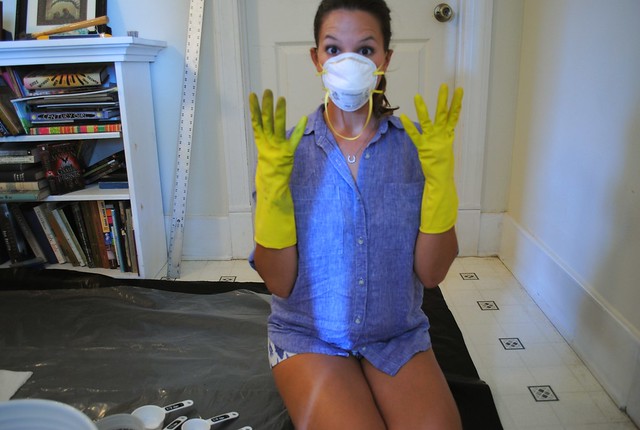
I swear I'm wearing shorts in these photos!!

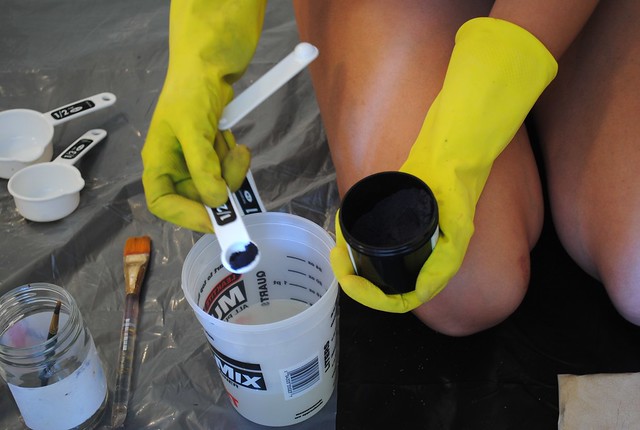
- Make sure you put on your dust mask and keep your gloves on before you open any dye containers! Safety first!
- Scoop about 2 cups of chemical water into a smaller bucket or jar. It doesn't have to be exact. For this sample I used 1 1/2 cups of water.
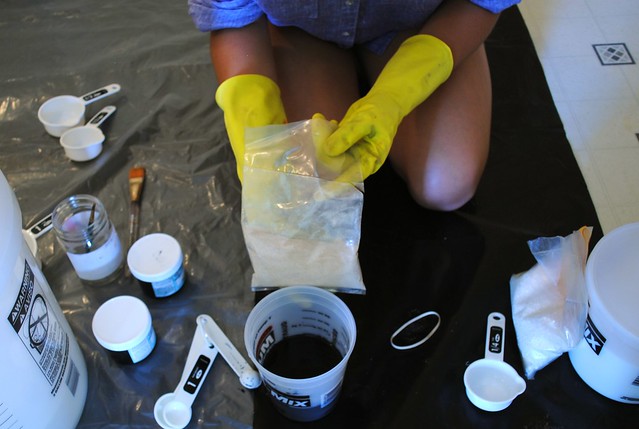
- Add Urea. The ratio I'm familiar with is 3/4 cups of urea for every quart of chemical water (for direct application, i.e. painting, like we're doing here). Since I'm only making 1 1/2 cups of dye I had to do some maths (actually, my husband had to do some maths) to figure out how much to use. I used just under 1/4 cup. Stir it up real good so all the little urea beads dissolve.
- Using your measuring spoons, measure out about 1/4 teaspoon of dye. The rule of thumb here is that for every gallon of chemical water, you use about 2 teaspoons of dye to get the maximum vibrancy. You want to adjust this for using a smaller amount of water, however you can play with this too. If you want a darker color, use more dye. For lighter, more pastel shades, use less dye. I generally just eyeball this, no maths involved.
- To mix your own colors you just want to sprinkle a small amount of your dye into the chemical water at a time. Start small and add slowly. It's easy to make a dye darker, but damn near impossible to get it lighter once you go too dark! Unfortunately there are no hard and fast rules for this sort of stuff - you just have to use your eye.
- If you want to thicken your dye to make it more of a 'paint'-like consistency, and so it doesn't bleed as much you can add a little sodium alginate to it. (Bonus! This also acts as a very light resist.) For my sample I did not add thickener to it. But basically you just sprinkle some into your dye mix and let it sit for a bit. It will take on a slightly gel-y consistency. Don't add too much, it thickens with time.
- Do this for as many colors as you think you are going to use - hence, creating your "palette", so to speak.
Painting Your Fabric:
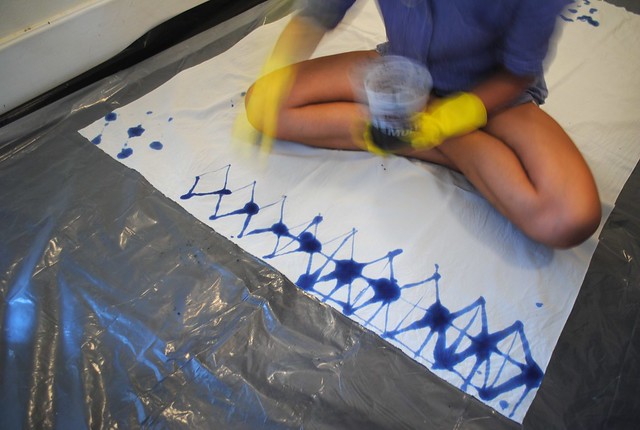
While you might want to just get started on your white fabric, it's sometimes nice to dye your fabric a base color first. If you want to do this - I recommend using the leftover chemical water bucket as your dye bath, and dunking your fabric directly in there. Wash it again (following the instructions below for washing out your dye) and dry it before preceding onto the next steps. For the sake of simplicity, I'm just doing a simple, direct design in one color on my white fabric.
Unfortunately, I can't really give you any cold hard facts about painting your fabric! This is where your own creativity comes into play. I can say this, though, if you are nervous about just going to town all willy-nilly on your fabric, then don't. Come up with a plan. It's much easier to work off a system than it is to just start throwing dye around and seeing what happens. Mentally create a grid on your fabric (you could even draw one out lightly with pencil, or a washable marker) and start from there. Geometric prints like stripes, dots, squares or diamonds are great places to begin - and they will still look totally unique and special because they are made by hand.
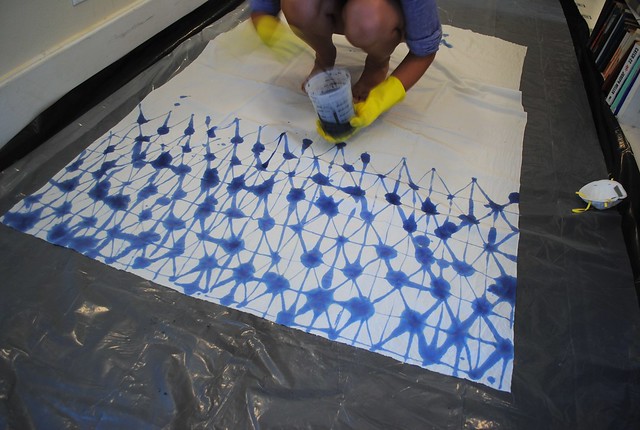
Additionally, if this is your first time with this, start with only one or two colors. Something like colored dots on a white background can be a great, fast and easy place to start, and anyone can do it. The more colors you add, the longer you'll be dyeing and the more complicated your pattern will become.
If you are using multiple colors, it's easiest to work one color at a time, like you're legitimately a fabric printer. Think of your pattern as building layers of color. Work from the lightest color to the darkest color.
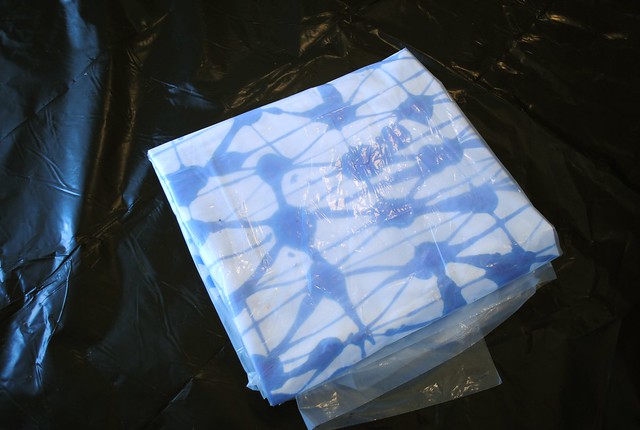
Once you finish, roll your fabric up in the plastic and store it for at least 4-5 hours, up to a day.
Washing Out Your Dye:

After you've let your dyed fabric sit for at least 4-5 hours (I usually leave mine overnight) you can unroll your fabric and rinse it. Rinse it first in cold water without soap. I do this right in the sink. The cold water will stop any chemical reaction that may still be happening with the dye. You may see some color bleed out, that's totally normal. Rinse your fabric until the water runs clear-ish.

Then you want to wash your fabric in hot water with another squirt of Dawn or synthrapol. This will get out any remaining loose dye molecules and you're dye will be set! I do this in the washing machine, but you could also do it at your sink - just be really thorough. Yes, even silks can take the hot water (protein fibers are tough y'all!) Hang or tumble dry, and that's it!!
If I'm doing multiple layers of color - like one flat base color and then a design on top of it - I wash the dye out after doing the flat color. I don't wash the dye out after each layer of color in the design. Does that make sense?
Clean-up:
I've never had a problem with my dyes staining anything, but as you can see, I'm pretty thorough about making sure my work surface is protected, and I never take off my gloves until I'm done with the whole dye process.
I generally pour any unused chemical water or dye down the sink. I'm not sure if that is entirely environmentally sound, but I think there are worse things I could be putting down my sink. Then I rinse my sink, so the dye doesn't stain the porcelain. All brushes and containers just get rinsed with water.
You can save your chemical water if you have a lot left over. You just need to add hot water to it again to bring the temperature back up, then adjust the soda ash and salt levels to compensate for the added water. This might be a good idea if you think you'll be doing a lot of dyeing, but for my purposes it never really made much sense.
Additional Resources:
I really learned a lot about dyeing from Dharma's website. I hate sounding like a broken record, but they just have a plethora of information packed on there. Also, their customer service people are brilliant. If you have a question about a technique or product, or just need to trouble shoot, you can call and talk to someone, and they are super knowledgable and helpful.
I think, like many people, I was really intimidated by the prospect of dyeing in the beginning. It seemed like everything needed to be so exact or else, I don't know, you'd blow up your kitchen, or something! So when I decided to take the plunge I signed up for The Art of Cloth Dyeing with Jane Dunnewold on Craftsy. This class is really great if you're the kind of person who needs to know the why behind the how. Like, what exactly chemically speaking, is going on here. Jane covers all that in a really, really down to earth way. This class also taught me that dyeing actually doesn't have to be exact. You can still get great results if you just kind of fudge it. Truth. It also covers a lot of really beautiful shibori-esque dye techniques, which are really popular right now.
And finally, you can give me a shout out! I'm far from being an expert, but I'm certainly enthusiastic and I've had my fair share of trial and error.
Well, friends, I hope I've piqued your interest in fabric dyeing, and that you found this to be an informative post! A huge thank you to my husband for being my lovely assistant in getting this process photographed. And now, stay tuned to see what I'm going to make with that kooky blue diamond pattern up there!
xx
I'm so glad you did this post! I definitely think you are going to inspire folks to get to dying. Well, we'll all die eventually, but we can DYE today! Anyway, super informative and funny, as always. Next Dharma order, getting me some supplies.
ReplyDeleteLet's form a cult and die - I mean, dye - together!!! Wahoo!
ReplyDeleteI'm so excited about this post! I finally have my own washing machine and am ready to dye some fabric. Of course, my first project is going to be dying all my previously black clothes black again... so much more boring than this! Thanks for sharing all your expertise!
ReplyDeleteThanks so much for this post! I've really wanted to combine my drawings with my sewing, but always felt too scared to really jump in!
ReplyDeleteIt looks so cool, but I'm terrified of the expense (and if we're being honest, the work) involved with dyeing. If I ever get over myself though, I'll definitely be referencing this post. :-)
ReplyDeleteThis is fabulous!!! I've avoided dyeing large amounts of fabric because I assumed you needed a washed and dryer in your house to do it, but since you don't, I'm totally in! Thank you SO much for sharing so much great information!
ReplyDeleteThank you so much for this!!! You had me at "It's like wearing a painting - except not weird."
ReplyDeleteIt's been a year or two since I last dyed fabric. A year or two too long if you ask me. I've never been very adventurous with it, though. This is exactly the push I need to experiment and be a bit more bold. I'm definitely bookmarking this!
What a great post! I have signed up for a shibori workshop in my town at the end of the year and might have to start experimenting at home.
ReplyDeleteHey Sonja! Just make sure you use REALLY hot water and wash your fabric really really thoroughly for that last step, and you should be fine. That's the only advantage of having a washing machine. Otherwise, your fabric may leach a little dye the next time you do your laundry (so you might want to wash it by itself the first few times, or continue to hand wash).
ReplyDeleteThat's a totally fair concern! It IS a lot of prep work gathering all the supplies in the beginning - and I would definitely say that dyeing is a Project, with a capital P. You don't have to buy everything all at once. I think the first few projects I did I only had about 3 dye colors (thats why everything was shades of blue for awhile!) the soda ash, urea and a bucket. But I've slowly added some of the other stuff. For me, the biggest expense is the fabric, but then again, fabric is ALWAYS my biggest expense :)
ReplyDeleteI hope this helps! It really is best to just JUMP in and get a feel for it yourself.
ReplyDeleteGreat post! I love the idea of this, but it still does sound a little scary, and as I'm not artistic as such, I'd be scared to create something I didn't like. However, I will be book making this, so you never know! Thanks for sharing!
ReplyDeleteI've wanted to start dyeing fabric since seeing your first piece. I love painted-look fabrics, so it seems only natural. I should have tried it out when I lived so close to Dharma Trading! Thanks for these tips. Once I make a dent in my current stash (which is incredibly hard thanks to MSN!), I want to try this out!
ReplyDeleteThank you for this post! I followed a itajime class in New York and that was an awesome learning experience. I think dyeing your own fabric makes it even way cooler indeed! I love the print you created.
ReplyDeleteThat class sounds awesome! I would love to have access to those sort of classes where I live - definitely one of the pluses of living near a huge creative center like NY! I do like that this print is reminiscent of a shibori flag-folded design, but with a subtle handmade quirk.
ReplyDeleteHey Helen! I definitely understand that dyeing is pretty scary, and I think it does help that I have a background in art so I was able to adopt a "what's the worst that can happen?" attitude. I think, if this is something you would like to give a try but are too nervous, than starting with a simple polka-dot design is really easy and great. Thicken your dye up a bit with some sodium alginate and just touch your brush to the fabric every few inches. It doesn't have to be perfect, in fact, the imperfections are what makes it so cool!
ReplyDeleteAnto, you'd be so great at this! I can just imagine the beautiful designs you'd create!
ReplyDeleteEveryone's gotta start somewhere!! If you're thinking of mixing up a procion dye bath (and I highly recommend these dyes for their color-fastness) then you might be interested in Dharma's new black dye (called 'hot black' i think). Often times black dye can go too purple-y or green or blue or something, but this is a great black. Here is their info on black dye: http://www.dharmatrading.com/html/eng/3796-AA.shtml?lnav=dyes.html
ReplyDeleteYou could also just do an easy RIT dye, of course, but I'm obviously partial to these dyes :)
Hey Jane! I'm always jealous of people who have access to those sort of classes where they live! Sounds like a great time!!
ReplyDeleteAmy, you definitely have a great eye for color and print! I could see you really rocking some hand painted fabrics! Of course, if I had the lure of beautiful Mood fabrics calling to me it would be pretty hard to ignore their siren song!!
ReplyDeleteAlso! Since you won't have the additional agitation of the washing machine, try using the synthrapol instead of Dawn detergent, since it's really MEANT for removing excess dye molecules. Ok. That's all!! Whew!
ReplyDeleteI really, really, want to dye my own fabrics. I've enrolled in the craftsy class and have the dyes, but just can't take the plunge. This post was very inspirational and informative. Just what I needed.
ReplyDeleteSallie, this is amazing, thank you so much for sharing :) I've been enviously looking on at your projects from the sidelines, watching your mysterious creations, but now, armed with this post I can go forth! All I need now is a bigger apartment :s
ReplyDeleteThanks Sallie! I did love your polka dot fabric, so sounds like a good place to start!
ReplyDeleteOh, what a cool tutorial! I love you handpainted fabrics! I haven't taken the plunge into dyeing yet (aside from silk painting while I was still in primary school ;) but this is totally making me want to try!
ReplyDeleteI'm totally bookmarking this post! I've done a lot of shibori-type dyeing but have never tried painting. Your dyed textiles are so gorgeous, thanks for sharing your process!
ReplyDeleteYou had me at "It's like wearing a painting - except not weird".
ReplyDeleteConsider me sold. I will be doing this.
And just so you know, I started reading this post thinking, "ummm no, I don't think I am up to this, but it's worth a read ....."
Thank you!
Gorgeous work, and great tutorial! I realize now that I already have a lot of these supplies in my garage-- just need the dye materials. I'm sure my husband would love for me to take up another artisitc endeavour that requires more supplies! Ha :D
ReplyDeleteCareful now... you might start getting fabric orders! Your work is stunning.
And yes, I too am ashamed at the how scared I am of using Illustrator... heck, even Photoshop. It's why I majored in Studio Arts and not Graphic Design. I know it's just expected that artists have those skills now, but I can't help but wonder how long it will be before people start craving original, hand-crafted art/ paintings/ drawings/ fabrics/ sculpture again. Everything now is so digitized and graphic and bold, which isn't bad-- I do like a lot of it. But give me a real paintbrush and a canvas any day!
Whoa, whoa, whoa, Sallie. You weren't lying when you said this was a loaded post. Mama, you just outdid yourself! This comes just in time because as you know, I was dying elastic last weekend. Slap me but I used RIT dye, but it was my first foray into dyeing and when I do it again, especially when I dye larger pieces, I'll be sure to up my game to Dharma Trading Company.
ReplyDeleteNow, I must admit, I only read half of the post because there was so much. I'm going to be back tomorrow in the am to read the rest and yup, you bet, comment.
Thank you for this in depth post. I am pinning it and would like to use it. Can't wait to see your finished garment from this piece.
ReplyDeletewow, Sallie, this post is amazing!! I'm totally game for some fabric dying. Not sure how soon I'll get to it, but after reading your post I definitely want to give it a try one of these days. The fabric in this post is gorgeous--can't wait to see your garment.
ReplyDeleteFabulous, Fabulous, Fabulous. I love info posts like this!
ReplyDeleteHey Sallie! I actually was very lucky to be able to take this class since I live in The Netherlands and was only in New York for four weeks! Otherwise it would have been impossible. My teacher Shabd has just released her first book about dyeing, a beautiful book! http://www.shabdismyname.com/book/
ReplyDeleteThank you so much for this. I´m actually very scared of dyeing, but you make it look easy. I´ll need to give it a go soon!
ReplyDeleteWell now that looks like a great time! I loved the post and am excited to see what you make with that awesome fabric! xoxo
ReplyDeleteHey Maddie! Yeah, it's a really long post - but I thought it would be better to have it as a resource for people all in one spot, rather than broken up into little bite sized chunks! Also, there's nothing wrong with RIT dye! I like these dyes because I do think they are more colorfast and yield slightly more interesting results - but RIT is GREAT for dyeing one color!
ReplyDeleteYeah! I am glad I could change your mind! It is a bit of a process, but no more than us sewists are used to! And it's fun to experiment now and then and switch things up!
ReplyDeleteHaha! I'm so glad I'm not the only one! I actually had to take a class in my foundation year of art school on digital art techniques and you should have seen all the crazy ways I worked around ACTUALLY using the software for all my assignments!! I should have gotten an 'A' in that class just for creative evasiveness alone!!
ReplyDeleteAnd I definitely think there is starting to be a shift in consumers desiring more hand-crafted goods. What goes around, comes around!
Want me to come do a workshop at 1010 Rosebud? ;)
ReplyDeleteOh yes please!!!!
ReplyDeleteOh that's so awesome!! I'm familiar with Shabd's work - Her line is actually one of my first dye inspirations! What a great opportunity!
ReplyDeleteAnd I'm back for round two! I wanted to soak all of this up (I know I will be dyeing more in the future) so I broke it into two reads. There is so much great information here Sallie and I can't thank you enough for the instructions, tips, and resources. A thousand times over and over - thank you! You're email helped me tremendously last week but this is going to be my go to resource for future dyeing. RIT worked for my first dyeing experiment and I think it worked because the pieces were so small but I will probably choose Dharma next time.
ReplyDeletewow, amazing! This really appeals to me, I love the look of hand painted fabrics. I think that's why I love Nani Iro fabrics so much. Can't wait to see what you make with this fabric, it is really cool! My main concern with the whole process is the toxicity of all the chemicals, I don't really know much about it but would like to find information about that, and if there are non-toxic alternatives.
ReplyDeleteAwesome, awesome, awesome. I love the painted fabric in this post. It reminds me of shibori. I just recently bought an indigo kit (from dharma, of course!) and I am 'dyeing' to try it out- ha! I just need the baby to give me an afternoon off. You know I love me some hand painted fabric. This post is a great resource.
ReplyDeleteWow! Great teaching post! Love the fabric that reminds me of Japanese cherry blossom prints. Can't wait to see what you do with it!
ReplyDeleteHi Kelly! I love Nani Iro fabrics too!! I do think some people can have allergic reactions to some of the chemicals in the dyes - so that is something to be aware of. As a painter I was constantly being made aware of how toxic pigment is and became very used to using dust masks and respirators and covering my hands while working with certain media, so I think this is something that is just ingrained in me. I think once the pigment is suspended in liquid it is no longer dangerous. But caution should definitely be taken while the pigment is in powder form. As far as non-toxic alternatives, there are some really great resources out there for natural dyeing - using things like berries and onion skins (which create a BEAUTIFUL purple-y red color) that you may be interested in exploring.
ReplyDeleteI'm so glad you approve!! I'm still too intimidated to try batik, but it's been in the back of my mind since you made that awesome skirt! I think indigo is absolutely gorgeous!! Can't wait to see what you do with it!!
ReplyDeleteThanks momma <3
ReplyDeleteHey Sarah!! You know... I just watched the videos for that craftsy course first to soak in all the information, and then proceeded from there. It was a really empowering class!! Take the plunge!
ReplyDeleteHahaha!! Thanks Jenny! I'm so glad you like the post! I do have to admit that we have an absurdly large hallway in our apartment (it used be an old boarding house) that lends itself incredibly well for dyeing fabric...
ReplyDeleteThanks so much to you (and hubby) for pulling this post together! Veeery interesting. Can't wait to see what you do with you cool new diamondy looking fabric too :)
ReplyDeleteOMG girl! Thank you so much for posting about this! I've had my dyes from Dharma sitting around for ages because I couldn't bring myself to you know, actually learn how to use them. Maybe I won't do any dyeing right away but I'm excited that you wrote this and now I know where to go when I'm ready for some major awesome dyeing action.
ReplyDeleteThanks for amazingly interesting post ! I would like to try dyeing one day but first, de-stash at least 50% of my current stock ... Looking forward to see what you will come up with your two dyed pieces :)
ReplyDeleteCan Not Wait to see what you do with these!! Don't you dare get dye on that kick arse linen archer or I will come over there and kiiiiill you!!
ReplyDeleteThis is such a great tutorial, not so intimidating now me thinks. Thanks heaps
Sallie, thanks for sharing! My mom is a fiber artist and I always relied on her for her fabric dyeing skills and (who am I kidding) supplies. Lately I have been toying with investing in dyes for myself and I have lots of ideas stored away. Thanks for giving me the push I needed. Here is a top that I made last year but just posted to my blog. It was shibori dyed with indigo and my mom's help. http://ashleyakers.blogspot.com/2013/07/hand-dyed-silk-top.html
ReplyDeletethat's one amazing post.. love your design, and i'll have to try your technique as soon as possible :)
ReplyDeleteThis is a great post! I love to try this some time. Thanks for encouraging me! :)
ReplyDeleteWhat a great post! Thanks for sharing your knowledge.
ReplyDeleteOh wow, look at her go. This looks like my kitchen lately, all those chemicals. I feel like a mad scientist and just love it. I've been using acid dyes for silk so it's a little bit of a different process but the colors are amazing.
ReplyDeleteCan I like this post a bajillion times? I've seriously contemplated dyeing and click on over to dharma and then proceed to get overwhelmed. This post made everything seem so much more doable. It's great that you found a new medium for your painting skills.
ReplyDeleteThis fabric is soooooooo beautiful! I'm lusting after the Scout top you made. Def. adding this to my list!
ReplyDeleteAwesome post, thank you!! :) I bought some of the Procion dyes from Dharma a long while back, with the intention of doing some flat colour dying as well as hand painting, but (whatasurprise) I haven't gotten around to doing it yet. Now you've made a handy dandy little checklist for me, that is one step closer to me actually doing it. Love ya!! XO
ReplyDeleteBeautiful pattern. One suggestion. When you scour/pre wash what you are going to dye in the washing machine add 1/2cup soda ash (sodium carbonate) and pre wash. HANG TO DRY. This does 2 things: the fibers "stand up" to receive the dye when you apply it. ****Also, this way you don't have to add the soda ash to your chemical water. That way you can save any dye concentrate that you don't use and use it later. Once the soda ash comes in contact with the dye powder, it is exhausted in about 45 minutes. If you have pre washed the fabric with soda ash in hot water (with Blue Dawn or Synthopol) The dye will react with the soda ash in the fabric. ***Another tip, you can buy "Washing Soda" (Wal Mart) or "Ph Rise" type product in the swimming pool store usually for less than buying from Dharma. Just make sure it says "Sodium Carbonate" and nothing else. ***Last tip: You can buy Urea from the greenhouse. They are little nitrogen pellets. Just ask someone at the store, The bag will say "contains urea." .
ReplyDeletethe awesome patterns you are making are called "direct application" dyeing. If you are interested, here is a link to a great, online low water immersion dyeing class for $25.00 http://dyeing100.candiedfabrics.com/ I have taken 3 of her classes. In low water immersion, you may only have 1 cup of dye concentrate for a yard of fabric. Depending how you fold and scrunch the fabric determines what patterns you get. Candy Glendening, who teaches the classes, has been in magazines and on TV. It is a work at your own pace type thing. The 102 class is all folding and clamping and pleating to make hundreds of patterns, similar to what you have done.
Keep the great work!
this is a wonderful artwork. I'm not that patient to finish such a bountiful pattern
ReplyDeleteVenus Puzzle
I'm a textile artist, just getting back to doing some new work. I found your blog on google. Totally thrilled with your reminders that this is not a precise, controllable medium. I'm ready to just sit down and paint now. Thanks!!! <3
ReplyDeletesu nimon