

Well it's finally here! This is my tutorial for how I removed the neck gathers from my Sewaholic Minoru Jacket, as seen in this post. This was probably the most dramatic change I made to this pattern, but for a full outline on what I changed, please see the original post.
Before I begin I just want to mention that while this tutorial is specific to the Minoru pattern, it can actually be used for any pattern where there are darts or gathers used for shaping. The principles are the same, we're just rotating out the excess fabric.
Also, these are pretty major changes to make to a pattern, so I highly recommend that you make a muslin after making these changes to make sure that the fit still works for you. Obviously, these were the changes I made and they worked for my body, but, you know, we're all unique little snowflakes, and what works for me may not work for you.
Okay! Let's begin!

Materials you will need for this tutorial:
- Your Minoru pattern front, back, sleeve, and collar pieces, as well as all your lining pieces (For the sake of brevity I will only be showing you how to adjust the Minoru front and sleeve in this tutorial, but the steps are the same for the back and lining pieces).
- A roll of tracing paper or parchment paper or some other sort of see-through paper for tracing
- Tape (I'm using electrical tape because it's what I had on hand... don't ask)
- Scissors
- A straight edge/ruler
- Measuring tape and Seam gauge
- Pens/Pencils
- French curve (not pictured)
Note: Most of my measurements for this tutorial are in centimeters. I just find it easier when I'm doing pattern adjustments.
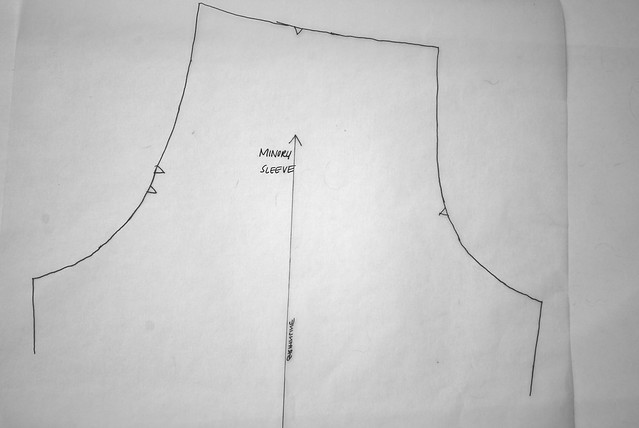
1) Start out by tracing your Minoru front and transfer all the markings, including grainline, guide for waist elastic, notches etc.
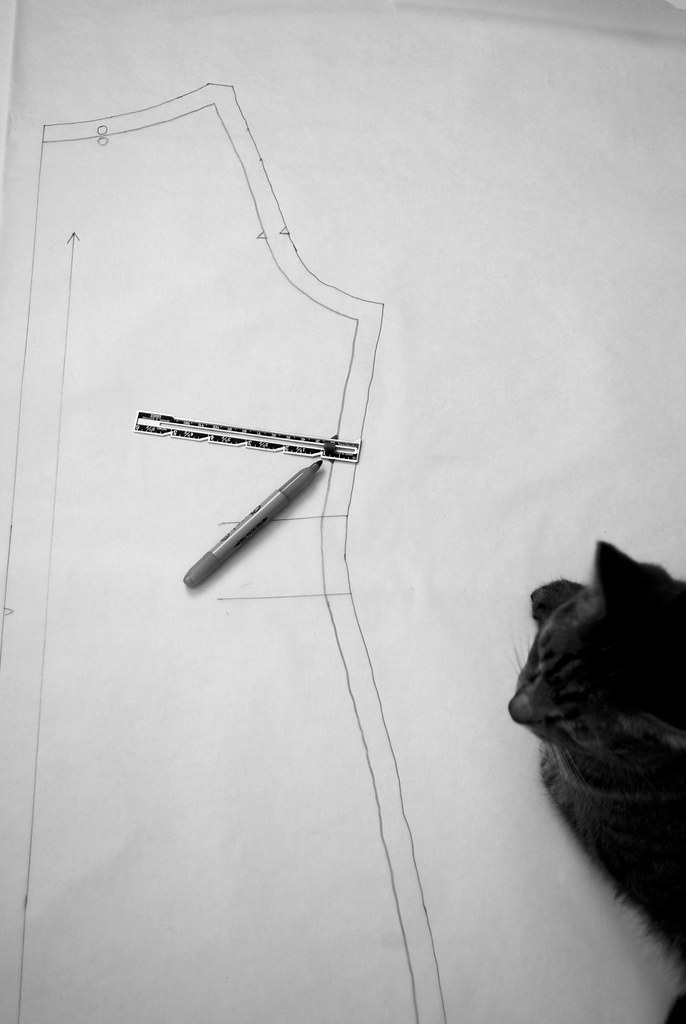
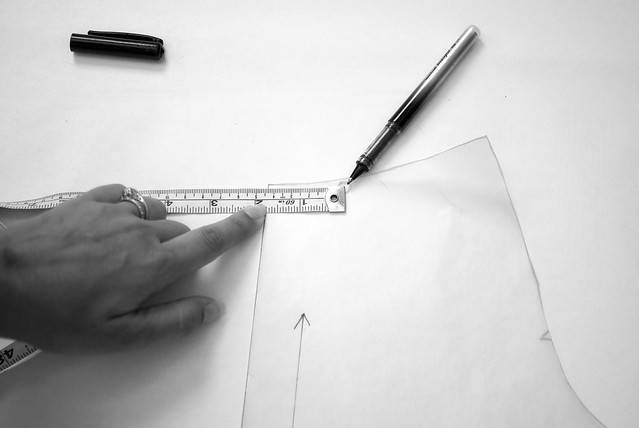
2) Using a seam gauge or ruler mark the stitching line along the side seam, raglan seam, and neckline. The Minoru uses a 5/8" seam allowance so you'll want to measure in from the cutting line 5/8". No need to mark the seam allowance on the center front. Transfer all markings as best as you can to this new line.
3) Cut out your pattern on the stitching line, all the way around.
Now we have to use some math to figure out how much fabric the gathers pull in, and therefore how much to reduce our neckline by. This next part gets a little tricky. Please note that all my measurements are for a size 8. You will have to do your own measuring and math for your own size, unfortunately!
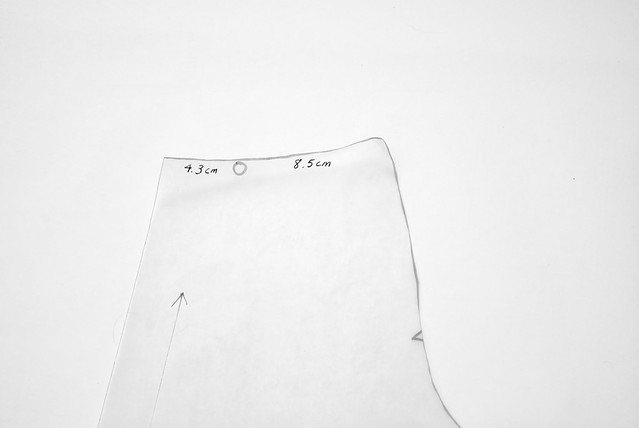
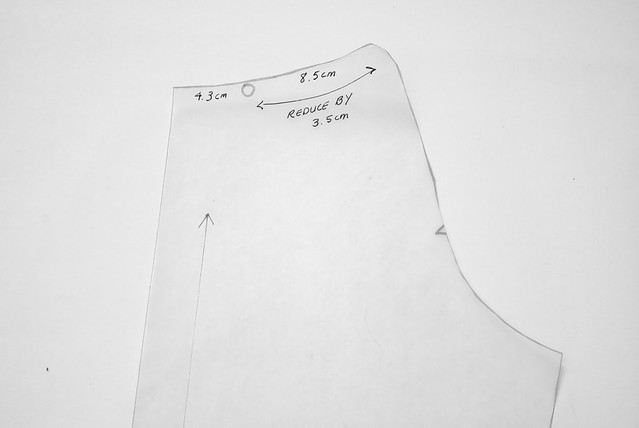
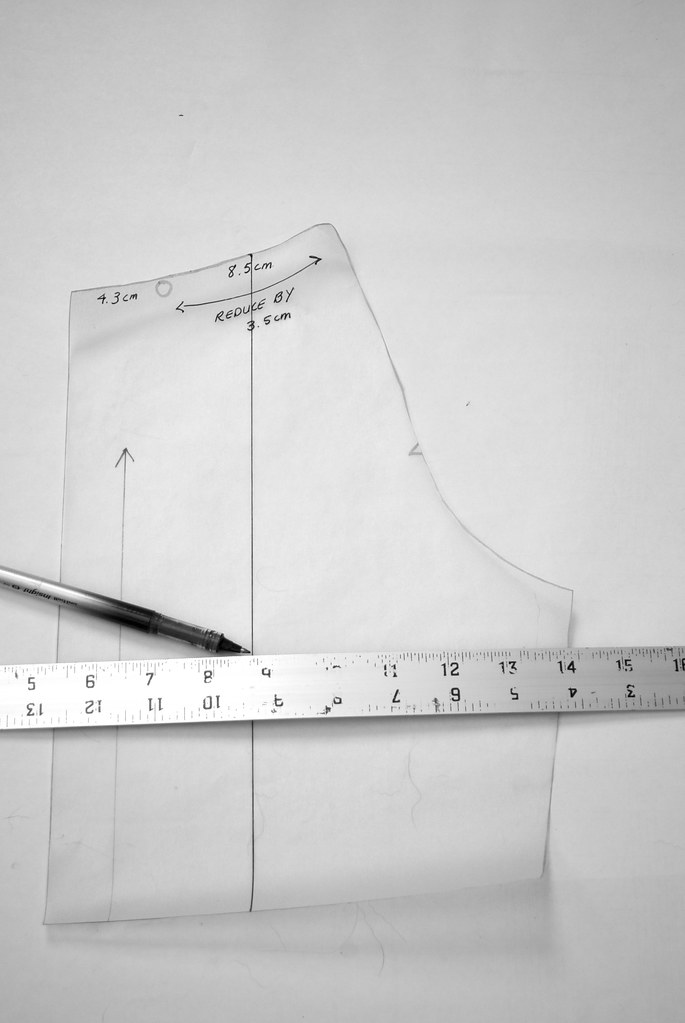
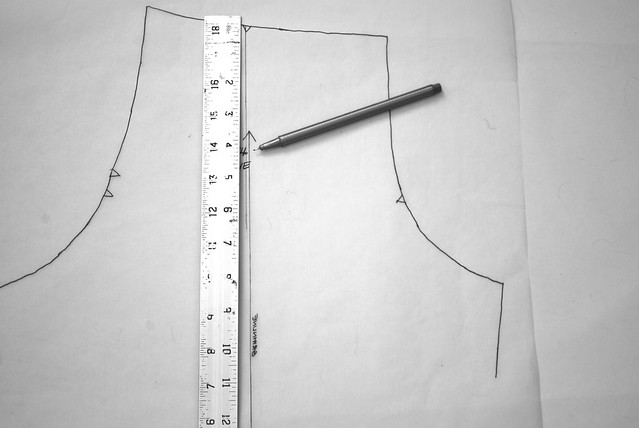
4) Measure from the large circle at the neckline to the center front. On my pattern that measurement is 4.3cm. This is the part of the neckline that does not get gathered.
5) Measure from the large circle to the raglan seam. On my pattern that measures 8.5cm. This is the area that does get gathered, and therefore the area that we will focus our adjustments on.
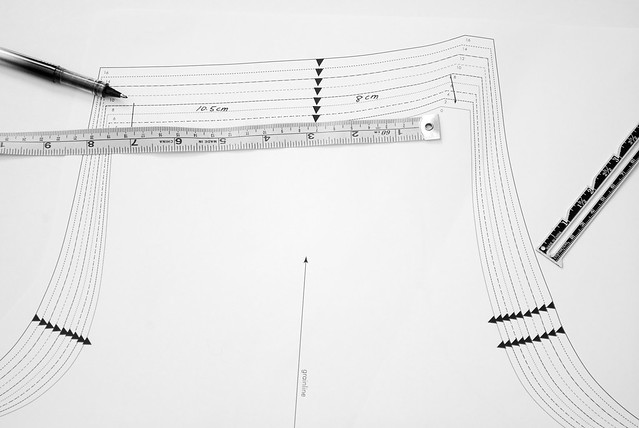
6) Now do the same thing for the sleeve, measuring the distance on either side of the notch at the top of the sleeve, omitting the seam allowances. You can see I drew little dashes for where the seam allowances are. Also note that you can tell the front and back of the sleeve based on the notches on the raglan seam - there is one notch for the front, and two notches for the back. So the front half of my sleeve measures 10.5cm at the neckline, and the back half measures 8cm.
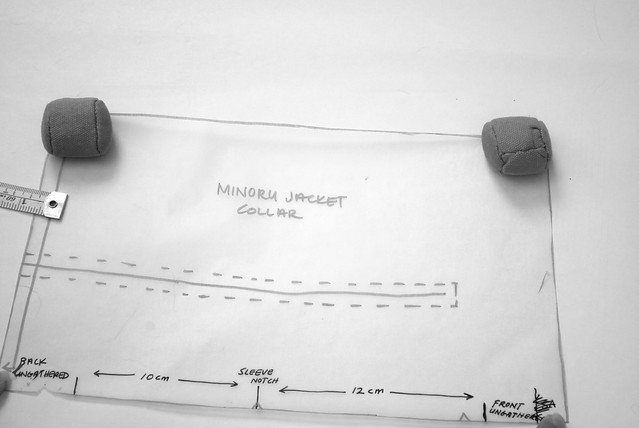
7) Now find the pattern piece for the collar. There are three notches on the bottom of the collar. One at the center back, one in the middle, and one towards the front. The notch in the middle corresponds to the notch at the neckline of your sleeve. Measure in from the center front (the side not marked "cut on fold") the same distance as the ungathered portion of your jacket front (4.3cm) and make a mark. Now measure the distance from that mark to the sleeve notch. On my pattern this is 12cm. This distance is the distance that we have to get the gathered portion of the jacket front and the front of the sleeve to fit into.
Note: you will be doing the same thing for the back measurements, but as I said earlier, I'll only be showing you the front.
8) Now comes the math part:
gathered part of jacket front + front of sleeve = total length of front gathers
8.5cm + 10.5cm = 19cm
total length of front gathers - distance between sleeve notch and mark from step 7 = amount that needs to be removed
19cm - 12cm = 7cm
divide by 2 = 3.5 cm
You will need to remove this figure (3.5cm) from both the jacket front and the sleeve front.
Fun (sorta) fact - I found that the gathering ratio was exactly the same all around the Minoru. So for me, 3.5cm was the amount that I removed from the jacket front, back and both sides of the sleeve. Of course I have no idea if this is true for all sizes, so to be safe, do the math (I'm sorry!)
Okay! No more math! I promise!
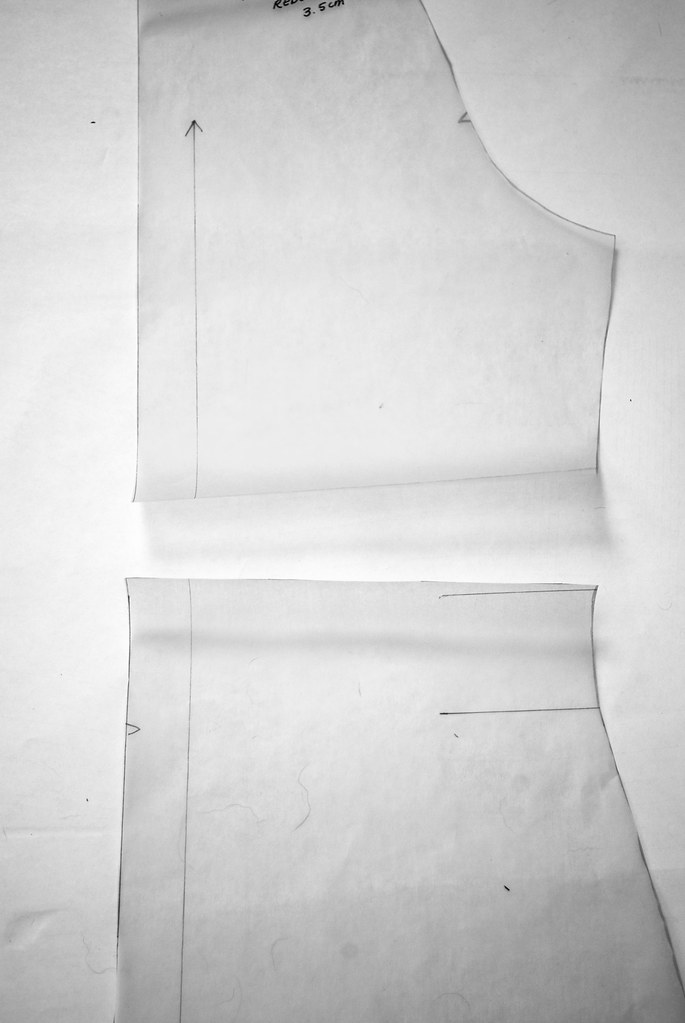
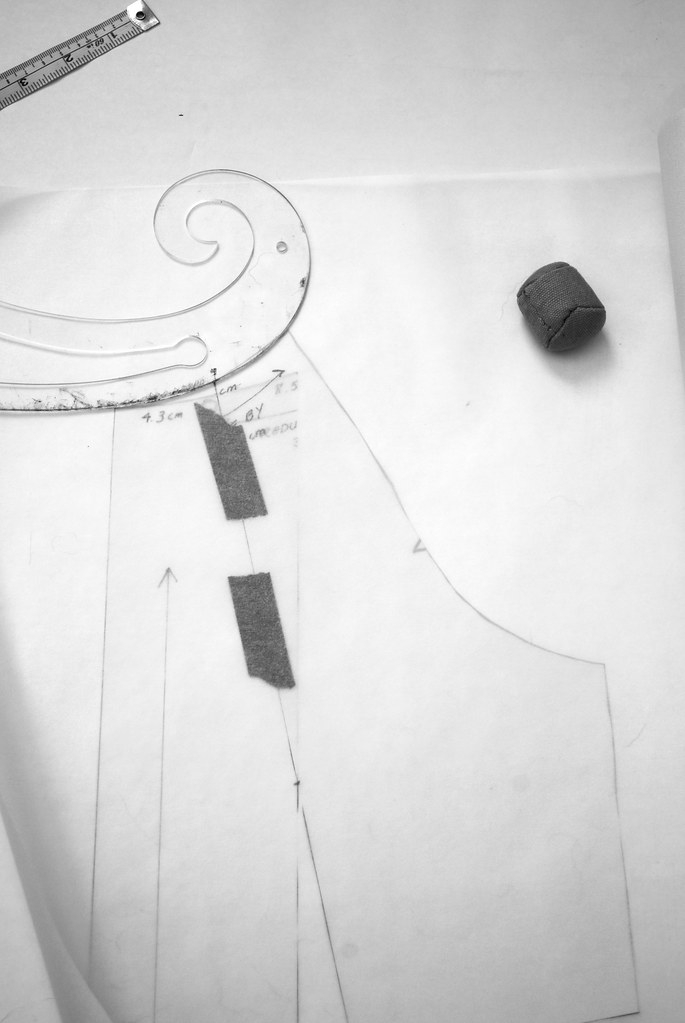
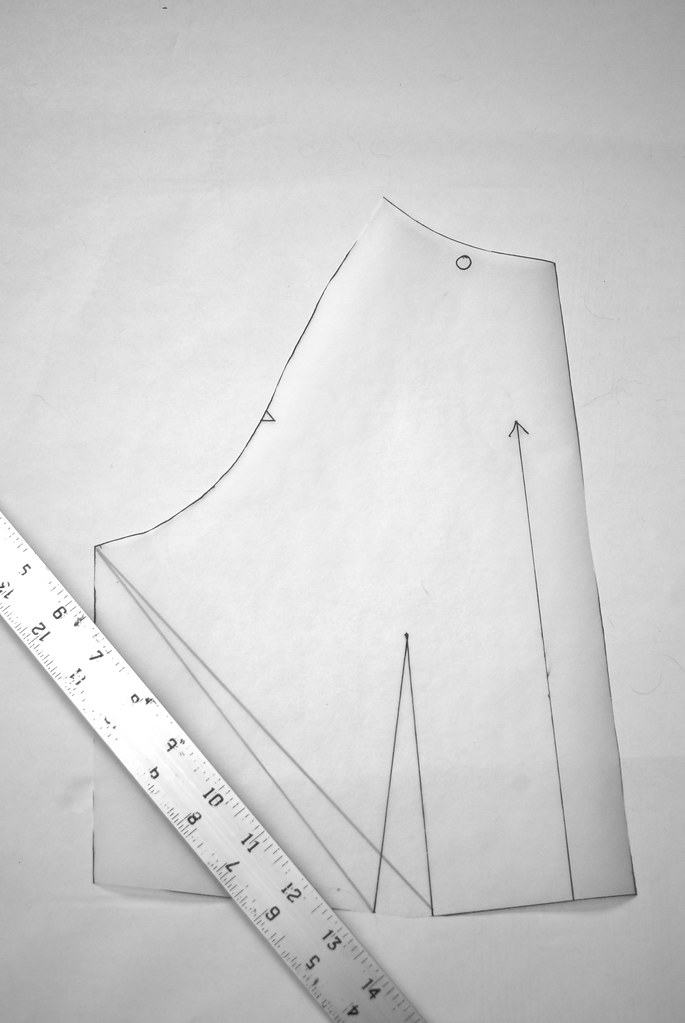
9) Draw a horizontal line just slightly above the guide for the waist elastic. This line should be perpendicular to the grainline and the center front. Cut this line so you have an upper portion and a bottom portion for your Minoru jacket front. Set the bottom portion aside for now.
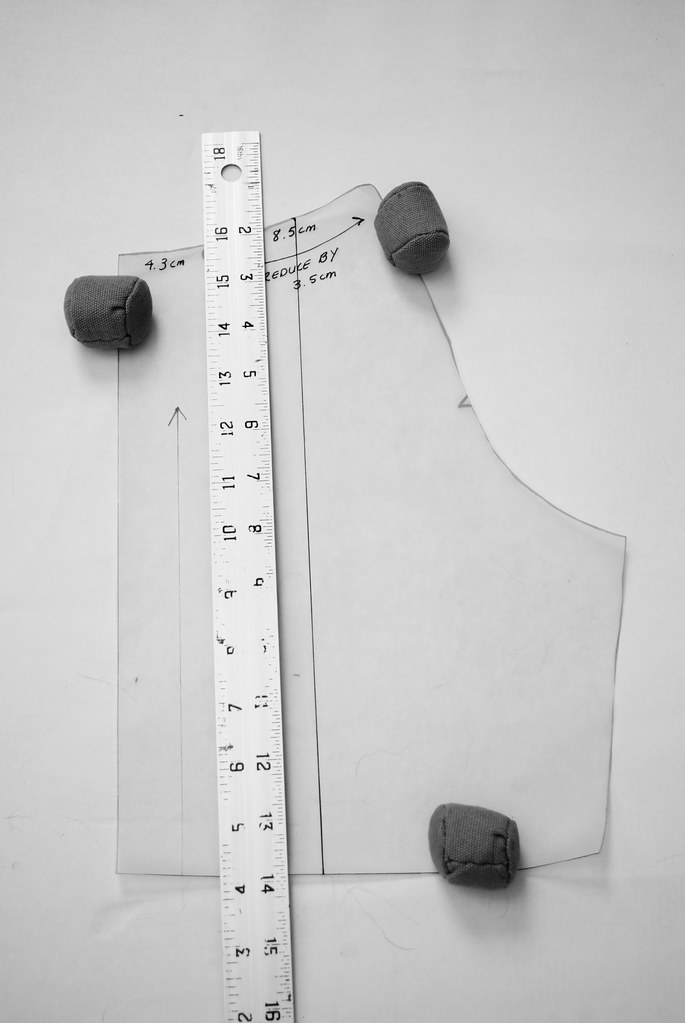
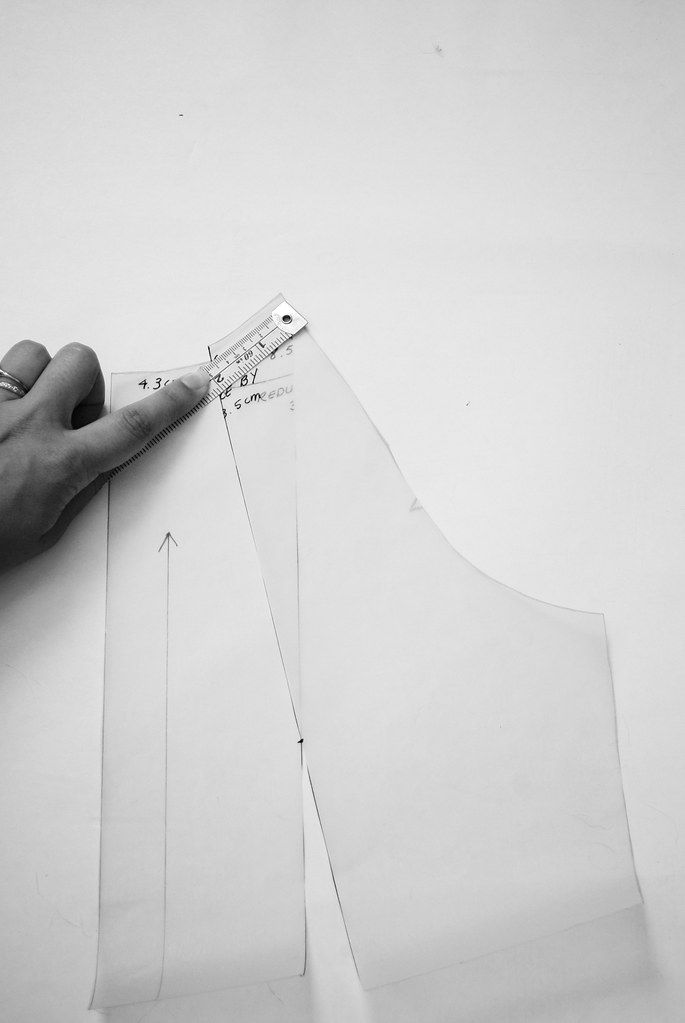
10) Find the halfway point between the large circle and the raglan seam (or half of the measurement you made earlier). On my pattern this was roughly 4.3cm. Make a mark.
11) Draw a vertical line from this mark to the bottom of your pattern piece. This line should be parallel to the grainline.
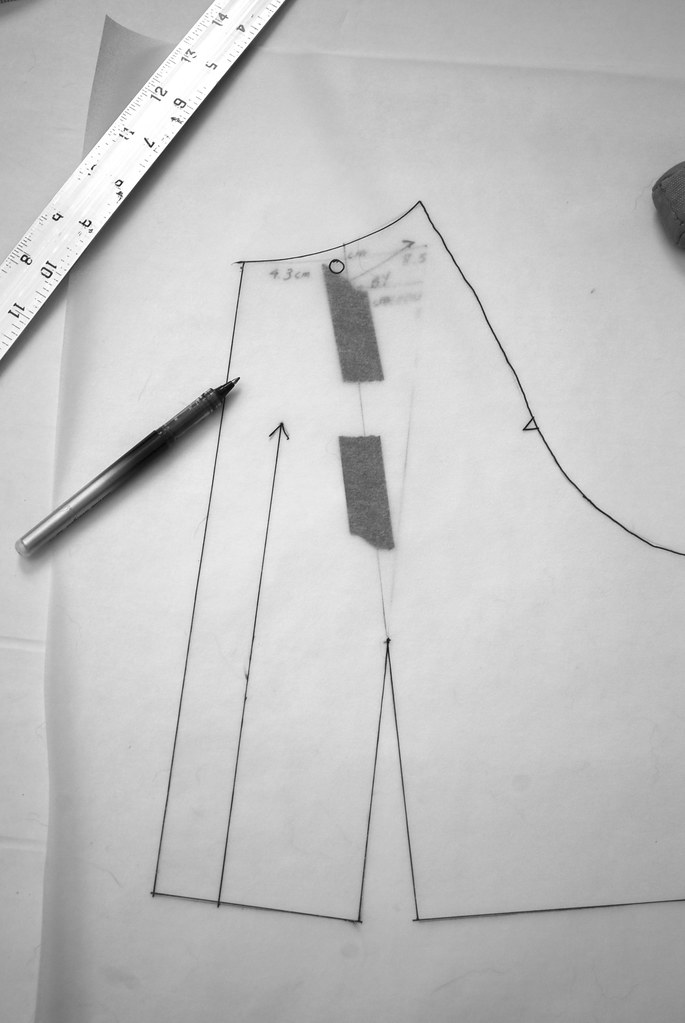
13) Okay, I'll admit that this step is not the most scientific. Basically you want to 'guesstimate' the position of the bust point on your vertical line. I just kind of eyeballed this, but if you want a guideline, measure down from the underarm about 1 inch or so and draw in a horizontal line. Make a mark where the two lines intersect. Honestly, I don't know that it makes a huge difference how accurate this point is.

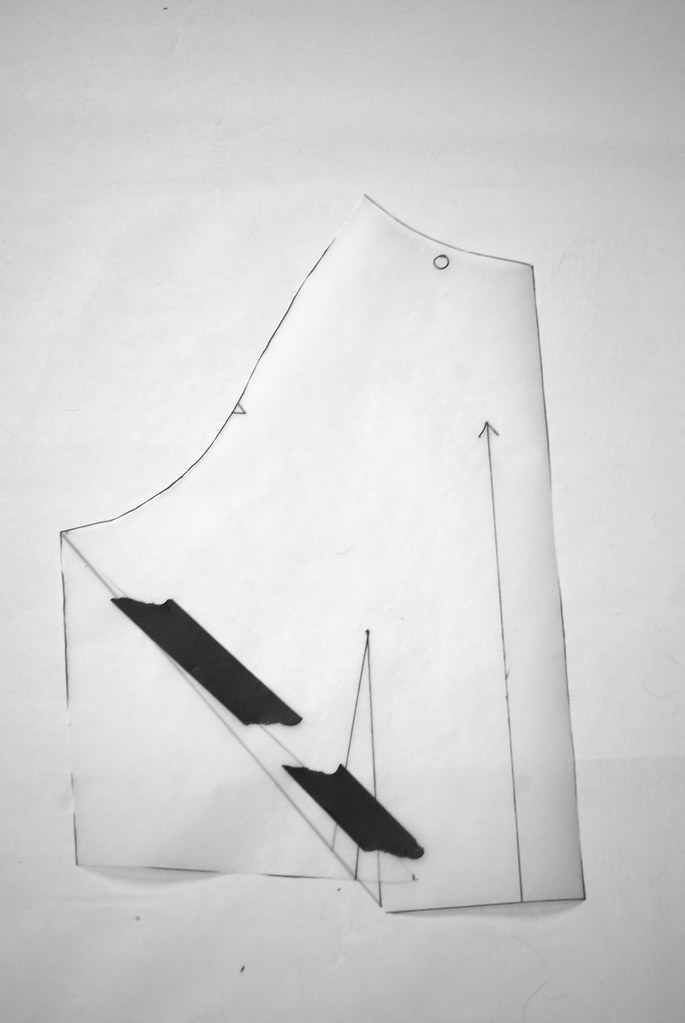
14) Now cut along the vertical line from both directions to the point, but not through it. This should create a little hinge where you can swivel both sides of your pattern piece.
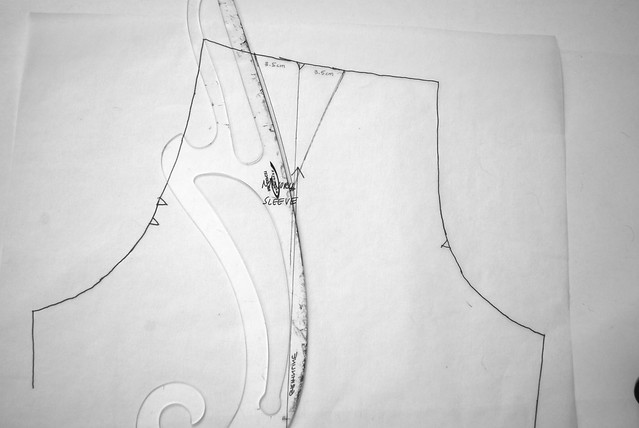
15) Using the numbers we came up with earlier, figure out the new length of this side of the neckline, and overlap the pattern until it measures the new length. So for my pattern I did 8.5cm - 3.5cm = 5cm. So I overlapped the pattern until that side of the neckline measured 5cm. Secure with tape. Notice how this opens up a dart at the waistline.
16) At this point I like to re-trace the pattern piece, smoothing out the neckline with a french curve. Make sure to transfer all marks including the grainline, and your new dart at the waistline.
 |
| I flipped the pattern piece over so it would lay flat. It is still the same jacket front we have been working with. |
17) Draw a new set of dart legs from the base of the dart to a point at the underarm. I noticed after I photographed this tutorial and went back and looked at my original pattern pieces that I actually ended my dart at a different spot on the underarm than I have shown here. Originally I ended the dart about 1inch into the curve of the underarm on the raglan seam. I don't know that it really makes a difference, but you may want to do it the way I'm describing rather than what I have shown because I know that to be successful. Sorry for the confusion! The rest of the steps are the same.

18) Cut along one of the new dart legs just to the point at the underarm, but not through, creating another little hinge.
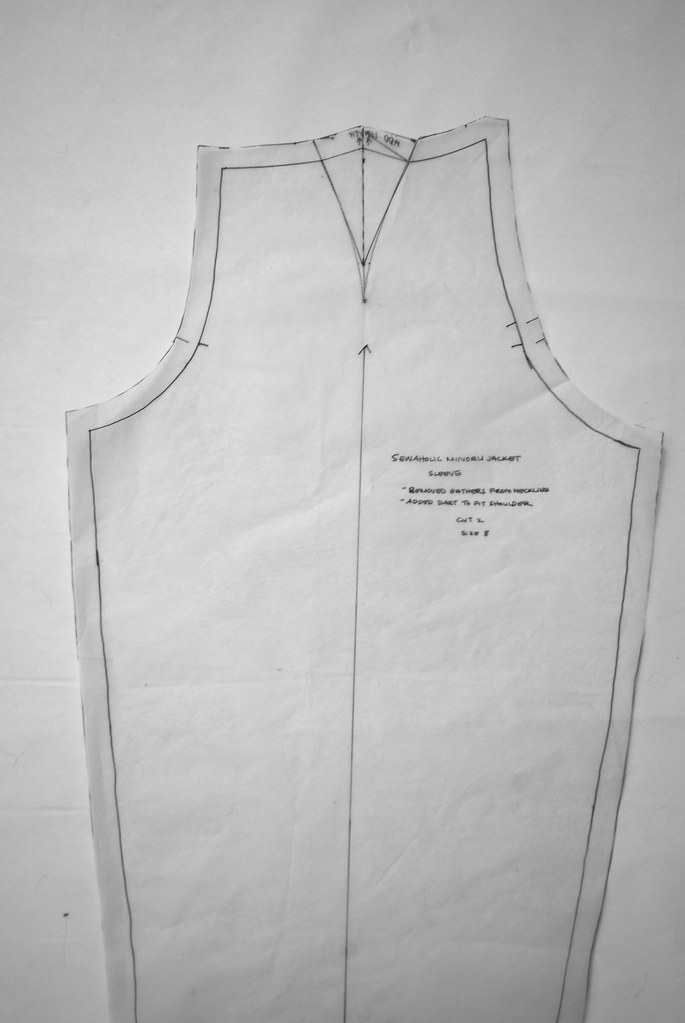
19) Swivel the side seam so the dart closes. Tape in place. Notice how the horizontal "waistline seam" we created earlier is now uneven. We've essentially rotated all the excess fabric from the neckline, into the waistline, and we're now going to blend it out.

20) Grab that bottom portion of the front jacket pattern that we set aside earlier and reattach it to the upper portion at the waistline, matching up the grainline. There is an obvious gap of fabric along the side seam now, but we're just going to ignore that and retrace our new pattern, blending the side seam between the upper portion and the lower portion of the pattern so it's smooth. There will obviously be a little bit of extra length now at the side seam, but since we'll be doing the same thing to the back pattern piece they should match up. Also, because we did not alter the markings for the elastic at the waist you can still use these as is. Since the waistline of the Minoru is fitted with elastic (or in my case, a drawstring) and not very tailored, I think this is a good place for the excess fabric to end up.
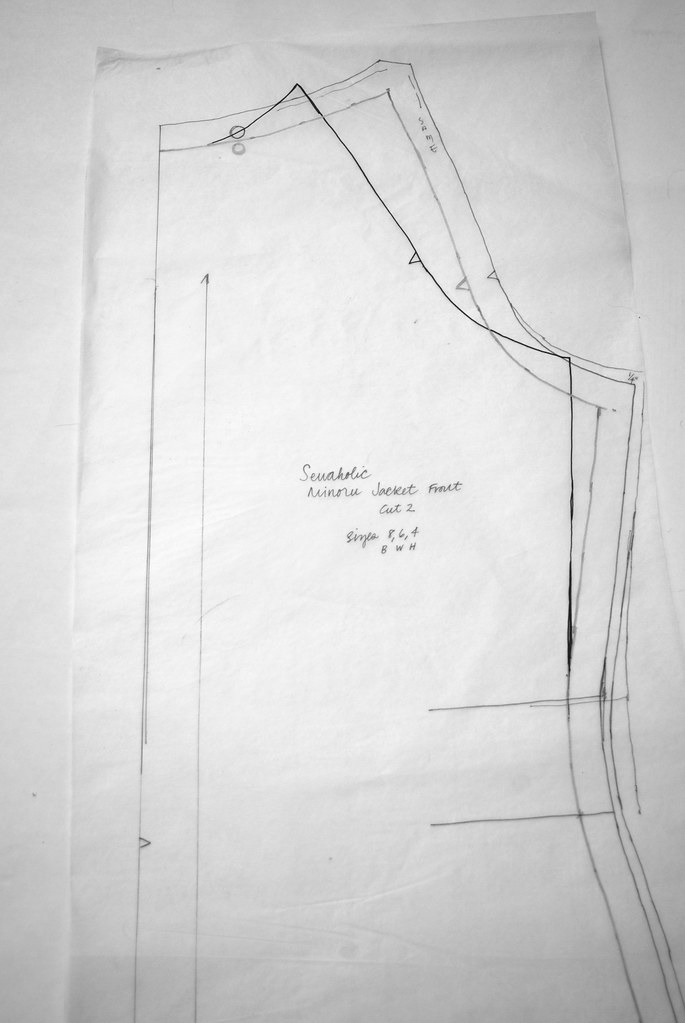
This picture shows the new pattern piece overlaid with the old pattern piece (ignore some of those strange lines at the side seam. This is actually one of my original tracings I used for my coat and I made a few notations along the side). You can see how everything below the waist stays exactly the same, and how the raglan seam lifts up and in.
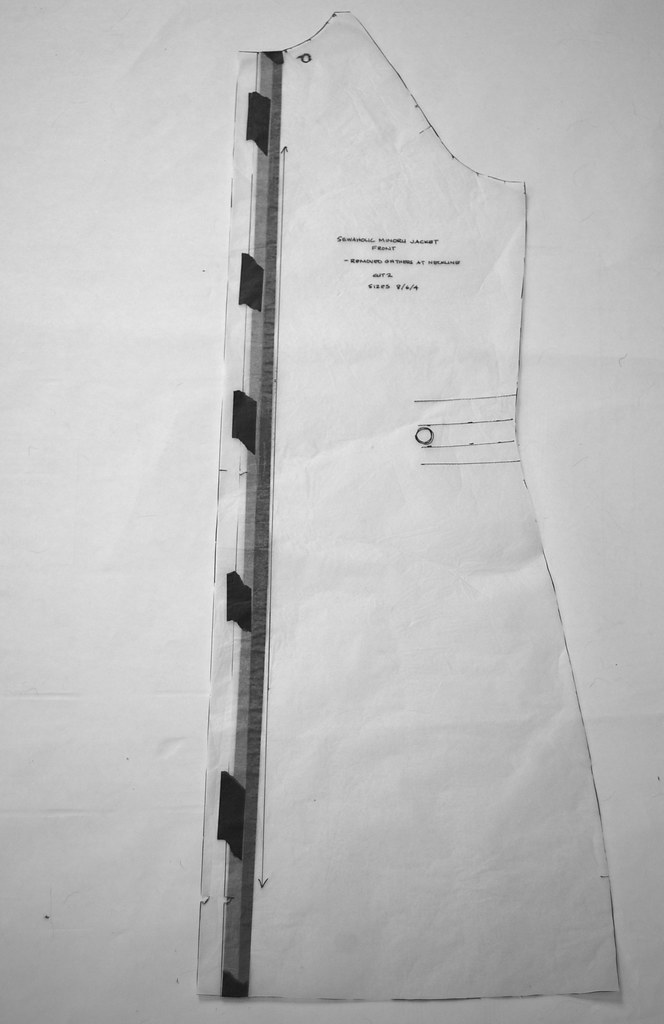
21) The very last step for the jacket front is to add back in those seam allowances we removed back in step 2. Remember that the pattern uses 5/8" seam allowances. Make sure to transfer the notches, grainline, and the markings for the waist elastic. The pattern piece pictured above is my actual pattern piece used for my jacket and reflects a few of the other changes I made to the pattern.
Don't forget to do the same thing for the jacket back, and both of the lining pieces!!
Now let's move onto the sleeve. This is far less complicated than removing the gathers from the jacket front, since we're just going to be converting the gathers to a dart. When I first started making adjustments to this pattern I tried to swivel out the gathers from the sleeve in much the same way that I did above. However this resulted in a sleeve with very little "corner" for the shoulder to fit in. Using a dart may not seam as neat as having a dart-less sleeve, but with a raglan sleeve like this it's really the best option!
1) Start off by tracing the sleeve and removing the 5/8" seam allowances, just like we did with the jacket front. Transfer all notches, and grainline. You'll notice that I only traced the upper portion of the sleeve here. That's because the top is really all we need.
2) Now draw a vertical line from the notch down about 6 inches or so. This line should be parallel to the grainline. Make a mark about 4 inches (or so... I just kind of eyeballed this) down on this line.

3) Measure out from the notch on either side the amount that you deduced should be removed when we were doing all our math earlier on and make a mark on either side. For my pattern this is 3.5cm. Remember how I said that the gathering ratio was the same for all areas of the Minoru? This means that I'll be reducing the front of my sleeve by 3.5cm, and the back of my sleeve by 3.5 cm (and the back neckline of the jacket). But as I said, do the math anyway just to be sure.
4) Using a french curve, connect the marks you made in step 3 with the mark you made along the vertical line in step 2. Yay! You've made a dart!
5) Now retrace your sleeve pattern, adding the seam allowances back in, and making a little bumped out 'v' shape at the base of your dart legs. This is so that when you fold your dart back it meets up with your seam line and gets sewn down flat, rather than flapping about inside your jacket! This is the actual pattern I used for my Minoru. You'll notice that I elongated and changed the shape of the dart. This was a change I made after making a muslin, and was done so that the tip of the dart ended at my shoulder point, and also so it had a nice curved shape. I also make a note to "add more height" at the base of the dart. You really do need a lot of height up there to allow for the dart to get caught in the seamline.
Don't forget to do the same thing for your sleeve lining too!!
.....................................................................................................................
Okay guys!! THAT'S IT!!!
Phew. I never said it was easy!! But it's definitely do-able. I hope that it was helpful to all of you out there that have been holding off on making this pattern because of those neckline gathers. And I hope it's inspired some of you to really make this pattern your own!
If there are any parts that you find confusing just give me a holler in the comments and I'll do my best to clarify things.
xx
Saving for future reference! The Minoru looks so much sleeker without all the gathers and elastic.
ReplyDeleteYou rock
ReplyDeleteHoly Moley Sallie! You're like an engineer, nuclear physicist or something!!!
ReplyDeleteThank you!! When I first decided I wanted to make the Minoru I wanted to change the neckline but had given up on the idea because I didn't know what to do. After seeing yours I got so excited. Can't wait to get working!
ReplyDeleteI agree! If you follow the tutorial, let me know how it works out for you!
ReplyDeleteSocks
ReplyDeleteHmmm... I don't know about THAT! But that was definitely more math and geometry than I've used in... years...
ReplyDeleteOh Hannah I'm so glad! Let me know how it works out for you!
ReplyDeleteDefinitely mentally bookmarked. I'm sure it will make more sense and seem a bit less like dark magic with a pattern in front of me!
ReplyDeleteFantastic reference, Sallie, thank you SO much for taking the time to share your process :) I wasn't sold on the Minoru with all the gathers and the elastic waist but after I saw your version, you opened my eyes, girl! It went STRAIGHT into my queue, and now I just have to work through the thousand and one things before it so I can get on with making myself a raincoat already - geez! ^__^
ReplyDelete