

aaand we're back!
this post will finish up all the adjustments you have to make to your paper pattern in order to turn your clovers into clover trousers. today i will be showing you how to draft some pockets and to adjust your waistband to accommodate your knew zip front fly.
adding pockets to your patterns is such a nice, easy way to customize the look. and this can be done to practically any pattern. as a matter of fact, casey did a tutorial this past summer on adding shaped pockets to her colette ginger pattern. the results were so cute!
but enough chit chat - lets get started.
materials you will need:
- your colette clover front pattern - with your zip fly adjustments
- your colette clover front waistband pattern - all fitting adjustments made
- pen/pencil
- ruler, measuring tape, etc.
- french curve - optional (truth be told, i've always eyeballed my curves up until recently when i got a french curve for christmas)
1. locate the hip mark on your pants pattern front (the circle). measure about 1/2 an inch to 1 inch below that on the stitching line and make a mark.

2. at the top of your pants pattern - along the waistband seam - measure in from the stitching line about 1 inch to 1 1/2 inches. make a mark.
3. connect these two points using a straight ruler (for a straight edge pocket - this is what i did on my denim pair of clovers) or with your french curve (as demonstrated above) or experiment with your pocket shape - as in casey's tutorial mentioned above. this is where your design can shine! (and i rhyme!)
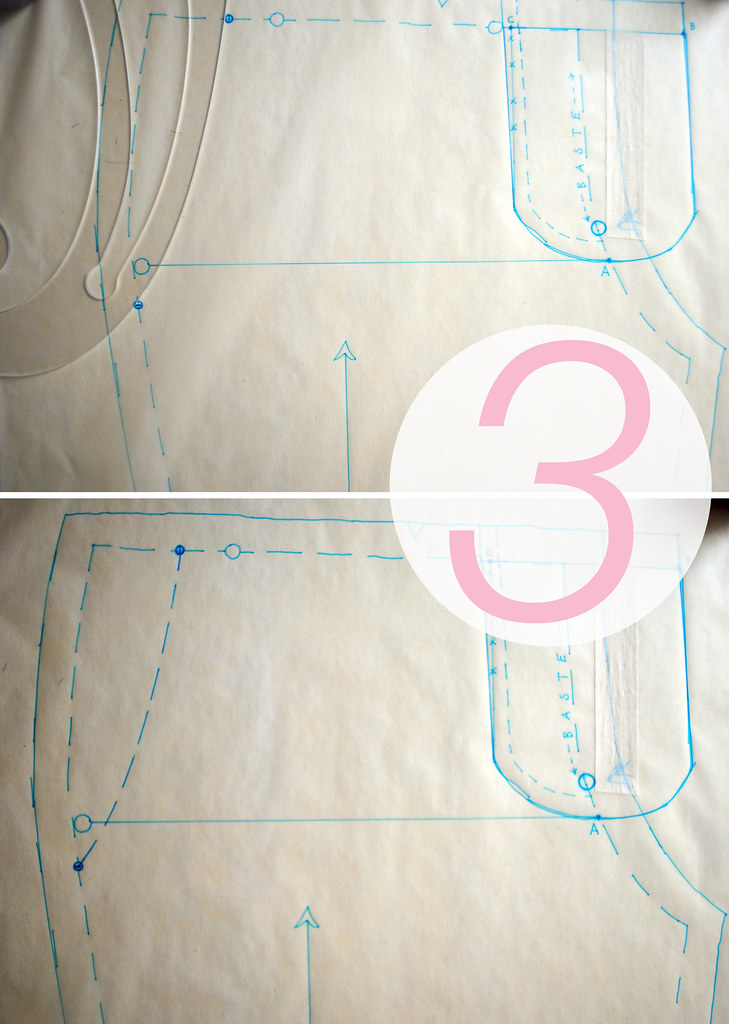
4. cut two pieces of tracing paper (or some other sort of see-through paperiness) about 8 x 10 inches. lay one piece over your pants front pattern - covering your waistband line and hip line. mark your pocket placement with two dots, and trace your original hip line and waistband line.


5) measure in from the top corner on your pants front about 6 inches, and down along the hip line about 9 inches. draw a horizontal and a vertical from these two points. you can have these two lines meet at a sharp corner - or round the corner as shown above.

6) place a little bit of tape on your tracing paper to hold it in place - then lay your second piece of tracing paper over both layers. mark your pocket placement with two dots. this time trace the line you made in step 3 for your pocket opening, then follow the lines for the pocket you drafted in step 5.

7. you should now have two pocket pieces. the bottom pocket and the top pocket (facing). measure out from the stitching line 5/8 of an inch to give yourself some seam allowances. theres no need to draw the seam allowances around the inner pocket part - but you can if you want.

8. on your pants pattern front, measure out 5/8 of an inch from your pocket opening line that you made in step 3 and draw in your new seam allowance. trim away the excess hip piece (optional - you can leave it intact as well, just make sure you trace the correct line onto your fabric). and now you've drafted your pockets!
lets move on to the waistband...

1. if you trimmed your pants front pattern, lay your bottom pocket piece over your front pants piece, aligning the edges, so you have the full length of the top waistband seam. measure your stitching line from the outer corner into the edge of your extended fly piece that you drafted earlier. make a note of the measurement.
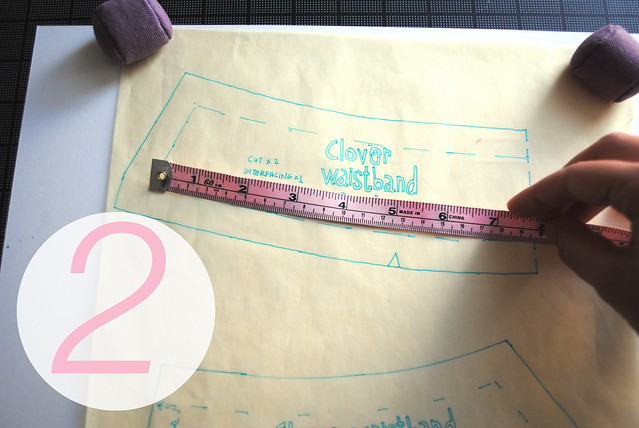
2. measure along the bottom of your clover front waistband (i made the mistake of measuring along the top at first and nearly had a heart attack - i thought my measurements were way off!)
*tip* i highly recommend checking all your waist measurements after doing your fitting adjustments. i found that after i fitted my clovers, my back waistband went down a size and my front waistband went up two sizes. its important you measure these separately rather than just check the entire waist measurement - or else your side seams won't line up.
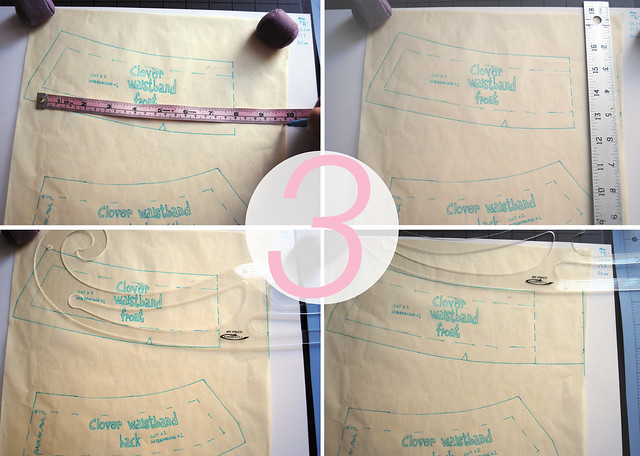
3. measure out from the CF (center front - the dashed line on the pattern that was originally marked "place on fold" however we are going to ignore that) the additional amount needed for your waistband measurement to match your pants front measurement. make a mark for both the top and bottom and connect them with a vertical line. extend the front waistband to this line - you can use a french curve to continue the curve, or a straight edge, or your eyeballs.
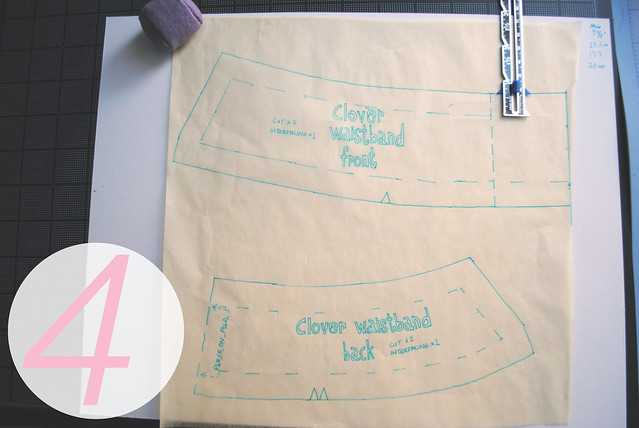
4. if you haven't omitted it already, cross out the instructions to "place on fold" and instead write "cut 4" and "cut 2" for the interfacing. extend the seam allowances.
and that's it!
you now how have all the pieces you need to make yourself some fancy pants! err... trousers...
the next step will be for you to cut out all your pattern pieces from your fashion fabric and interfacing. A few tips:
- for a more comfortable waistband, try cutting your pieces on the bias. this builds some stretch into them - its something i noticed on a lot of my ready to wear pants. to do this you will have to trace your back waistband so its the whole thing (not half) since you won't be placing it on the fold.
- try a contrasting fabric for your pocket bags, waistband facings, and right fly extension piece. sure no one but you will see it, but it will make you smile every time you do!
- when cutting your waistband pieces - its not a bad idea to cut the fronts a little longer, just in case your right fly extension ends up longer than expected - i learned this from experience! or you can just be proactive and check your measurements now!
if you missed the first part of this tutorial you can find it here:
xx
Great tutorial! I was inspired to make a fly front for some denim clovers after I saw your first "reveal" last fall! I used a Kwik Sew shorts pattern though, instead of actually drafting my own that worked great, but as I made some other bad decisions (ahem, bias waistband... don't do it), they haven't been revealed yet. Since they need re-doing, I'll add these pockets... so cute!
ReplyDeleteOh! Is a bias waistband a bad idea? Uh oh - I had planned on doing that for this go around... hmm....I might try it anyway - best to learn from mistakes - especially since I have plenty of extra fabric!
DeleteWhen I made my denim pair I actually just laid another pattern that had a fly over it and traced those pieces. It DID work great - but I figured not everyone has a random fly front pants pattern laying around, so this time I actually tried to do it from scratch.
Glad you liked the denim clovers! I wear them a bunch - I hope you work out the kinks and get to enjoy yours!
Ahh, wonderful tutorial! I'm especially grateful for the pocket instructions: I've been wondering how to make this sort of pocket (what's the term-- trouser pocket? bagged faced pocket? Er...) for ages. Between your instructions on drafting and Casey's photos, I think I can manage to put these pockets onto my Colette Meringue skirt, now!
ReplyDeleteYes! Casey's tutorial was great - and I really just followed the same basic principals. I also have no idea what these type of pockets are called... I've been calling them "side slash pockets" because I think it makes them sound tough... but really I think thats something different ;)
DeleteGood luck with your Colette Meringue! Every good skirt deserves pockets!