well here we are again - with the third installment of clover adaptation! and, friends, we are in the home stretch. but before its smooth sailing - its time to sew your fly.
sewing a fly front on your pants isn't hard - but it does involve a number of steps and some finnicky small parts. the first (well first few, really) times i sewed a zip fly it went woefully wrong. i cut holes in my pants in places where you don't want holes. i was following the instructions in the built by wendy sew u book, which, while they are relatively straightforward, were a bit confusing for a beginner.
when i sewed my denim clovers i sat down with the built by wendy book and a pair of ready to wear jeans and really examined them, going back and forth between the instructions in the book and really inspecting a ready-to-wear fly. as a result, the instructions i'm going to give are a bit of an amalgamation of the built by wendy instructions, and my own observations.
i'm no fly expert - by any means - just some chick who's sewn a fly front or two, and made plenty of mistakes, in my time. but hopefully these instructions will be clear enough to help anyone who's been suffering from some fly front phobia.
now - down to bweez-nezz! (thats business to you folks...)

sewing your fly will be the first thing you do to your pants. so gather together your materials:
- your cut and marked clover pants fronts
- a 5 inch jeans zip (or another short zipper)
- your right fly extension piece - cut on the fold
- scissors and pins
- topstitching thread (optional - not pictured)
i won't be doing the traditional "jeans" style topstitching on my trousers because of my fabric choices - but i will tell you throughout the instructions when to add topstitching. if you are using a heavy fabric, like denim, your topstitching will look best if its done in topstitching thread. you can choose a contrasting color like yellow or orange for a nice "pop".
1. pin your pants fronts together along the CF (center front) line. stitch, using a long basting stitch from the top of the pants to the circle on your CF line (the blue pen is pointing to it below). then continue stitching using a short stitch length from the circle to the end of the crotch curve.
2. spread your pants front on a table, right side facing down. spread open the fly and locate the right fly piece. trim just the fly piece down 3/4 of a an inch.

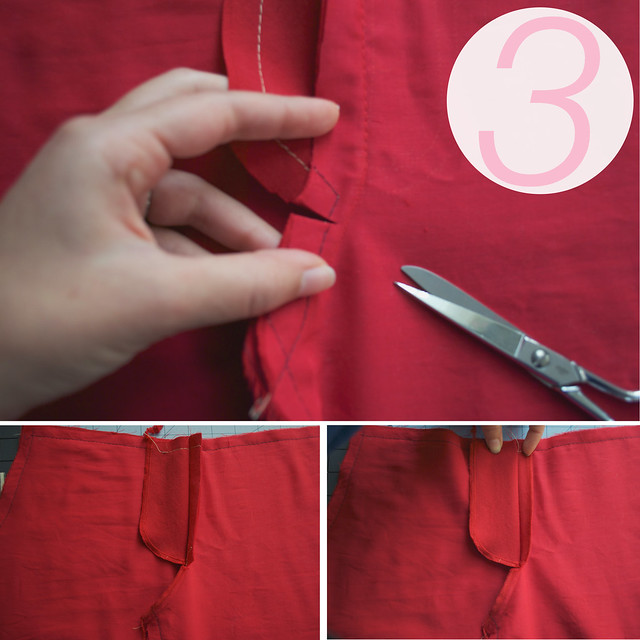
3. hold both the left fly and the trimmed right fly together and make a clip in the front rise - right up to your stitching - just at the bottom of the fly curve. finish your left fly edge, your crotch seam, and the trimmed right fly using an overlock stitch, a zig-zag stitch or pinking shears. i will be finishing all my seams with my serger. i recommend that you finish each of these edges separately, holding back the rest of the pant as you do. this is especially true if you are using a serger. i also recommend lowering (or disabling) the knife blade on your serger when you sew around the bottom of the left fly extension and the crotch seam. i learned this from experience - the second time i tried to sew a fly - when my serger's knife hungrily chomped a hole right into the crotch of my pants! unrepairable!

4. fold your right fly extension piece with right sides together. stitch along the curved bottom. turn it right side out and press. finish the long, open edge by overlocking, zig-zag, or pinking (alternately you can sew down the long edge and the bottom curve all together, turn it right side out and press if you prefer).
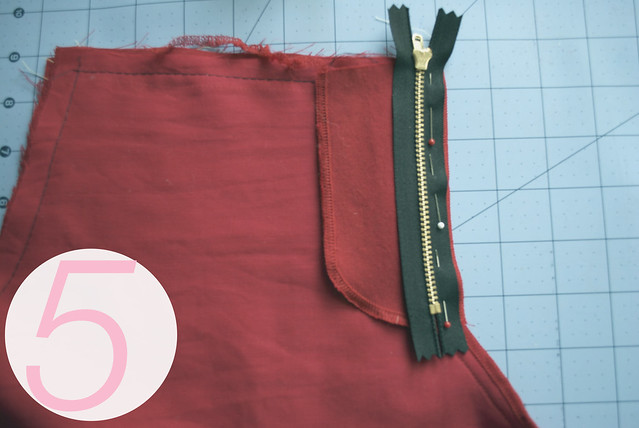
5. fold your pants fronts with right sides together. lay your zipper upside down over your CF seam - aligning the teeth with the basted CF seam. pin the zipper tape to the trimmed right fly. the bottom stopper of your zipper should fall to the bottom of your fly pieces. if your zipper is long - let the extra length go off the top.

6. with the zipper foot on your sewing machine, stitch the zipper tape to the trimmed right fly. make your line of stitching about 1/8 of an inch away from the zipper teeth. reverse stitch at the top and bottom.
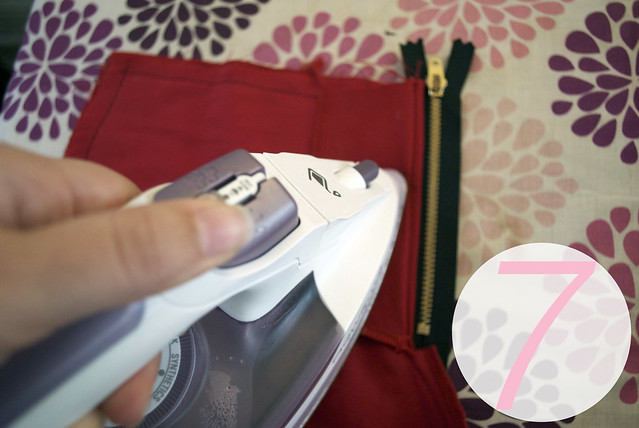
7. press the fly away from the zipper teeth.
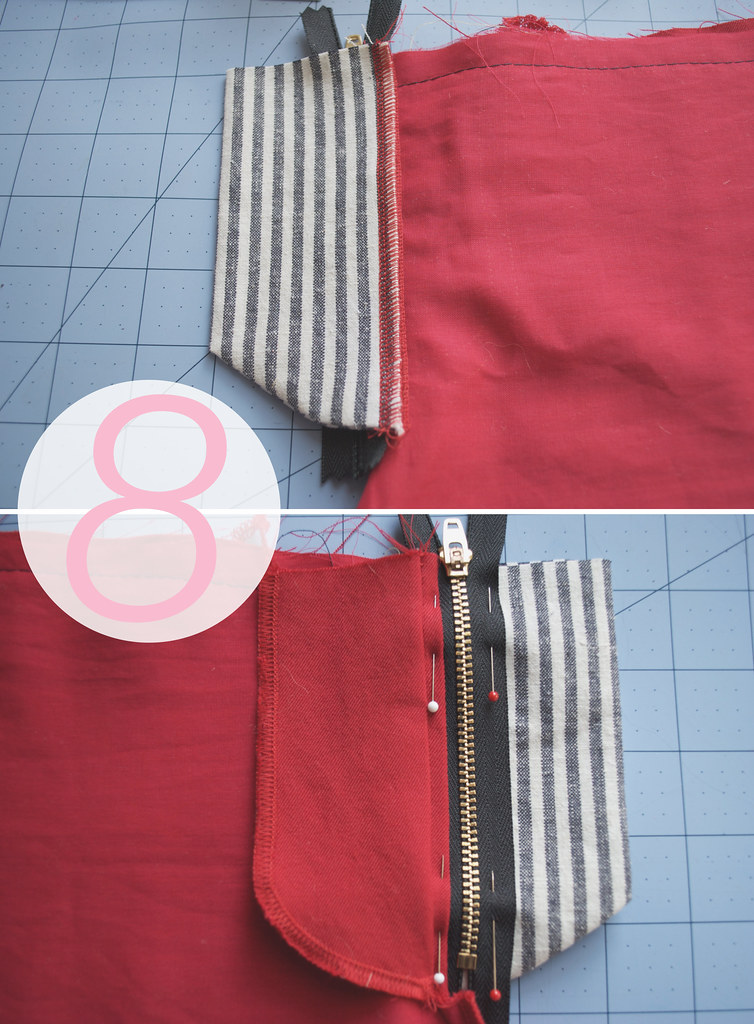
8. fold your pants right sides together and lay them so that the trimmed right fly is against the body of the pants and the back of the zipper is up. align the finished (in my case, serged) edged of the right fly extension with the finished edged of the trimmed right fly - sandwiching the zipper tape in between. with the zipper tape right side up, pin the tape to the right fly extension on both sides of the zipper teeth. this will keep your zipper tape and fly extension from shifting while you stitch.

9. with your zipper foot on your machine, edgestitch along the right fly (which should be pressed back away from the zipper) as close to the zipper tape as you can get. stitch through the right fly, the zipper tape, and the right fly extension - but not through the body of the pants! if you are doing topstitching this should be done in your topstitching thread.
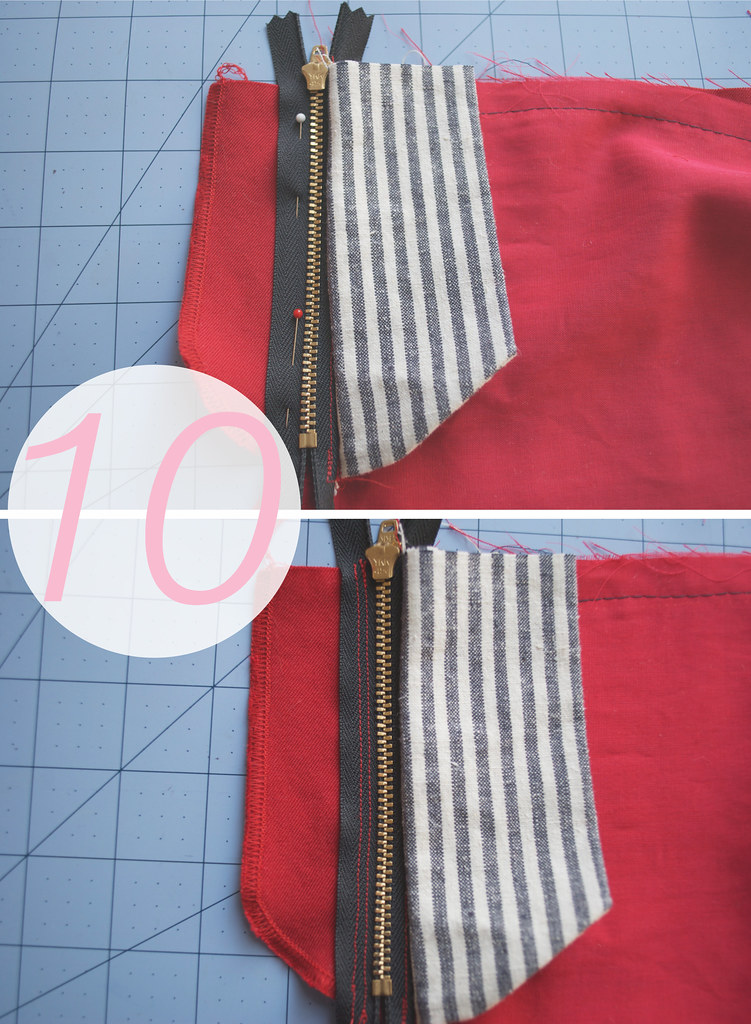
10. hold the body of the pants away from the left fly. spread the fly open and lay the other side of the zipper tape against the left fly. the zipper should be upside down with the teeth even with the CF seam. hold the right fly extension back and pin the zipper tape to the left fly. with your zipper foot on your machine, stitch the zipper tape to the left fly. make one row about 1/8 of an inch away from the zipper teeth and a second row 1/8 of an inch away from the first. backstitch at both ends.

11. lay your pants face down over a sheet of carbon paper or chalk paper. hold the whole fly apparatus over to the right, and using a tracing wheel, trace over the topstitching lines you should have marked on your pants from drafting your fly. these lines should follow the shape of the fly. flip your pants over so they are face up and pin the left fly (the red fly on my pants) to your pants front. hold the right fly (the striped fly on my pants) out of the way and topstitch along your traced lines - securing the left fly to the body of your pants. if you want a more "jeans" styling to your fly - do a second row of topstitching 1/4 inch in from the first. as you get close to the CF seam you will probably be sewing over your zipper teeth. if your machine is anything like mine, it won't like this very much. just go slow, and use the hand wheel if needed.
at this point - if you are doing the full shebang with the topstitching - you can add a row of topstitching about 1/16 of an inch (in other words, edgestitched) down the CF seam - on the same side as you just topstitched.
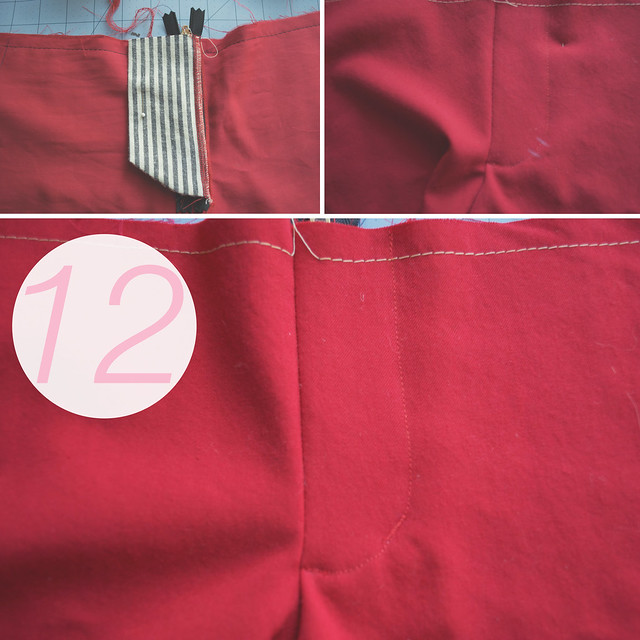
12. with your pants face down, lay the right fly extension over the left fly and pin in place. on the right side of the pants mark the placement for a bar tack. the bar tack will go through all layers of your pants and hold your right fly against the left. typically it falls along the front topstitching, right where the curve begins to straighten out. your bar tack should be about 1/4 inch long. to make a bar tack choose a zig zag stitch on your machine and set it to a small stitch length. go back and forth over the same 1/4 inch about 3 times.
tip: if your machine has an automatic buttonhole feature you may want to use that selection since most machine buttonholes will feature a close set zig zag.

13. make a mark along the CF seam for a second bar tack. this tack should fall about 1/2 inch above the point where your fly topstitching meets the CF line. again, the bar tack should be about 1/4 inch long and fall perpendicular to the CF seam - it can even cross the seam just a smidgen. use the same zig zag stitching to make this bar tack - sew through all layers. this might be a bit tougher because you will be going over the zipper teeth, but again, just take it slow and use the handwheel if things get rough.
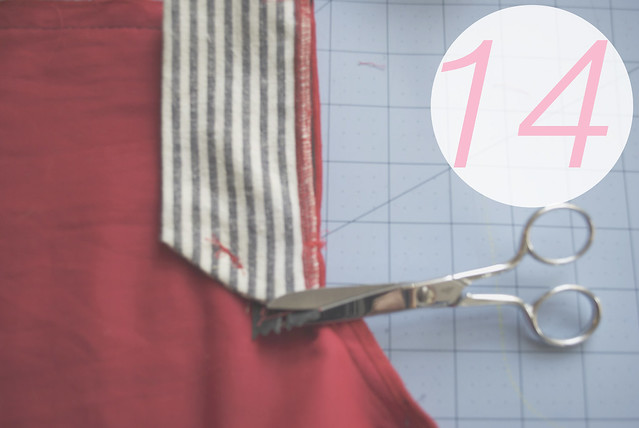
14. your entire fly apparatus should now lie neatly to the left. from the back, trim the bottom of the zipper tape so its not hanging below the fly.
to give you an idea of how your fly might look with all the topstitching bells and whistles - here is a close up of my (already well worn) denim pair.

aaaaaaaaand! your done!!!!

use your seam ripper to undo the basted CF seam and give that zip fly a few good zips! friends - you just sewed a zip fly! fly-phobics, that wasn't too bad was it? any holes in the crotch? any completely unrepairable mistakes? i hope not.
the next thing you will want to do is sew in your pockets - but that, gentles and ladymen, will be one of the subjects for our next, and final, clover trouser tutorial.
for the first two tutorials in this series:
xx


Sallie! I do so love you for posting these tutorials! I'm very excited to try these with my Clovers. I am in absolute love with your version. You are such a clever little minx...
ReplyDeletexoxo
Ahh! You're a genius! Thanks for sharing!!!
ReplyDeleteonce again, sallie... that's for sharing these great how to's with us. each one was wonderful. i appreciate you sharing the fruits of your labors with us! hugs!
ReplyDeletethank-you so so much for putting this tutorial together. your clovers are my favorite! if i ever tackle them again - my "final" pair is currently hidden in a corner covered in tears - then i'll make the fly for sure.
ReplyDeleteHey! You are awesome! Thank you soooo much for your zip tutorials. I needed a right hand fly zip instruction, and yours was very helpful. I did a dry run of my pattern as it instructed, which gave me left hand zip! Even in the pattern photo it was left for a womans pant/short! I am just not so handy with the fly to try to reverse it myself. So I tried another dry run with muslin, with your fly facing tut and extension, and it worked out great! Yours photos are very clear. I haven't checked out your whole site yet, but I'll be looking for waistband, cuffs, collars, plackets!
ReplyDeleteI LOVE your front fly tutorial. I have sewn for a number of years but couldn't seem to get the front fly down - so I have been shying away from many patterns due to an OBSCENE amount of time I have spent with a seam ripper and a front fly (most of which could not be salvaged). Your tutorial seemed pretty straight forward and low and behold, I whipped up 2 pairs of shorts (perfecting the pattern for my shape) over a weekend and BOTH flies turned out like a dream.
ReplyDeleteThanks again and keep up the sewing - I love to see your projects.
I'm so glad this worked out for you! Flys are one of those things that I need hand-holding for every single time I do them. So this tutorial was as much for me as it was for all of you!
ReplyDeleteThese are completely awesome instructions !!! I made my adult son a pair of wool hunting pants from a blanket, using a pair of his jeans and these wonderful instructions as a pattern! It was my first attempt at a proper fly and they turned out perfectly !!! I was shocked and so pleased with myself !!!!!!! THANKS SO MUCH !!
ReplyDelete