
many moons ago, when i was just a young buck, in the days before i knew of such things as "red jackets" and "couture techniques", when life was, dare i say, a bit more innocent...
i had a vision. a vision that one day i would bring my knowledge to this blog and share it with all who wished to share it with me. that we might learn together. is this a utopian ideal?
no. this is sewing with sallie.

thats right! i am pleased to introduce my first ever official tutorial (besides the tutorial i scribbled on a random napkin as an afterthought one day. that one doesn't count)
in the back of my brain, in between red jacket madness, job changes, christmas and the like, i've been rolling around the idea to share how i made my changes to the colette clover pants pattern.
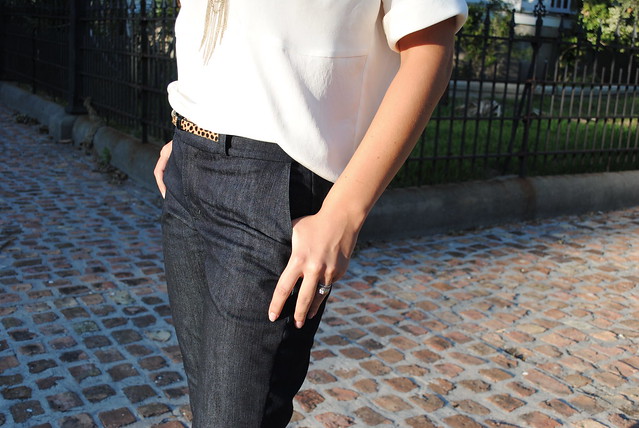
in case you missed it, i blogged about these pants (and shirt) here. i love taking a great, versatile pattern, like clover, and finding a way to make it my own. i already feel like this pattern will have future iterations - but for now, i'd like to show you how i took the clover pattern, a simple, elegant, slim fitting, side zip pant, and gave them a more masculine edge with some trouser details. i will be splitting these tutorials into as many posts as it takes - for my own sanity. i'm thinking right now it will take about 4.
in these tutorials, i will show you how to:
- draft and sew a front zip fly
- draft and sew side pockets
- convert the clover waistband to a button/tab closure at center front
the pants i made above also have single welt pockets on the rear, however i won't be showing you how to do that in my tutorial since i think there are already a lot of great tutorials lurking around the internet on how to do that. like this one. or this one.
so lets begin, shall we?
materials you will need:
- your clover pattern with all fitting adjustments made
- tracing paper - or whatever pattern paper you fancy
- pen/pencil/marker
- ruler
- french curve, or your eyeballs

kinda gnarly. so the first step will be to:
1. trace your adjusted clover pants pattern onto a clean piece of tracing paper, transferring all marks, grainlines, etc. since we are only making adjustments to the front pattern piece you can just trace that if you prefer.
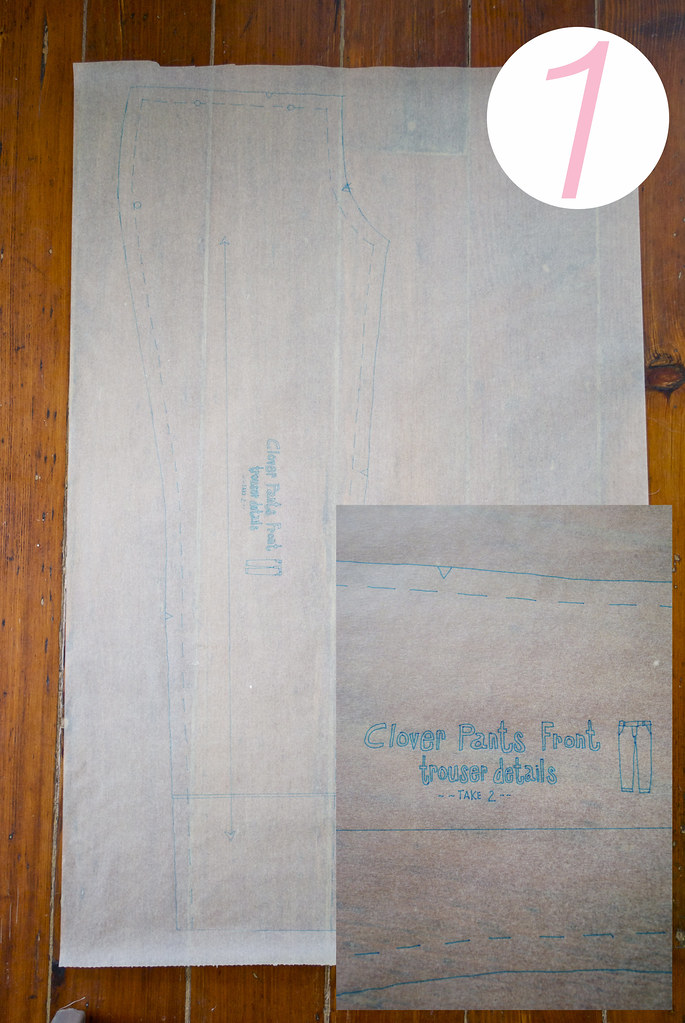
 2. to draft the front fly, begin by drawing a straight horizontal line from the circle on the hip over to the CF (center front) crotch. label the point where your line and CF meet point A.
3. working from the sewing line - not the outside of the seam allowance - extend the top edge from the CF to the right by 2 inches. label this point B.
4. make a mark 1 1/4 inches to the left of your CF seam. label this point C.
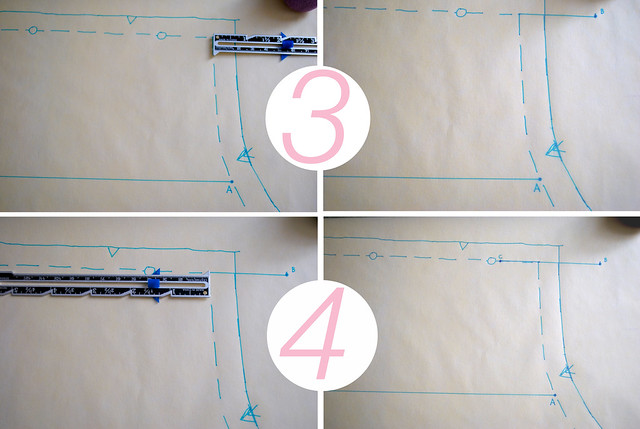
5. draw a vertical line from point B down to point A, curving your line toward CF about an inch above A. use a french curve to help you if you are uncomfortable eyeballing the curve. the length of this line will vary depending on the length of your crotch depth/front rise.
6. draw a line from point C to point A - mirroring the curve of line B - A. As you can see from my example, I didn't quite like the angle of my first line, and so changed it to be more parallel to the angle of my CF line. To be perfectly honest, it doesn't really matter - but for accuracy sake its nice for those two lines to be parallel. I also attempted to mask out my seam allowance line because I was finding it distracting. As you can see... it didn't do much.
7. draw a dashed line 1/4" to the right of line C - A. this will mark where you will be topstitching (should you choose to topstitch).

8. mark a point 1/2 inch above where line A intersects the CF seam.
9. make a note to "baste" from the top of your pants on the CF seam to your dot you just marked.
10. to draft your pants right fly extension (don't worry about what this is at this point - all will be revealed in good time!) you will need to find a clean piece of paper. draw a line approximately 4 1/2 inches long.
11. measure out to the right of this line 2 3/4 inches. draw a line.

12. square a line down from this line - extending it approximately 5 1/2 inches.
13. connect the two parallel lines along the bottom with a gently curved line. use your french curve for guidance if you don't feel comfortable eyeballing.
14. make a note on the left hand side of this piece (the shorter side) to "cut on fold". you will only need to cut one of these pieces. no need to add seam allowances.
*note* the measurements for this piece were based off of my own clover pattern - if your front rise is significantly longer than mine your right fly extension piece may need to be longer. please check the length of the fly you drafted onto your front clover pattern and make any changes to your right fly extension piece accordingly. (the short side of the right fly extension should be about 1/2 inch longer than the length of your fly)
congratulations! you just drafted a zip front fly! not too hard, huh? before you finish - extend those seam allowances along the top of your clover front pattern to meet up with your new fly front.
in the next post i'll show you how to draft some pockets and make changes to your clover waistband to accommodate your new zip fly.
feel free to leave any questions you may have in the comments and i'll try and answer them as best i can. and yay for fun with clovers!!!
xx
Oh, yeah! I'm so glad you are going to share this information. While I did buy the Clover pattern, I would have loved it infinitely more if it had been a trouser cigarette pattern like this.
ReplyDeleteI, obviously, agree! Its really not a hard adjustment to make - don't let the long posts fool you! And I think it makes for a really nice finish.
DeleteOh, and I did buy that Vogue blouse pattern purely because of your version! Loved it in white.
ReplyDeleteI wear that blouse ALL the time! While I've seen some really lovely versions of it in prints - for me having it in white just makes it really versatile. If you end up making it I'd love to see it!
DeleteI've been dubious of the plain front Clover and was planning on adding a zip front fly so you're tutorial has come at a perfect time! I'll let you know when I try it out. Thanks, Sallie!
ReplyDeleteI think its been pretty well publicized that the Clover pattern has some crotch issues. While I think I managed to get rid of it through fit - the zip fly definitely helps distract - at least for me! I really wear those pants all the time. Please do let me know if you try them out!
DeleteAwesome. Love your Clovers :)
ReplyDeleteThanks! I love them too ;)
DeleteThanks so much for sharing this! I really loved these, so I'm so interested to see how you accomplished the look! Gotta find the time to put together my muslin!
ReplyDeleteUgh - the muslins for these were not fun - I think for most people they require a good bit of fitting - but I felt it was worth it because they end up being really versatile and great for variations. Let me know if you ever give it a try!
DeleteThank you so much, brilliant tutorial!
ReplyDeleteCool stuff, thanks for sharing!
ReplyDeleteOh, yes, please! Thank you for sharing! I haven't yet bought the Clover pattern: while I love Colette Patterns' designs, I really didn't dig the idea of plain front pants. But now-- fly-fronted Clovers shall be mine!
ReplyDeleteLooking forward to the next bit of instructions!
Yay! So glad you're into it! If you try it - let me know how they turn out!
DeleteThis is a fantastic idea for a tutorial and I love how you put it together. I've been mulling for awhile about doing something similar after I figured out a good way to add fly zips to a pair of shorts. It's so fun when you figure something out--you want to share! I love your trouser-style jeans, too. Pretty sweet.
ReplyDeleteThanks Amy! I was just doing some pattern drafting reading the other night (you know, something light before bed...) and it gave some alternative instructions for doing a zip fly. If you end up posting about your shorts I'd love to see how you did them!
DeleteI am so excited that you're doing this "sewing with sallie" bit! Great visuals and layouts. SO helpful and informative!
ReplyDeletewhat a fun friendly helpful tutorial! Great job!!
ReplyDeletehey! you figured out how to comment! thanks mom!
DeleteThis is great and lovely and clear. Thanks. I've book marked it so when I wanna sew trousers I can check out how you did your clovers. Fab look too.
ReplyDeleteI just found your blog and I am so glad I did because I am going to be making the Clovers this year! :)
ReplyDelete