

actually - there really isn't much saga to it. i just tend toward the overly dramatic. this weekend i got my butt in gear and tackled those erroneous sleeves like someone was paying me to do it.
when i first realized that the sleeve cap was too large for my armhole i felt like my world just caved in (ahem. overly dramatic). fixing this seemed like the most difficult thing in the world and at the time i just couldn't wrap my head around it. before you judge me, let me just restate that i was running on very little fuel and pushing myself towards a deadline which, in all honesty, it was clear a good week ahead of time, i was not going to make. so i consider it a blessing for this little jacket that the holidays came when they did and i was forced to take a break - before someone (or something) got hurt.
i mentioned in my previous post that i received some sewing related gifts this christmas. chief among them was this book. i have been wanting a big ol' fat patternmaking book for some time - but just couldn't cough up the dough for one. thus - a perfect gift! i truly believe that this book will pay for itself in no time, since after barely flipping through the first few chapters i already gleaned the solution to my sleeve cap problem.
now - adjusting a sleeve cap isn't a hard pattern adjustment to make. in fact, its stupidly easy and if i had given it any normal amount of thought i probably could have figured it out on my own. however i was having some sort of massive (trauma induced, i'm sure) blockage on this issue, so seeing it illustrated was a wonderful, cartoonish, lightbulb-y, a-hah!!! moment for me.
fast forward to this weekend. as i set about to slice and dice my sleeve pattern my mind wandered to this blog and thought that perhaps i'm not the only one whose brain farts out on them over the simplest of alterations. which is why i decided to bring you my illustrated instructions on how to simply and easily reduce your sleeve cap size.
do not be fooled by these wibbly wobbly illustrations - i have an mfa in painting peeps (thats right i said painting - which explains my utter ineptitude with technology designed to make these things easier, like, say, adobe illustrator)
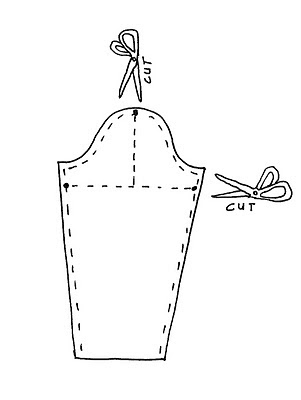
so this is something along the lines of what a standard sleeve pattern looks like:
 it has actually been my experience that many commercial patterns have too much sleeve cap height for my taste. generally speaking, you want your sleeve cap to be about 1 1/4" to 1 3/4" larger than your bodice armhole. its best to check this on the paper pattern so you can easily make adjustments early in the game. if you find that your pattern calls for more ease (and a puffed/gathered sleeve is not part of the design) you may want to make your sleeve cap smaller by reducing both height and width. this is how you do it:
step one - slice your pattern at the cap line (about an inch below the top two corners) do not cut through the seam allowance! and cut a vertical line from the cap line, all the way up through the sleeve cap and its seam allowance.
bonus points if your scissors look like evil, maniacal birds!!!
step 2 - you should now have two wing-y pieces. rotate these in towards the center of the sleeve, overlapping in the middle and at the bottom.
 step 3 - weigh down your wing-y pieces with some pattern weights. re-measure your sleeve cap and adjust as needed. when you get it to the right measurement, tape down your wing-y pieces and retrace your pattern (or just trim off the excess and redraw your seam allowance lines, smoothing out as you go - a french curve helps if you're not comfortable eye-balling)
and voila! a smaller sleeve cap!
easy. peasy. lemon. squeezy.
xx
edit: lizz, of agoodwardrobe, left an excellent question in the comments - and i thought it would be good to add a clarifying little illustration (and because making little drawings of patterns is really fun!). she wondered where exactly you measure your pattern to determine the amount of ease. you just measure over the curved part of the pattern:
 in addition - to measure your armhole, lay your bodice front and backs together, matching up the sewing line at the armhole (you want to exclude the seam allowance in your measurement) and measure around the curve:
 those seam allowances should be overlapped - but you get the idea!!
step 3 - weigh down your wing-y pieces with some pattern weights. re-measure your sleeve cap and adjust as needed. when you get it to the right measurement, tape down your wing-y pieces and retrace your pattern (or just trim off the excess and redraw your seam allowance lines, smoothing out as you go - a french curve helps if you're not comfortable eye-balling)and voila! a smaller sleeve cap!
easy. peasy. lemon. squeezy.
xx
edit: lizz, of agoodwardrobe, left an excellent question in the comments - and i thought it would be good to add a clarifying little illustration (and because making little drawings of patterns is really fun!). she wondered where exactly you measure your pattern to determine the amount of ease. you just measure over the curved part of the pattern:
in addition - to measure your armhole, lay your bodice front and backs together, matching up the sewing line at the armhole (you want to exclude the seam allowance in your measurement) and measure around the curve:those seam allowances should be overlapped - but you get the idea!!hope that helps clear things up!
over and out.
over and out.
What a timely post. I've been thinking about sleeves in general lately. This is a stupid question but for clarification are you measuring for ease starting at the base of the sleeve cap and working your way around to the other side? So say the pattern I'm working with a pattern that has a puff detail but I don't want it, can I use this alteration to get rid of that gathering?
ReplyDeleteHey Lizz! So glad this is of help to someone else!
ReplyDeletefor clarification - you measure from point to point on the sleeve cap (so just around the curvy part - not down into the straight part)
and yes - you can use this alteration to get rid on the puff sleeve - just make sure you leave enough ease for the shoulder - that should be about 1 1/4" to 1 3/4" (depending on fabric, size, etc.)
alternately - you would spread the wing-y bits if you wanted to add puffs to your sleeve pattern that doesn't have them.
making the sleeve cap smaller is actually very easy - once i changed the pattern i just laid it over the fabric i already cut for my (larger) sleeve and re-traced the sewing lines. i didn't cut the extra fabric off until the sleeves were sewn in - just in case!
sorry for the long reply!
Great tutorial! Thanks for sharing this!
ReplyDeleteI have the Helen Armstrong book and it's great, really, especially the trousers section, which even gives sewing instructions, something that doesn't normally get covered in the book. I will warn you though that there are quite a few printing mistakes, which can be a bit tricky when you're half way through drafting something, but nothing that can't be worked out by yourself thankfully. Also because the book was 1st drafted in the eighties, some of the examples used are somewhat dated, so just watch out for low armholes and baggy upper silhouettes on some of the suggested blocks/slopers. But please dive in and enjoy, it's great fun and very addictive.
ReplyDeleteThat's a great explanation of decreasing the cap size and I'm sure someday I'll need to use it on a pattern but I mostly have to increase the width up there, to encompass my sausage like upper arms! With regard to the measurement of the cap and sleeve, I was taught to measure at the seam line, not the outer line of the fabric where the pieces actually fit together You'll find the patterns in the Helen Armstrong are drafted without seam allowances, which makes measuring easier.
Good luck and enjoy
@ Bibliophile - thanks for the heads up on the book! I am definitely looking forward to diving in. Also - thanks for the clarification about where to measure - yes, I always measure at the seamline rather than the outer edge of the fabric - I'm seeing now perhaps my little drawings are more confusing than clarifying!! ha!
ReplyDeleteVERY informative! Thanks for the update and maniacal bird/scissors illustrations!
ReplyDeleteThis is very interesting. Thank you for the information. Have you read this article on the subject?
ReplyDeletehttp://www.fashion-incubator.com/archive/sleeve_cap_ease_is_bogus/
@ Katy - Thanks for the article! I've never read that - but it absolutely makes sense. Totally enlightening! But now what to do with this information??
ReplyDeleteI love your illustrations! It took me about three months to make Colette Patterns Lady Grey because I was working on the sleeve cap ease in a two-piece sleeve (and then had to redraft the lining, ugh), much like you've done here. I've a lot to learn but the sleeve looked much better in the end. For some reason cap ease drives me bonky. How's the jacket coming along?
ReplyDelete@ Amy - yes, I think cap ease might be the devil! I suggest you read the article Katy recommended in the comments - it's definitely making me think about how I will treat my sleeve caps in the future...
ReplyDeleteThis is kind of random, but I'm SO... vicariously?... excited for you having got Patternmaking for Fashion Design for Christmas! I just got it from the library (ugh, time to read an 800 page textbook before it's due back). Hooray pattermaking-book-reading-twins!
ReplyDeleteYour red jacket turned out lovely. Such devotion, and with such great results!
Yay!! Pattermaking-book-reading-twins!
DeleteI, however, do not envy you trying to cram that book into a library checkout time span. Perhaps a multiple checkout?
Thanks Rachel :)
love the illustrations. I bought a vintage pattern for nightgown and dressing gown; i made a toile out of muslin, and am glad I did that. Much as i love June Carter's style, it isn't my style. And those fabulous 1970's puffed sleeves make me more than a bit nervous. So down with come the sleeve heads. thanks.
ReplyDelete