11.26.2014

wool weather

Mood Fabric Wool Sweater Knit Saiph Dress 

Howdy Y'all! Well, it's finally sweater weather here in East Texas. Sorta. Off and on at least! Which means that it's time for me to do what I do every year around this time: freak out about my utter lack of cold weather clothing and start eyeing the blankets on the back of the couch maniacally, wondering if I can quickly drape and belt them into some passable semblance of clothing! Every year I feel completely taken off guard when the mercury decides to dip below 60 degrees (that's about 15C to all my non 'Merican friends).  I think having 9 months out of the year with triple digit temps does something to your brain...

That's why this month my Mood Sewing Network makes are all about quick, but warm, wooly dresses. I needed something warm, and I needed something warm now.  (Before the weather decides to return to balmy temperatures in a few days time!)

Mood Fabric Wool Sweater Knit Saiph Dress

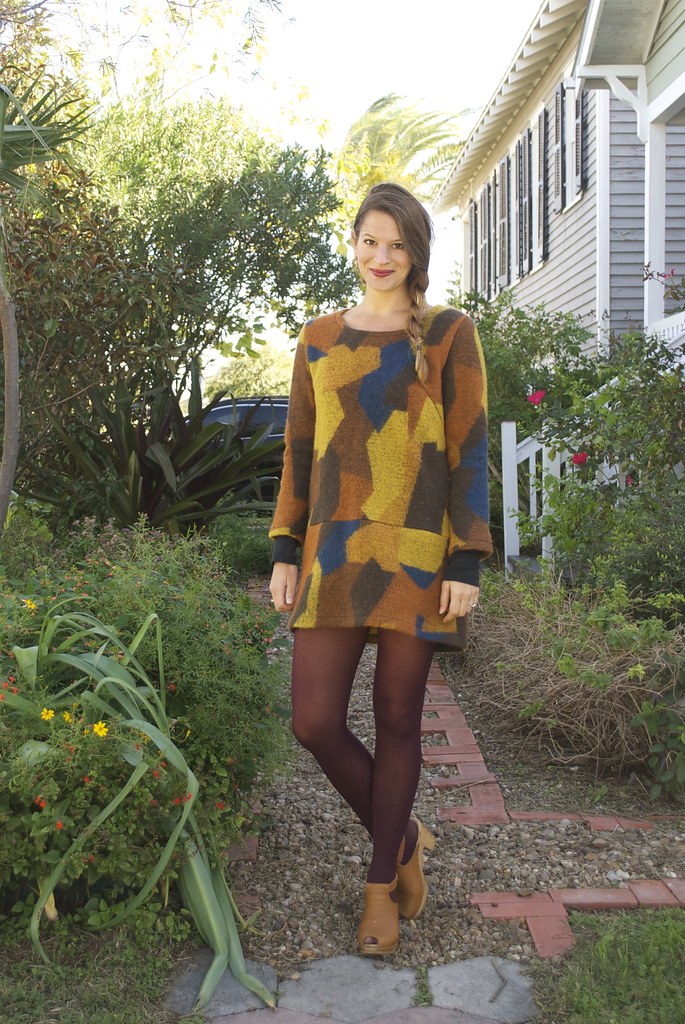
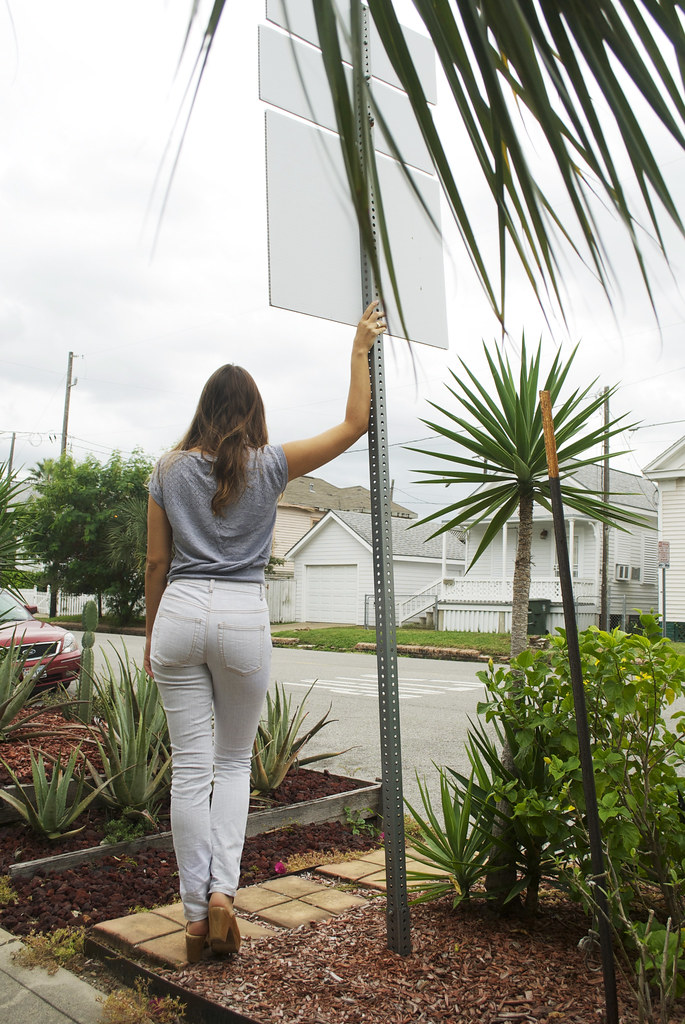
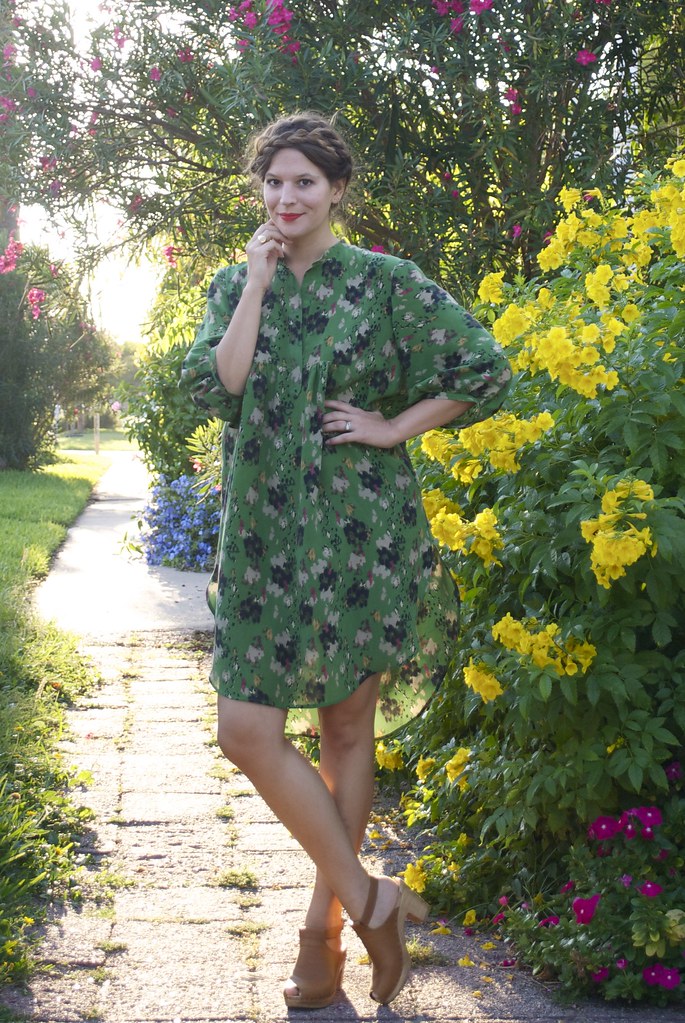
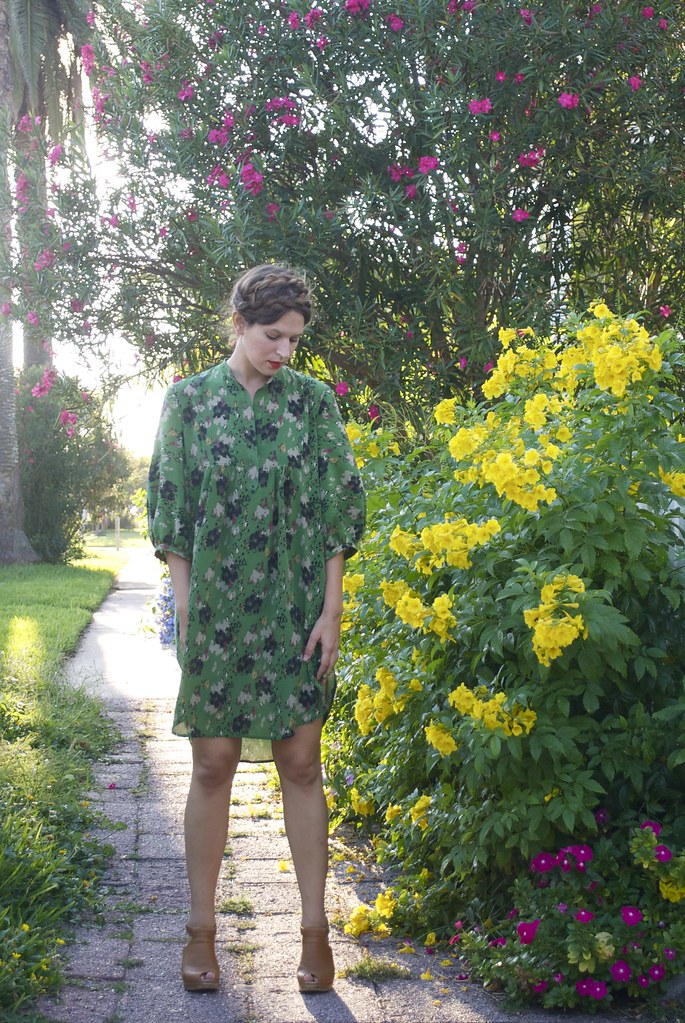
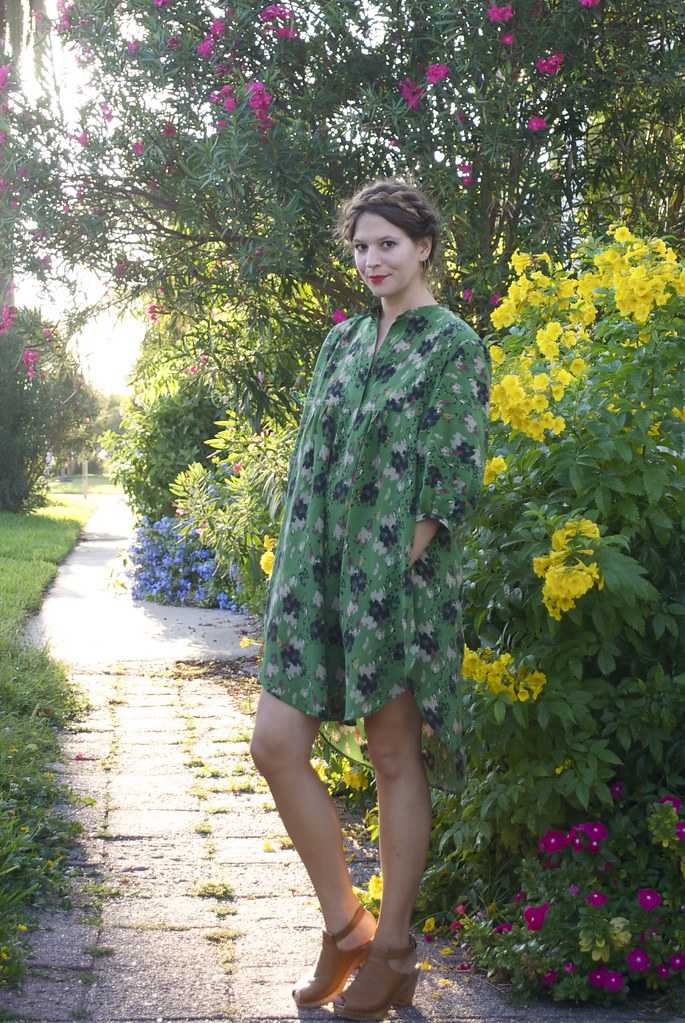
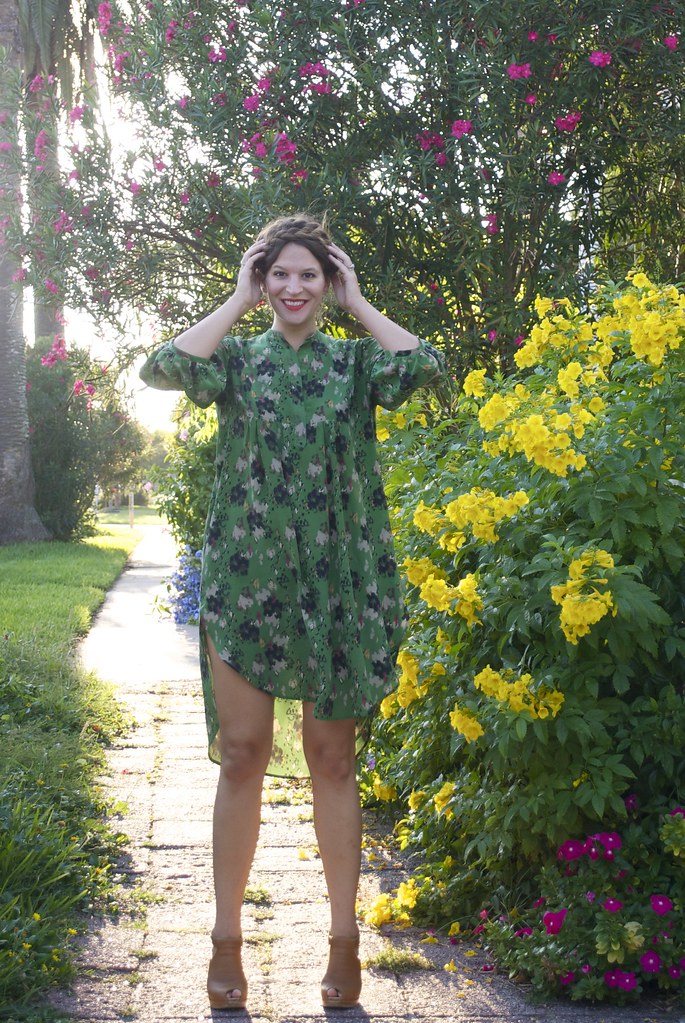
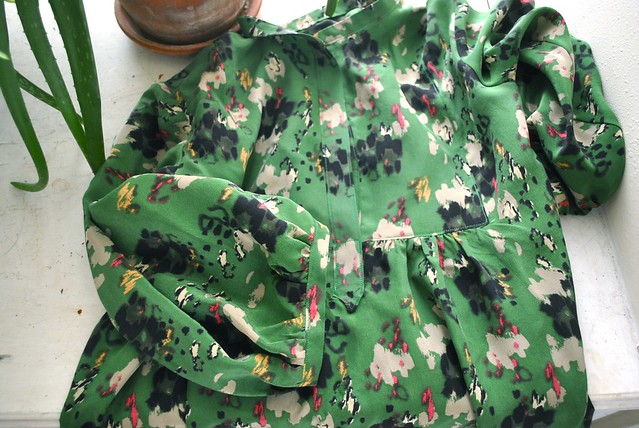
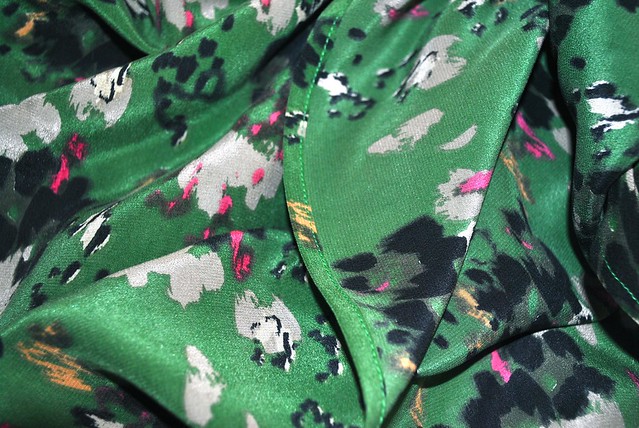
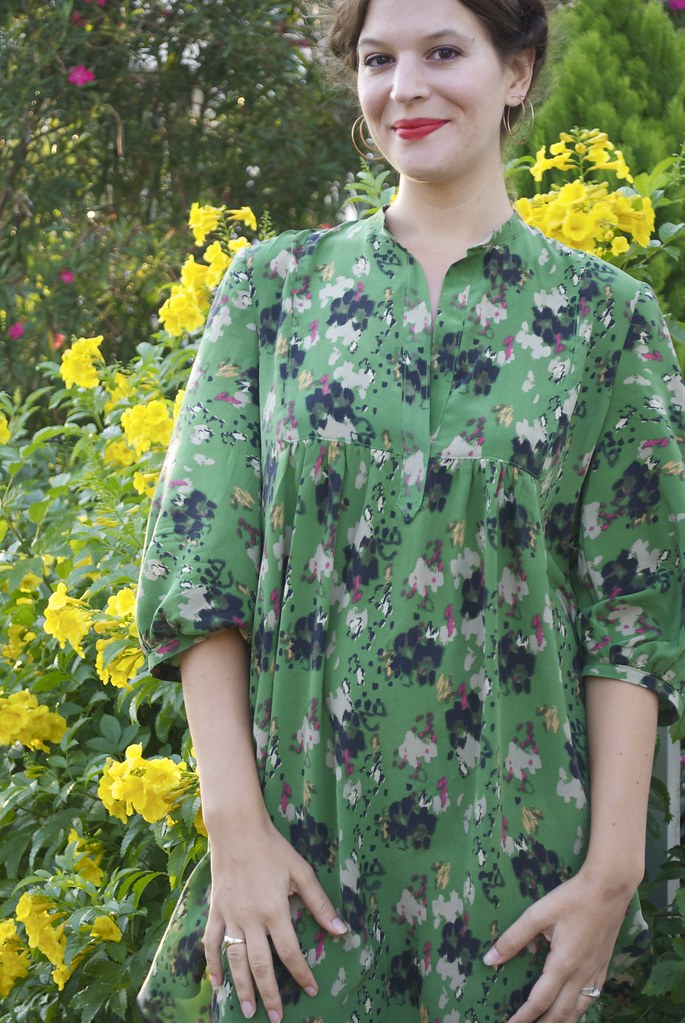
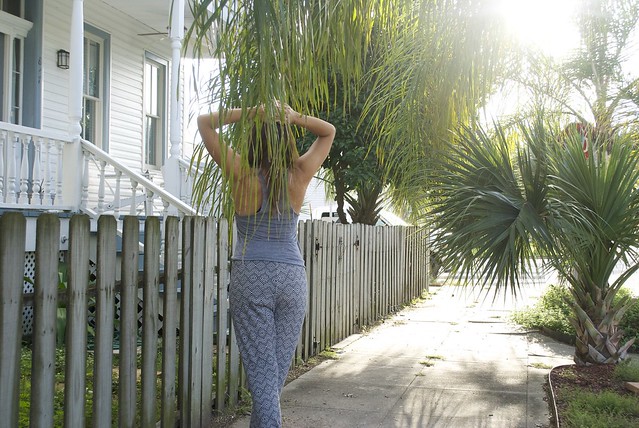
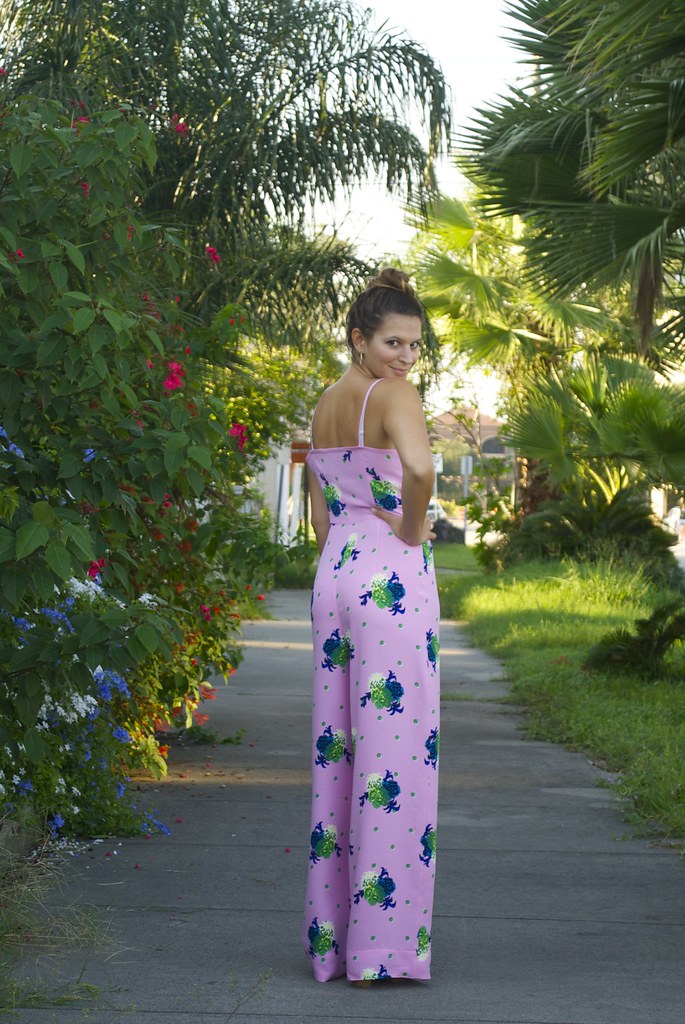
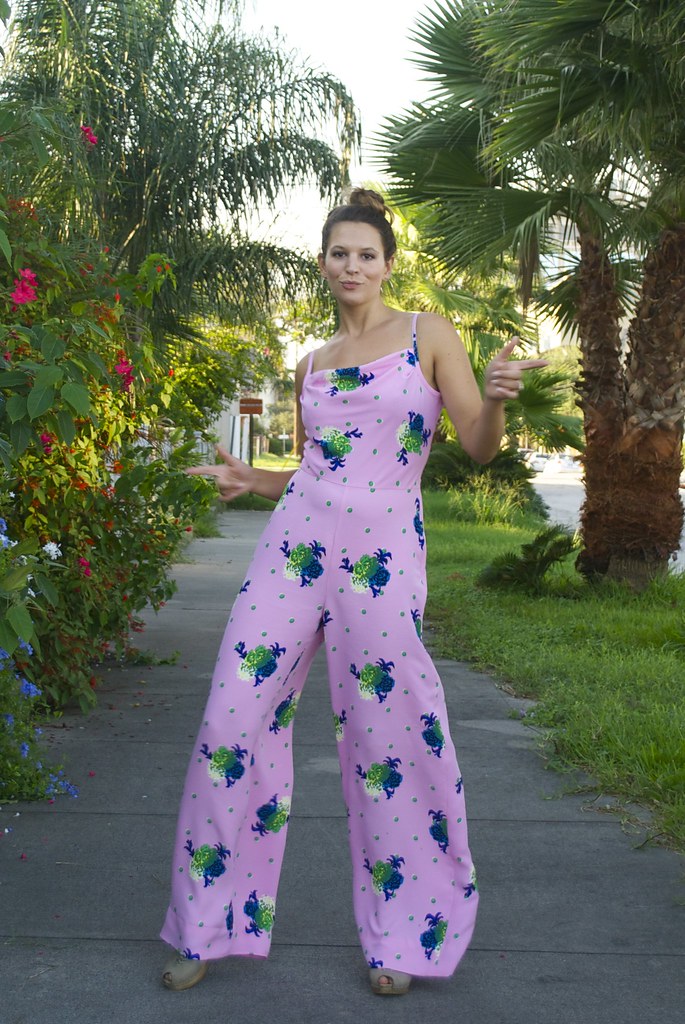
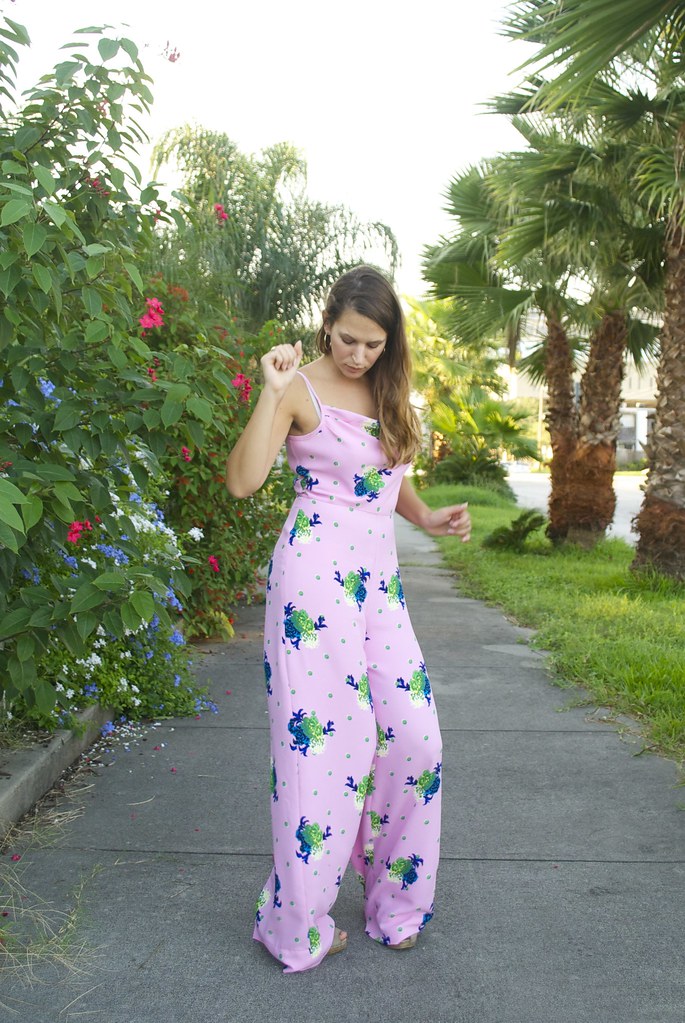
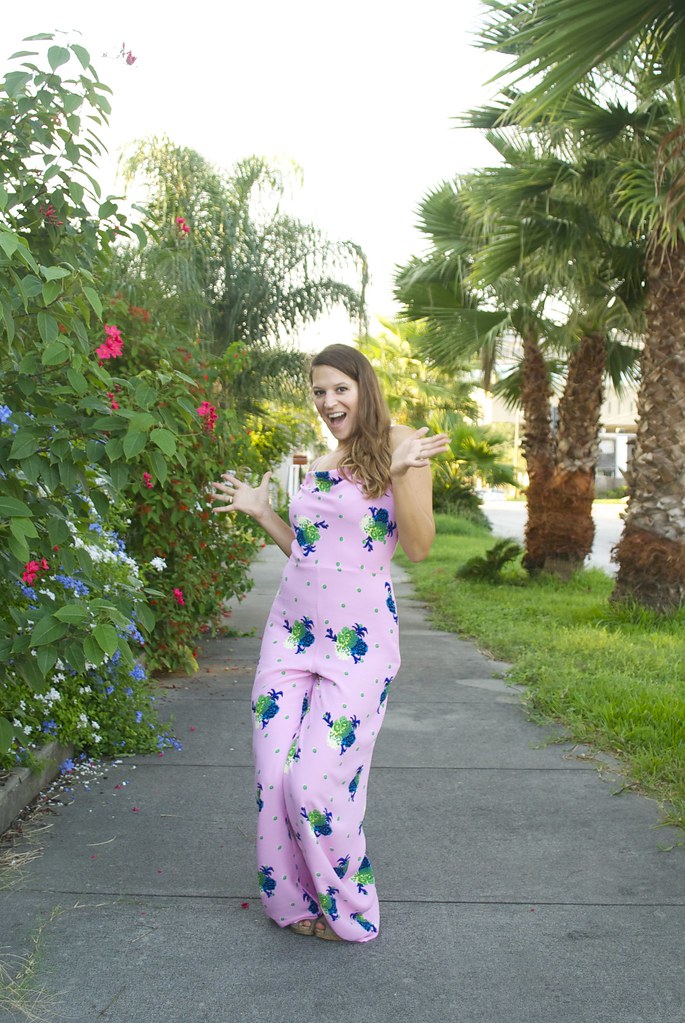
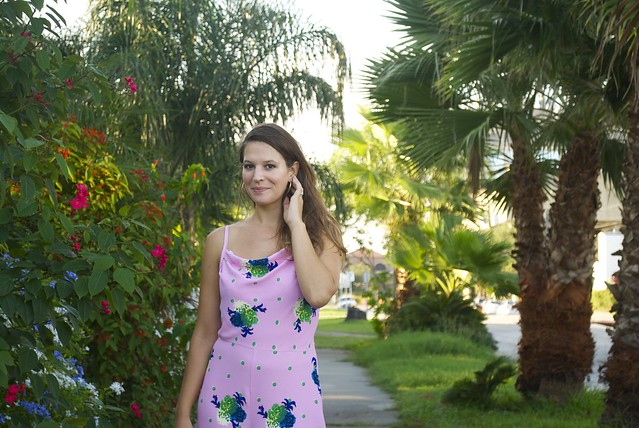
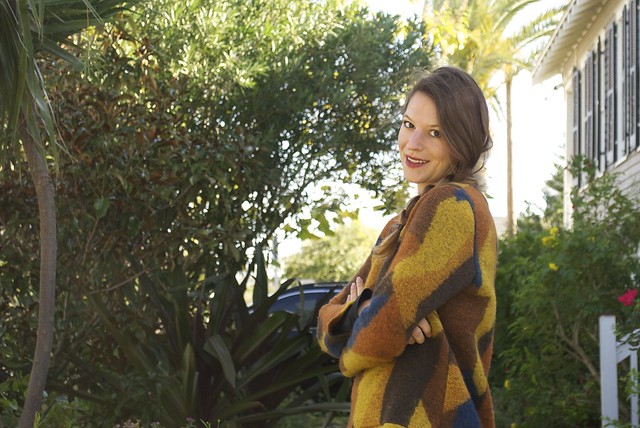
My first dress was made using this thick and fuzzy Designer Wool Sweater Knit from Mood Fabrics online, which is, of course, no longer available. Those wool knits go fast dudes - my advice is if you see one you like, pounce on it, like a tiger, regardless of the seasonal appropriateness of it.  For example, I spotted this fabric back in early August - when just blinking put one in danger of overheating - and I think I must have been daydreaming about cooler weather because I had to have this fabric then. At that moment. I think Nick was a bit concerned when the box came and I proudly pulled out my yardage and started crooning over it's springy, scratchy, wooly goodness. Of course, maybe it wasn't the fact that I was buying wool sweater knits in the middle of August that caused his brow to furrow, but rather the fabric itself. It's a little bit like an 80's Cosby sweater thrown in a blender... I mean, what is with those colors?! And why am I kinda obsessed with them?

Mood Fabric Wool Sweater Knit Saiph Dress

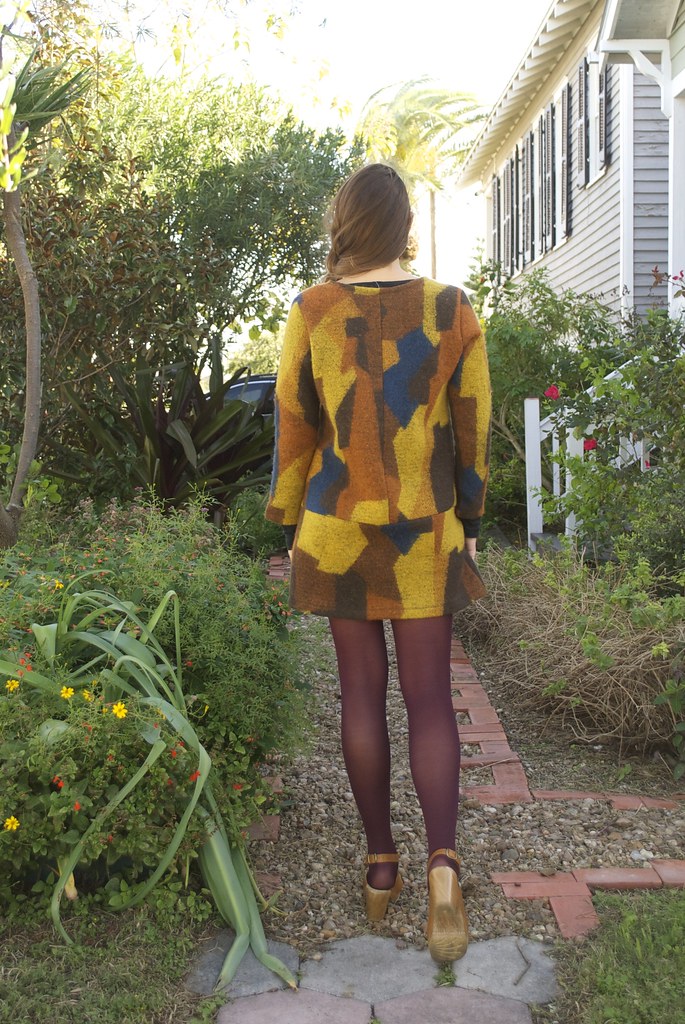
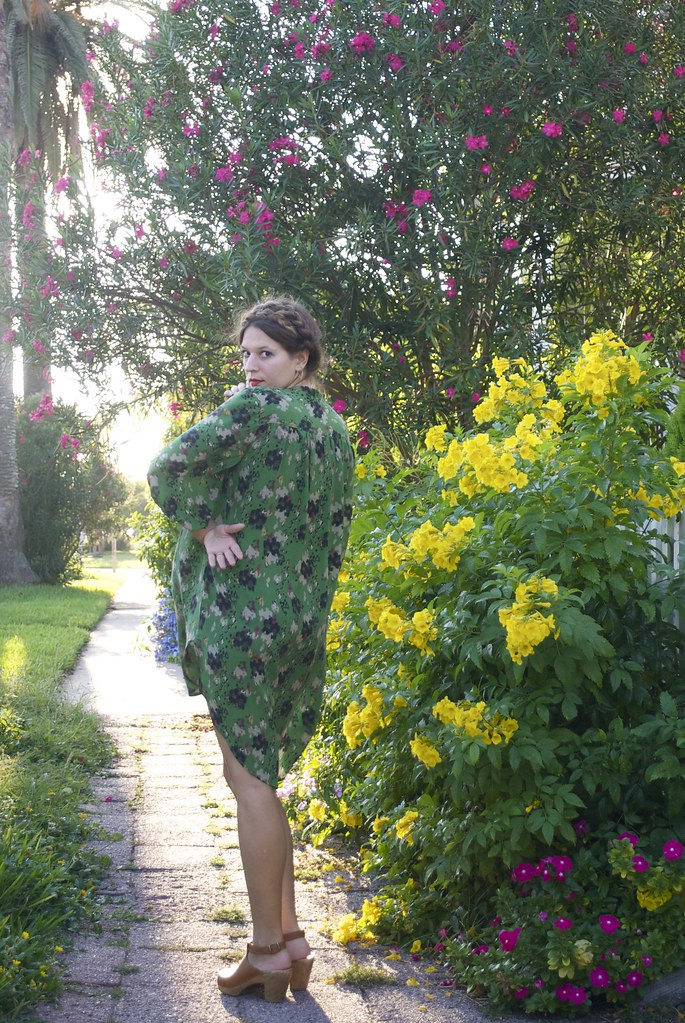
Despite my love for this fabric, I had a bit of a hard time deciding what to do with it. It's quite thick, and scratchy, which means that whatever I made had to be roomy enough to wear something underneath, but not so big that I end up looking like the Michelin Man rolled in mud. I settled on variation 2 of the Saiph Tunic from Papercut Patterns because I had made one last year out of a medium weight black wool knit that I loved, but that sadly died a tragic death in the dryer (*sobs* R.I.P.) and I felt that this pattern worked well with heavier weight fabrics with a stiffer drape.

Mood Fabric Wool Sweater Knit Saiph Dress

Because this fabric was pretty lofty, I ended up changing a couple of things about the Saiph Tunic in order to keep bulk to a minimum.  First I left off the neck facing and instead just simply turned the neckline in 5/8" and topstitched it with a double needle. This made for a slightly wider neckline, but I'm okay with that.  I also left off the front in-seam pockets, which I'll admit was partly because of the bulk issue (4 layers of this fabric is a lot) and partly out of laziness.  Although I'm regretting not trying to find a thinner substitute fabric that would have worked, because I keep trying to dip my hands into non-existant pockets! I also omitted the back neck button closure because I remembered from my last version that the dress was plenty big enough to slip on and off over my head.

Mood Fabric Wool Sweater Knit Saiph Dress

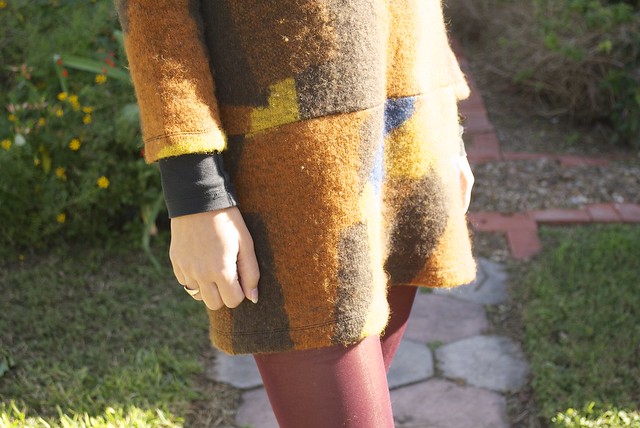
Despite the thickness of this wool sweater knit, I had no problem zipping through it with my serger, which I used for all the major seams.  The cuffs and hem were stitched in place using my double needle on my regular machine.

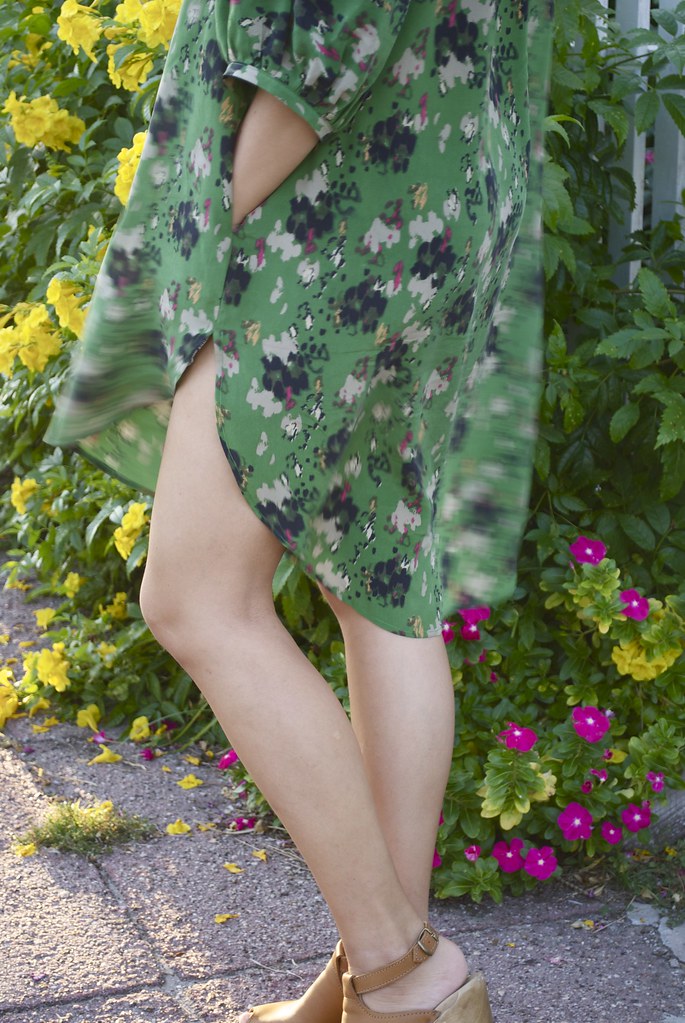
I wasn't sure how I would feel about this dress, but after wearing it around the house and for pictures, I have to admit I'm fairly smitten! I love that the boxy shape is tempered by the short hem, and the horizontal seam at the drop waist does wonderful things visually to the crazy print.

Mood Fabrics Wool Knit Nettie Dress

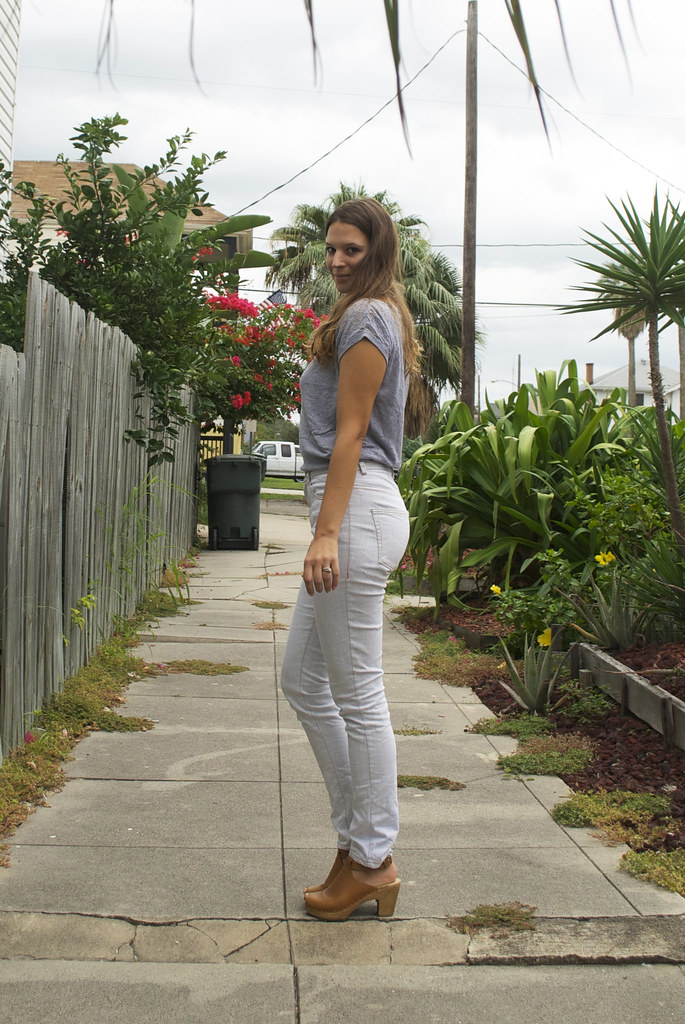
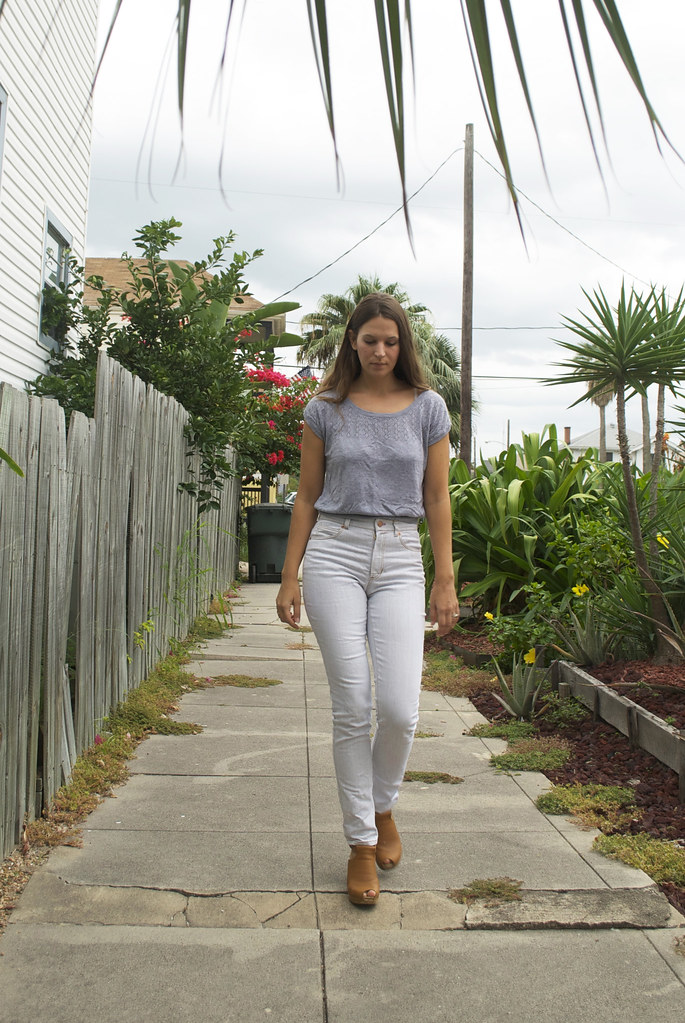
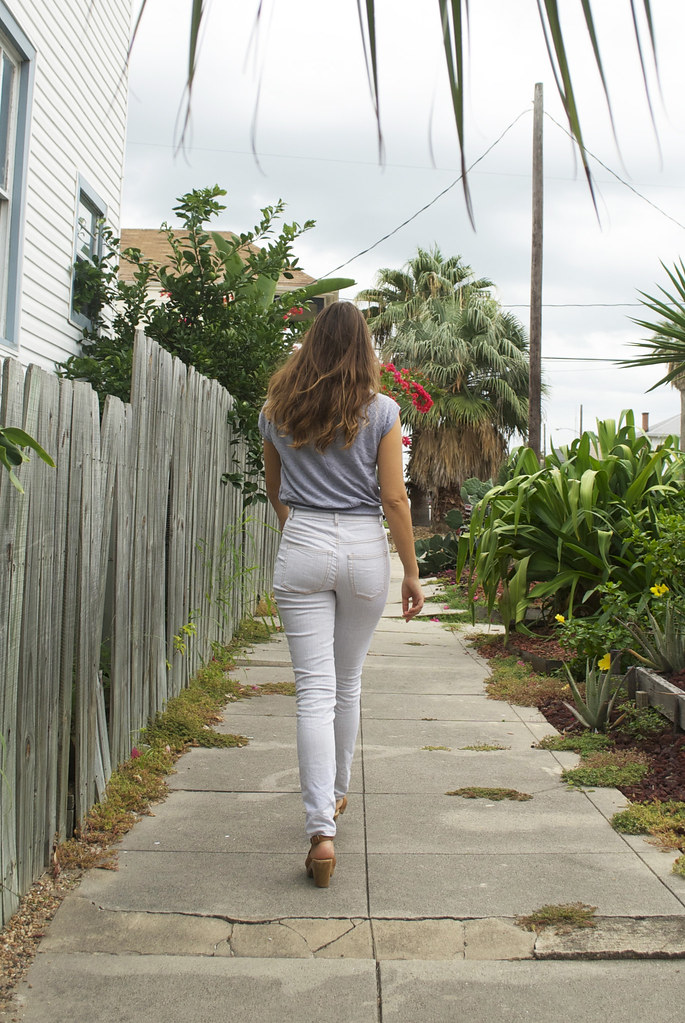
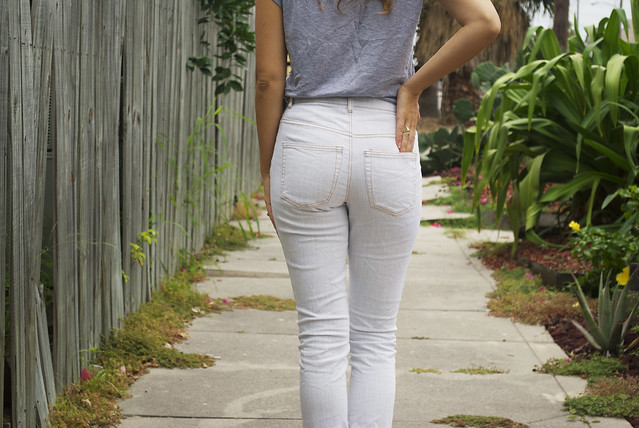
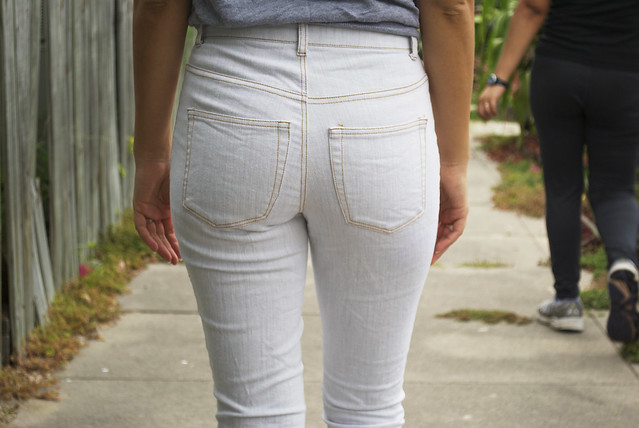
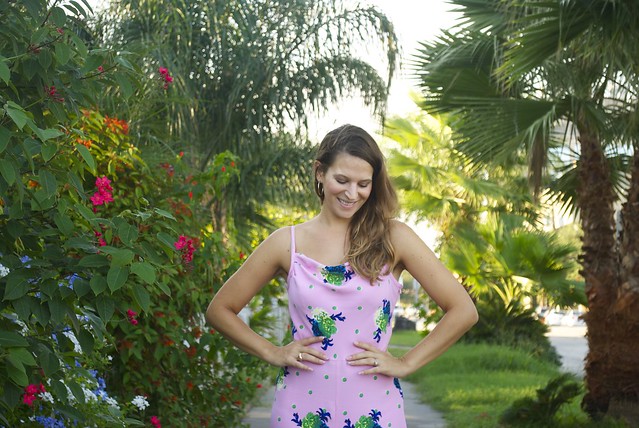
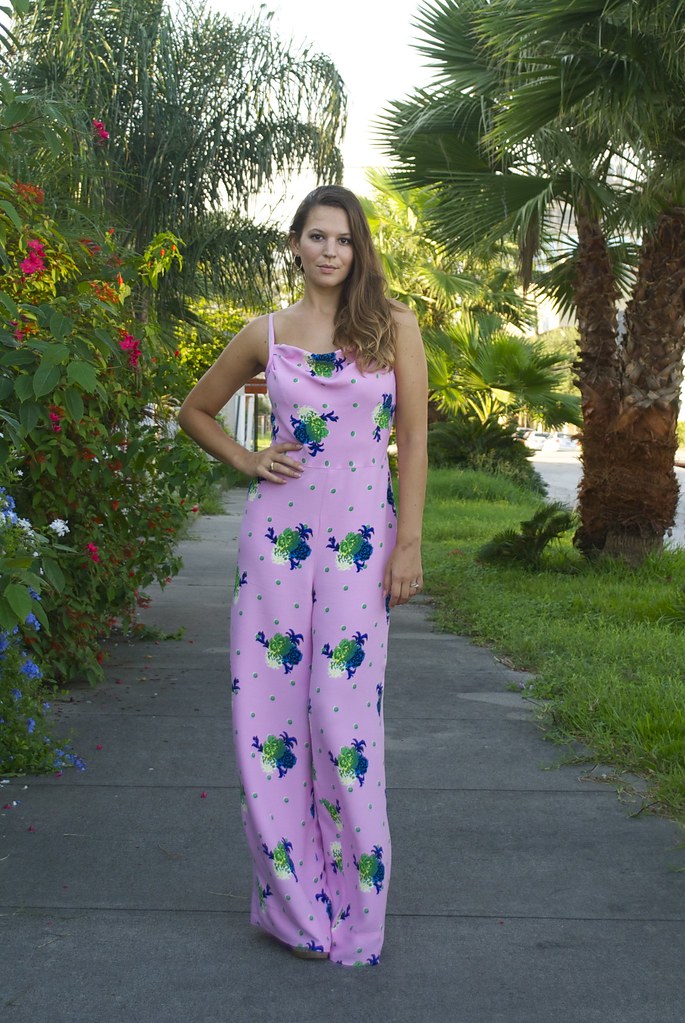
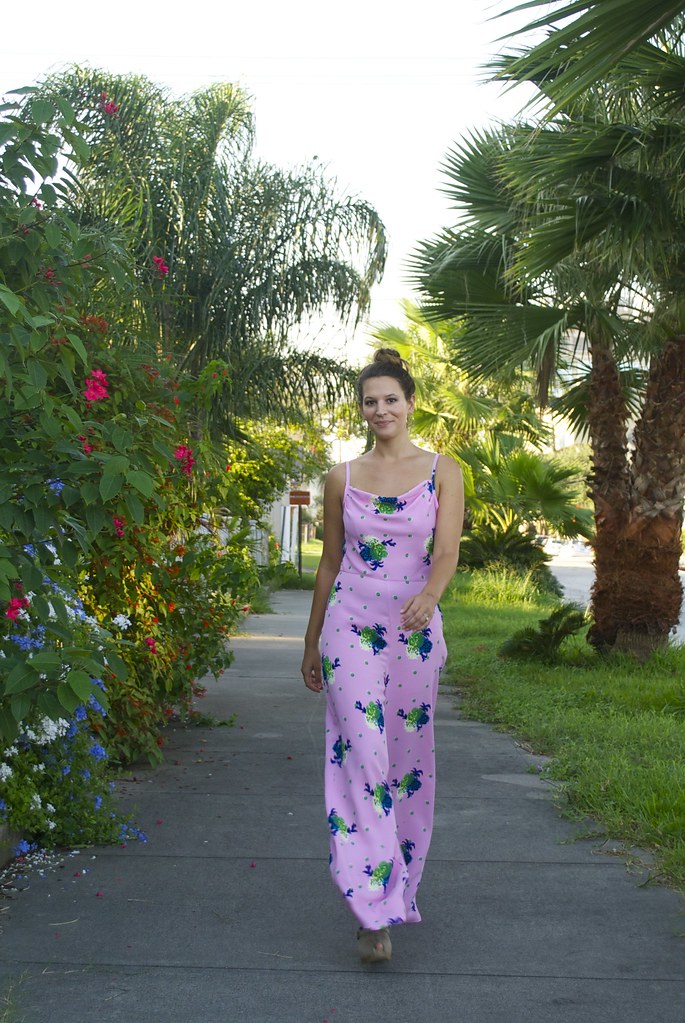
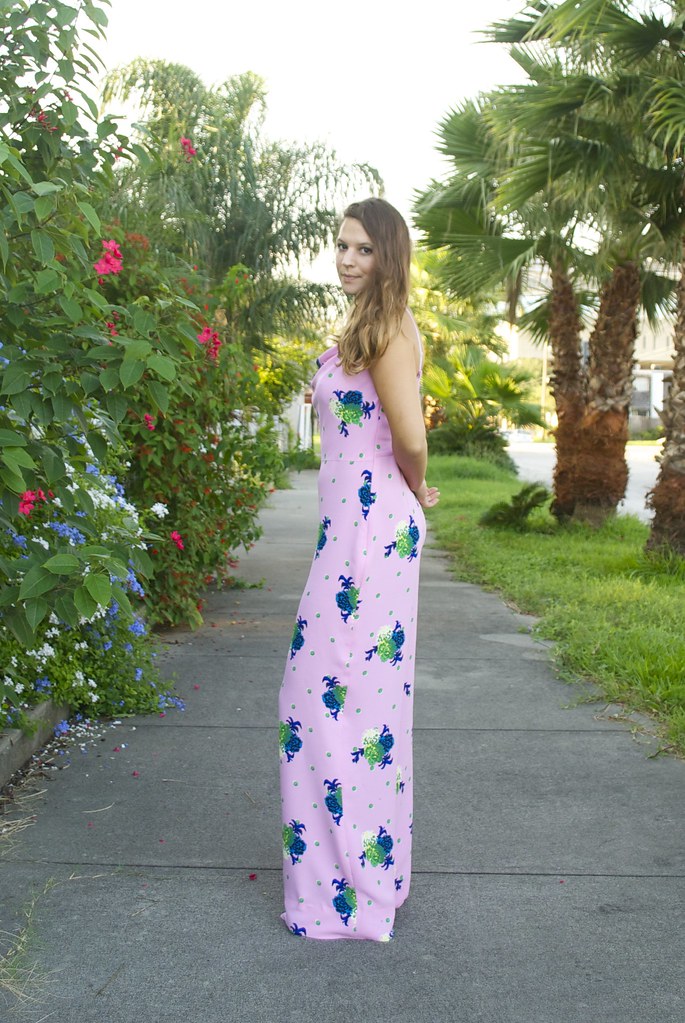
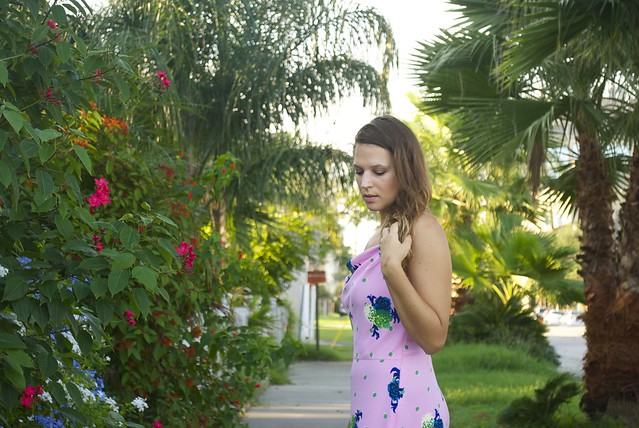
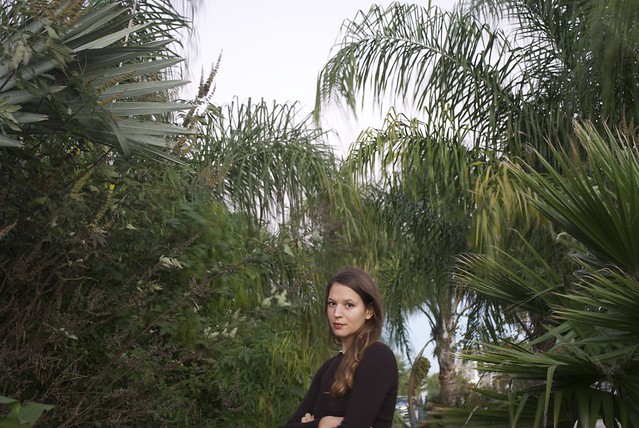
But, you know, sometimes you just don't want to feel bulky all winter long! In which case, let me introduce you to my second wool knit dress for this month! This was made using a smooth, mid-weight wool jersey, with a nice amount of crosswise stretch, in a bitter chocolate color (I'm also not seeing this exact knit online anymore, but this gorgeous deep maroon jersey is catching my eye!)

Mood Fabrics Wool Knit Nettie Dress

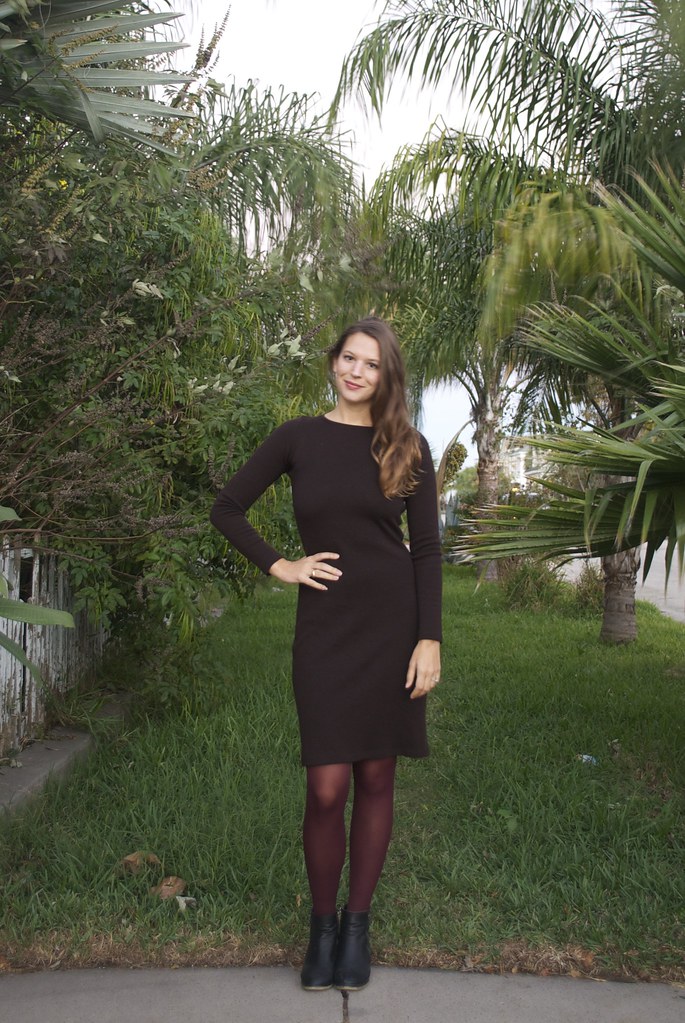
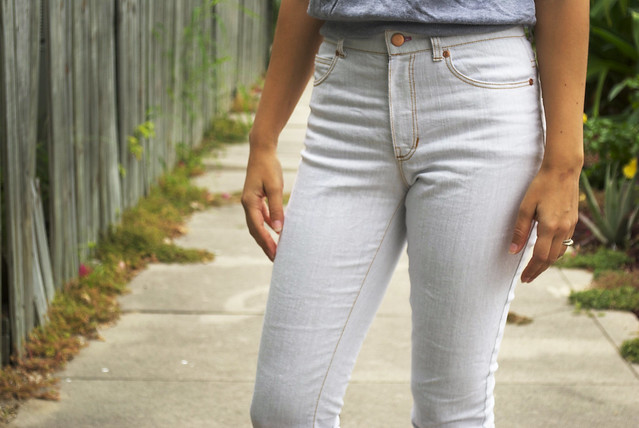
Unlike the first sweater knit, this wool jersey was soft enough to wear against bare skin, so I thought a body-hugging silhouette might be really flattering. It's also thick enough and completely opaque so I don't have to worry about every little lump and bump showing through.  For this dress I used Closet Case Files Nettie Bodysuit & Dress pattern.  This pattern has so many great options for variations.  For this version I decided to make it a dress (obviously) and went with the high neckline for both the front and the back, and the long sleeve.  I was hoping the modest neckline might add a counterbalance to the curve-hugging silhouette.

Mood Fabrics Wool Knit Nettie Dress

This dress came together in no time at all. Of course it's a very simple design, but still, I think I wound up sewing the majority of this one morning before work! And I love the results. This dress is just so easy to throw on and yet still look like you tried. It's also warm, which was my main motive, and I think the bitter chocolate color is a nice, unexpected alternative to the usual black. I'm already eyeing more appropriate wool jersey to make more of these, because I could basically live in them all winter long.

Mood Fabrics Wool Knit Nettie DressMood Fabrics Wool Knit Nettie Dress

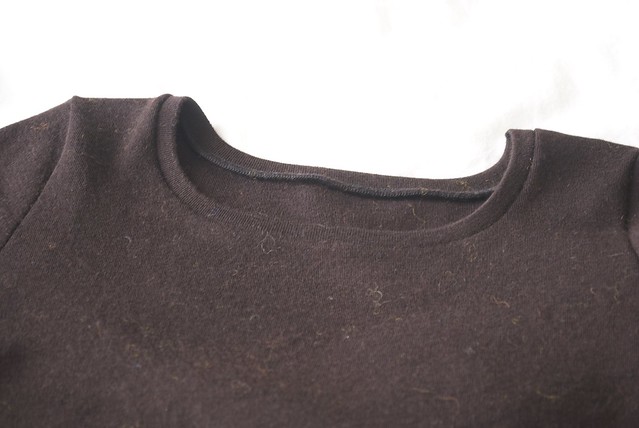
The only downside is that it attracts fuzzies and hair like it's its job! So please excuse all the lint in these closeup shots.  As far as construction goes, I just zoomed all the major seams through my serger.  The neckline was finished with self fabric binding, and the sleeves and cuffs were once again hemmed using my twin needle.  Easy peasy!

Mood Fabrics Wool Knit Nettie Dress

And that's it! Two quick and simple wool dresses to keep me warm... for as many weeks as winter decides to last! Best of all, both of these dresses go really well with these mulberry colored tights I pulled out of the depths of my sock drawer the other day, and immediately proclaimed them the perfect colored tights for Winter 2014/2015! Okay, okay... maybe they are just the only tights I still own that haven't been shredded to bits. Yet.

What are you sewing to keep warm or cool, depending on your hemisphere?

I hope all my friends here in the States have a safe and wonderful Thanksgiving week, and for all my international buddies, Happy Sewing, as always!

xx

11.11.2014

my gingers

Ginger Jeans

I need to be honest with you, friends, I could probably have filled this post with just pictures of my butt because, seriously, every single photo I took today of my rearview was just killing it!! And while that probably sounds like I have an insanely inflated sense of self when it comes to my booty, I assure you, I don't! IT'S JUST THESE JEANS!! 

Ginger Jeans

So for posterior  I mean, posterity, I've included some front shots too, but I just want you to know it wasn't easy!!! *Sigh* the things I do for you guys...

But anyway, Heeeyyyy! What's new with y'all? Did you have a good Halloween? Is your November getting off to a swinging good start? I got myself into a bit of a blogging rut after posting my last Mood Sewing Network make - I just couldn't muster the mojo to re-write the post over here on my home turf, so if you haven't seen it, let me just direct you on over to the MSN site.  Once I accepted the fact that that post was just not going to get re-posted I felt like I unclogged the drains and could finally move on to sharing some of these other makes that have been sitting around waiting to be blogged about! 

And first on that list are these white Ginger Jeans - the newest pattern from Closet Case Files!

Ginger Jeans

You know, I really love seeing women that I've come to know, and call my friends through the sewing  and blogging community expand, and grow, and take on new ventures, and find success through their passion and hard work.  And no one embodies this more for me than my pal, Heather Lou.  I'm just so proud of her and her burgeoning pattern business! And it's with good reason too - because each new pattern she releases knocks it out of the park.  And I'm not just saying that because I love her (even though I do) but I really believe that each of her patterns possess a little bit of magic that makes me feel like a million bucks every time I put them on.  Case in point: these Ginger Jeans have since been dubbed my 'sexy jeans'.  They may not be perfect, but that rear view is worth the title alone, in my opinion!!

Ginger Jeans

Okay, okay, I know you guys didn't come here to listen to me wax poetic about my tush and my love for Heather, so let me tell you a bit about the actual pants you see before you.  First of all, Heather asked me to test this pattern, and I said 'yes' because I love making jeans, and I love wearing jeans, and I love learning about jeans, and because - duh - she's my girl! (Okay, I'm done, I swear... well maybe not...) So the jeans in this post are my test version.

Ginger Jeans

I used a moderately stretchy, mid-weight denim that I picked up with my Mood allowance.  Funny thing about these jeans - this is actually the wrong side of the denim! The right side of the denim was described on the Mood site as being a 'burnished gold', and of course, me being me, I thought "oooh gold jeans!!!" and clicked 'buy' without a second thought. Then the denim arrived and, much to my dismay, they weren't so much 'gold' in real life as they were a sad, slightly greenish, khaki color. Boo.  (To be fair, had I gotten past the 'gold' descriptor and gone on to read the rest of the color description I might not have been so disappointed) I was all resigned to just make them up as a muslin that never saw the light of day, when I had the sudden brainwave to use the wrong side of the fabric, which is this pretty normal looking white color you see before you. Total save!

Ginger Jeans

I'm no novice to jeans making - in fact these Ginger's will make my sixth pair of handmade jeans.  And I really have to say, it's one of the things I love to make the most.  I just get so much satisfaction out of all the topstitching and details, and I really enjoy knowing that I'm making something that will get a lot of love and wear.  For my test version of the Ginger Jeans pattern I made View B - the high-waisted and skinny leg variation.  I chose this style for two reasons: 1) I love a good high rise for their vintage-y sexy look and 2) My hacked-to-pieces Built By Wendy pattern that I've been using to make my own jeans pretty closely resembles View A and I was looking for something a little different.  I cut a size 6 for these, which is a size smaller than what I've cut in Heather's patterns in the past.  My measurements were a bit all over the place - a 6 in the waist and a 10 in the hips.  I gambled by cutting the 6 and sewing the hips and legs at a 3/8" SA instead of the instructed 5/8".  The resulting fit is very close, but they're still comfy (stretch denim is a beautiful thing)!

Ginger Jeans

I really love the fit of these! I'm sorry, I have to say it again, but I don't know what sort of voodoo magic Heather puts into her patterns because each one makes my bum look ace! I really only ever have this experience with her patterns, so... obviously it's witchcraft.  To be fair, I do have a bit of a camel toe issue with the front rise (I tried to pose in such a way as to minimize it's appearance in these photos - also, isn't 'camel toe' an awful name?) but it's not enough to make me stop wearing them in public. Also, it should be noted that Heather has made a few fit adjustments to the pattern after we testers gave her our feedback. I believe one of the things she changed was to take a little scoop out of the crotch curve on the high-waisted version to solve any potential camel toe issues. Of course, we're all such unique little snowflakes, no one is going to fit any one pattern exactly the same.  I'm sure I'll still have to make little tweaks here and there when I make my next pair of Gingers from the finalized pattern, but... that's sewing!

Ginger JeansGinger Jeans

Some of the little details I added to my jeans were this gold topstitching thread and copper buttons and rivets, all bought from Taylor Tailor.  And maybe my favorite little detail is the hot pink thread I used to sew the buttonhole.  This was something I did on my husband's jeans and I just loved how personalized it made them feel.  See?! There's just so many little ways you can customize your jeans when you make them yourself - it's like a 'Choose Your Own Adventure' sewing experience! 

I also have to say that these are some of the most thorough instructions I've ever come across.  Sewing jeans can be a bit of a process which is probably why so many people are intimidated by them.  Heather really breaks the whole thing down for you with the instructions, I even learned a few new tricks to add to my jeans sewing arsenal! And, of course, she's doing an exhaustive series of posts as part of her sew-along covering just about everything you could ever want to know about making your own jeans. Truly, it's a like a gold mine of jeans sewing information! I've long been an advocate of making your own jeans - it's just so damn empowering - and I love that now there's all the information you could possibly want all in one place.

Ginger Jeans

Let's finish off with one last look at that boot-ay because... I mean... hot damn!

I'm sure I probably sound like a Closet Case Files fan girl in this post, and, well, I am! But I also hope you guys know I wouldn't just rave about something for no good reason - I'm just really pleased with the way my jeans turned out! 

But I guess the real question is whether or not the Ginger Jeans pattern will replace my Tried and True Built By Wendy jeans pattern? You know... they just may! I most definitely need more of these high-waisted beauties in my closet, and if the low rise version gives equally good ass - then who am I to complain! I will say that I was able to get my dirty little mitts on one of the Ginger Jeans denim kits before they sold out, and... yeah. There's gonna be more Gingers in my future.

What about you guys? Anyone else looking to make this handmade jeans thing happen?

xx

10.23.2014

greenness, gathers, and gratitude

DSC_0020

So I'd like to start this post off with a little announcement, one that I've been struggling to keep in for the past few weeks, but I've been given the green light so I figure it's time to shout it from the rooftops!


A couple weeks ago I received an email from BurdaStyle informing me that I was voted as one of their Top 50 Best Bloggers for Sewing Enthusiasts!! I was so floored by this news, I can't even tell you! As so many of you know, sewing and blogging can feel like a lonely pursuit if it wasn't for the amazing community I've been able to connect with by doing both.  Every single person who takes the time to comment, email, stop by, lurk, or end up here by accident makes my day brighter and makes me so happy.  I love to share what I love to do, and you guys make that pursuit worthwhile.  So thank you to whoever nominated me for BurdaStyle's 50 Best Bloggers, and thank you to all of you who took the time to vote for me! I feel so incredibly grateful to have so many wonderful ladies (and gents) by my side, encouraging me and letting me be a part of this lovely community. Thank you guys! I love you!

Burda hasn't gotten around to posting the full list of all the 50 bloggers, but I can't wait for them to! I love discovering new blogs, and this list is sure to recommend some awesome new-to-me blogs! I promise to share as soon as I get wind...

DSC_0009

Now that I got that off my chest... let's talk shop! One of the things I love about all the sewing blogs out there is that they present a never ending stream of inspiration. Sure, this can sometimes be overwhelming (I never seem to have enough time or resources to make allll the dresses!) but it can also light a little spark that makes you want to try a style you never considered before, or dredge up some forgotten love for a particular detail.

This particular getup was inspired by some of my favorite lady sewing bloggers. Last spring, Morgan from Crab & Bee wrote a few posts about her love for yokes and gathers as a design feature, and proceeded to make a few, utterly lovely, garments that featured said yokes and gathers - such as this one, this one, and especially this one (that last one... sigh... be still my heart!) Those makes got lodged somewhere in my brain, and ever since then I've been on the lookout for a good "yoke 'n gather" look for myself (sadly, that Built By Wendy pattern is out of print... *sobs*).  Then Mary from Idle Fancy went ahead and added fuel to this slowly building fire when she made two, back-to-back, swingy, artist-smock-esque tops, here and here. And then I remembered that I went through a brief period on Pinterest where I couldn't stop pinning looks with full, romantic, 19th century poet sleeves, like this one, and this one. And in a thunderclap of yokegatherbohemianbigsleeve mania I decided I needed to have all the things on One. Dress. Because I'll practice self-restraint when I'm dead, dammit!

DSC_0015

The result of said mania is the dress you see before you! This might be another one of those makes that just isn't everyone's cup of tea. There's a lot of poofiness going on here, and a general shapelessness that some might consider 'unflattering'.  As I was making it I was getting some pretty distinct "nightie" vibes from it, followed by "choir robes"... Hopefully this amazing fabric (more on that in a bit) helps steer it from "housecoat" and more into the romantic-bohemian-artist territory that I was going for. The pattern is Burda 10/2010 #122 which I selected as one of the five free patterns I was awarded by BurdaStyle (seriously hard to choose five patterns, by the by!) I changed the sleeves to be 3/4 length and added serious width at the hem by slashing and spreading the pattern piece to create the full sleeved, slightly 1800's, look I was going for.

If all of this is looking a little too Little House on the Prairie for you, don't worry, because this dress also delivers some serious leg!

(Complete aside: Is Little House on the Prairie still a relative cultural reference? Did I just age myself by bringing that up?? Not that I really care because I loved that show! It made me feel lots of feelings!)

DSC_0018

Those side slits are verging on indecent! However, I decided to go with it as a counterpoint to all the poof that was happening up top. I zeroed in on this pattern because I loved the squared off yoke (with the prerequisite gathers, of course) on the front, and the little placket and mandarin collar.  However, like most Burda patterns, the instructions are a bit scant. I love Burda because they have such a huge, insanely affordable, offering and they really cater to trends. I don't sew with their patterns nearly often enough, but any time I'm looking for a hard-to-find style in a sewing pattern, I always start with Burda. However, you definitely do not get the generous hand holding and lovely illustrations and thorough instructions that we've all been spoiled by with indie pattern companies. This wasn't a huge issue, since I've got a nice bit of sewing under my belt at this point, but in the future I think I'll trust my gut more and follow my own sewing instincts rather than trying to decode the included instructions.  It took me sewing the front placket according to their instructions to figure this out though...

DSC_0003

Egads!!! Are your eyes bleeding?? What? You want to get in closer??

DSC_0002

The HORROR! 

Ah well. You win some, you lose some. I'll know for next time!

DSC_0012

I treated myself to this fabric from Emma One Sock (sadly, all gone) specifically for this dress.  It's a light weight silk that seems to fall somewhere between a crepe de chine and a habotai, and it's completely lovely.  Ya'll might remember how I was going on about green not being my favorite color when I made this skirt.  Well, that skirt must have started something, because I'm all of a sudden finding myself drawn to all sorts of amphibian shades! Primarily this lovely grassy shade.  But really, it was the print that sold me on this fabric. I just can't get enough of painterly prints, and there is something about this one that I just find especially lovely (it's slightly 'leopard-y').  It definitely wanted to be made into a voluminous, billowy, bohemian look! It was lovely to cut, lovely to sew, lovely to handle, and lovely to wear. The only sad thing is that I've used it all up! 

DSC_0005

I wish I had had enough fabric to make bias tape to face the curved hem (and keep a bit more length) like Rochelle and Lauren, but I was literally down to teensy scraps (definitely filing this tip away for the future though! So simple and so genius - especially when you don't want to sacrifice length).  So I had to make do with a simple 1/4" narrow hem.  Oddly enough, sewing these sort of hems on lightweight silks like this one is (dare I say it?) one of my strengths when it comes to sewing. Isn't that funny? I hate bias binding (different than bias facing), but I don't mind narrow curved hems.

DSC_0045

Ah yes, and pockets! I'm not entirely sure what I plan on putting in these pockets, but it's fun to have a place to hide my hands amongst all those rippling folds. 

DSC_0038

Well my best beloveds, there you have it! My take on yokes and gathers and artist smocks and poet sleeves and maybe more than a dash of Little House on the Prairie. I had another length of fabric earmarked for this exact same pattern as well, but I think I might give Tessuti's newest pattern, the Alice Dress / Top a go. Or should I save that one for spring... what do you think?

And as a final note, can I just say how hard it was to shoot this green dress in front of my usual photo backdrop of 'some stranger's garden'? Talk about dueling greens! It's hard to compete with nature!

Have a great end to your week everyone! 

xx

*Disclaimer: This pattern was given to me for free by BurdaStyle, but I selected it because I loved it, and wanted to make it, and I'm very happy I did. All thoughts and opinions on the pattern are my own and not influenced by the lovely people at BurdaStyle.

10.09.2014

lounging

DSC_0014

I've said it before and I'll say it again: my life is really more of the 'leggings' 'jeans and a t-shirt' kind of grind than the 'pink jumpsuit' 'cocktail dress' affair I portray on this ol' blog. I'm pretty sure I'm not alone in that regard! Don't get me wrong, I wear the shit out of every damn garment I make, but that also means that I'm inappropriately overdressed for 99% of my daily activities. You should see me wield a weed-wacker in a pencil skirt, crop top, and espadrilles! It is truly a sight to behold!

DSC_0017

I've always enjoyed making wardrobe basics - things like jeans and t-shirts. I find that for every one of those items I make my wardrobe seems to expand tenfold. But my new endeavor takes things to even more casual places. I want to make a concerted effort to inject my wardrobe with more "softies" - comfy, casual clothing that can work, play, and snuggle with me. Because, really, isn't that what life is about?

DSC_0008DSC_0019

First stop on the Softie Sewing Journey are these cuh-razy, black and white, zigging and zagging, you-are-now-entering-the-twilight-zone, print Hudson pants. I've been waiting all summer for it to get cool enough for me to make this pattern. Spoiler Alert: it's still hot as balls here. But I went ahead and made them anyway. And proceeded to wear them all day. And experienced so. much. leg sweat. But it was WORTH IT  I tell you!

Kelli made a winner of a pattern! This pattern has everything that I love about indie patterns: on-trend styles with a modern cut and sizing, clear and easy to understand instructions, and great, everyday, wearability. These were a great quick project for me to knock out in between more involved sewing projects - almost instant gratification!

DSC_0004DSC_0005

The fabric is a french terry from Girl Charlee (sold out, it seems). I wasn't really sure what french terry was, but I kept hearing it pop up on other blogs in reference to this pattern and it sounds kinda fancy, no? I mean, this ain't no Podunk Terry, this is Frennnncch Terry.  Which, if your curious, means it has a smooth face and a loopedy-looped textured back, like regular old terry cloth. So, yeah, not so fancy after all! But perfect for my Hudsons. They are a bit thicker than a regular cotton knit, but thinner than a sweatshirt fabric, falling somewhere in between. And that print was really what sold me. I've loved all the awesome print Hudson's I've seen pop up all over the internet (like these and these) and I wanted to get in on that action. The  black contrast fabric is some leftover cotton lycra, from this project, and also, incidentally from Girl Charlee. I picked up my black drawstring from none other than JoAnn's.

DSC_0009

I made this pattern up exactly as drafted, which worked out fine, especially since it has such an easy fit. I followed Kelli's instructions to choose your size based on your hip measurement, which put me at a size 8, which was a whopping two sizes bigger than my waist measurement according to the size chart! I think overall this resulted in a more relaxed, 'fancy sweatpants' sort of look than some of the more 'legging' like varieties I've been eyeing. I'm okay with this for this pair, but maybe I'll size down in the legs for future pairs. Especially since, after wearing for a day, I can see that this french terry doesn't have the best recovery and tends to bag out, particularly in the knees and butt. I actually emailed Kelli to ask her about fit and she mentioned that I may want to baste, try on, and take in the legs to get the fit I'm after. I, of course, was too excited to wear my finished pants to do this, but I'll keep it in mind for next time! I did sew the ankle band a bit smaller than instructed, because I got some scrawny ankles.

DSC_0007

And that's about it! My plan is to alternate some of these comfy, lounge-y, clothes with more sophisticated makes this fall and winter. I think, mentally, this is a good strategy so I don't overwhelm my brain with allll the difficult makes at once and then go numb with allll the quick and easy knits in one go. Variety is the spice of life! 

I can't wait for it to actually get cooler so I can style these pants with layers - I'm thinking button down shirts and blazers paired with ankle boots to get a more sophisticated, and even professional (and sneakily pajama-esque) work look. Even though I totally wore this to work today like this. You just can't teach an old dog new tricks... I will forever be trying to make my life more fancy than it is! Even in sweatpants!!

xx

10.01.2014

you make me feel like dancing

Mood Fabrics Marc Jacobs Floral + BHL Holly Jumpsuit

Hey Gang! I hope life has been treating you good over the last few weeks! Goodness, has it been that long? After coming down from the last crazy show install at work I have been trying to spend some time on 'me' the past month. Trying to find that life balance again of work/play/home/food/exercise/friends/family/hobbies... you know, the never-ending list that makes up a 'life'! And I've also been trying to soak up as much of the summer as I still can. September and October are my favorite months here in Galveston because the tourist season has ended, I get the beaches to myself (little known fact, fall is the best time for the beach here, the water is totally clear, slightly cooler than it's normal 'bathtub' or 'urine' temperatures, and there's no seaweed) and the weather is still summery perfection. I always feel like this time of year is sort of a brand new start - perhaps a bit of that lingering 'back to school' mentality - a great time to make goals, take stock, perhaps slow down a bit, and renew priorities. So that's been my focus these past few weeks.

Mood Fabrics Marc Jacobs Floral + BHL Holly Jumpsuit

And of course I've been sewing! Because 'life' would not be 'life' without the feel of fun new fabrics and the whir of my little machines. I've mostly been focusing on my latest make for the Mood Sewing Network - this fabulous Holly Jumpsuit made up in a bubblegum pink, vintage-y Marc Jacobs viscose print (no longer available online). I originally fell in love with the sister color-way of this fabric (coral and yellow flowers on a deep blueish-purple background) but sadly my 'buy now' fingers were not fast enough and it was sold out in the blink of an eye. Devastated, I consoled myself with this, slightly odd, pink, blue and green yardage you see here. Pink and green seems like a bit of a peculiar color combination to me, but I think that's precisely why I ended up loving this fabric. The green tones down the overall Barbie vibe of this pink and takes into a more unique, even modern, territory. 

Mood Fabrics Marc Jacobs Floral + BHL Holly Jumpsuit

The pattern is of course non other than By Hand London's newest pattern release, the Holly Jumpsuit. I was pretty smitten with the cowl-necked, disco fabulous version of this pattern as soon as I saw it. Many of the versions I've been seeing pop up in the ol' blog feed since the release have been from pattern testers who either tested an earlier version of this pattern, or Variation 1, featuring a cute button-up bodice. Don't get me wrong, those versions are fabulous, but it was this 'Bianca Jagger goes to Studio 54' view that really stole my heart. I wasn't completely sold on using this Marc Jacobs print to make this pattern at first (I had visions of 40's inspired fall dresses) but after a quick consultation with my pal Heather Lou (always a good idea to keep sewing friends on speed dial - or in this case, email - in the event of just such a conundrum) I decided a head-to-toe pepto-pink-and-green look was exactly what I needed in my life!

Mood Fabrics Marc Jacobs Floral + BHL Holly Jumpsuit
Crazy eyes!!
I actually made two - count them, two! muslins of this pattern because I wasn't completely confident about the fit - jumpsuits are kinda tricky like that. I went with a size US8 and the first muslin (here and here) seemed to have a lot of excess fabric pooling above the waistline of the back bodice and some horizontal pulling at the bust. I pinched out the excess fabric at the back and then performed a small 1/4" FBA (full bust adjustment) - not something I usually have to do - to the front bodice, rotating the dart into the pleats of the cowl neck. I felt like these were pretty big pattern changes to make so I went ahead and made another muslin to check fit again, but decided to check the FBA changes before adjusting the back bodice, because I had read somewhere that you should only make one fitting adjustment at a time. Well, my second muslin (here and here) had a nice, neat looking back without any fabric pooling, but my horizontal lines at the bust were still there! Not to mention that the FBA had added width to the side seams (as it's supposed to do) which in the second muslin I felt like I could do without. But I was muslin-ed out and deemed my second go around 'good enough' and decided to cut into my fabric. Also, my deadline for my post was fast approaching... decisions had to be made. 

Mood Fabrics Marc Jacobs Floral + BHL Holly JumpsuitMood Fabrics Marc Jacobs Floral + BHL Holly Jumpsuit

As I was cutting out my fabric I gave absolutely zero thought in regards to print placement. Like less than zero. Seriously, it didn't occur to me at all. Which means that the fact that those green flowers are so evenly placed down the front of my legs leaves me pleasantly baffled! However, not all my cut pieces were quite so serendipitous... my original front bodice piece (which is cut on the bias) featured two big ol' green and blue flowers right over each breast! Yep. Way to go, Sal. Luckily I had just enough fabric left to cut myself another bodice with less suspicious flower placement. 

HOWEVER!! After I cut bodice numero uno (the one with the FBA, remember?) I noticed that it grew considerably due to the bias cut in my fabric. Turns out this Marc Jacobs viscose/poly silky, crepe-y, magical fabric is quite susceptible to shiftiness and stretching on the bias! Which means... when I cut out my second bodice I decided I didn't need the extra room after all and went with the originally drafted bodice straight out of the packaging. Yes, that means what you think it means: THOSE TWO MUSLINS WERE FOR NOTHING!

So my final thoughts on fitting this pattern are: 1) a drape-y fabric can hide a multitude of fitting sins 2) strap length can also make a huge difference with this pattern (in my case, it got rid of all that mysterious back bodice excess fabric I mentioned way back in muslin #1) and 3) The BHL gang are currently executing a Holly Jumpsuit sewalong with a myriad of fitting posts!

Mood Fabrics Marc Jacobs Floral + BHL Holly Jumpsuit

Putting this jumpsuit together was really quite straight forward. Those BHL ladies wrote some fine instructions, and, remember, I had already sewn it twice before (no, I'm not still bitter...) I decided to give my pants a deep, 3" hem, and I hemmed them to wear with my clogs. For reference, I'm about 5'6" and my clogs have about a 3" heel. I didn't have to add any length to the legs because these suckers are loooong as drafted.

But just because the instructions and process was straight forward doesn't mean that I didn't muck it up. I ended up cursing my way through attaching the bias binding along the back, armholes, and extending into the shoulder straps. You guys. I. hate. bias. binding. I glued that shit down and used about a thousand pins per inch and still it somehow managed to shift out of place under my presser foot. I think in the future I'm just going to hand sew it in place. It will probably take less time overall once you consider all the unpicking I have to do! But it turned out fine in the end *deeep sigh*.

The other place I made a major cock-up of things was with the zipper. In my sewing haste I did not stop to consider that my bias cut front bodice may have continued to grow as I was working on it and therefore when I went to attach my zipper my waist seam was way off. If you squint you can see it in the photo above. And I left it like that... because.... pink jumpsuit. More of the 'frosting' type of garment than the 'cake', wouldn't you say? In other words, as much as I love my finished jumpsuit, it probably won't be a wardrobe staple, more of 'special occasion' getup. And on those 'special occasions' no one will be looking at my waist seam.

Especially after I stun them with my sweet sweet dance moves!!

Mood Fabrics Marc Jacobs Floral + BHL Holly JumpsuitMood Fabrics Marc Jacobs Floral + BHL Holly JumpsuitMood Fabrics Marc Jacobs Floral + BHL Holly Jumpsuit

Ah HAH! You thought my title for this post was completely arbitrary, didn't you!?!? No no! There is always a method to my madness! In this case, I took those disco vibes I was getting from this pattern very literally.

Now I would like you to imagine me pulling out my worst best dance moves in front of my tripod, with a self timer, on this residential sidewalk, in front of some stranger's home, at around 5pm when everyone is driving home from work.  Picture it in your mind...

YOU'RE WELCOME!

Mood Fabrics Marc Jacobs Floral + BHL Holly Jumpsuit

And on that note, I'll sign off! Until next time, my friends, Happy trails!

xx

*The fabric for this post was provided to me free of charge by Mood Fabrics*