11.06.2016

and now for something completely different...

DSC_0343

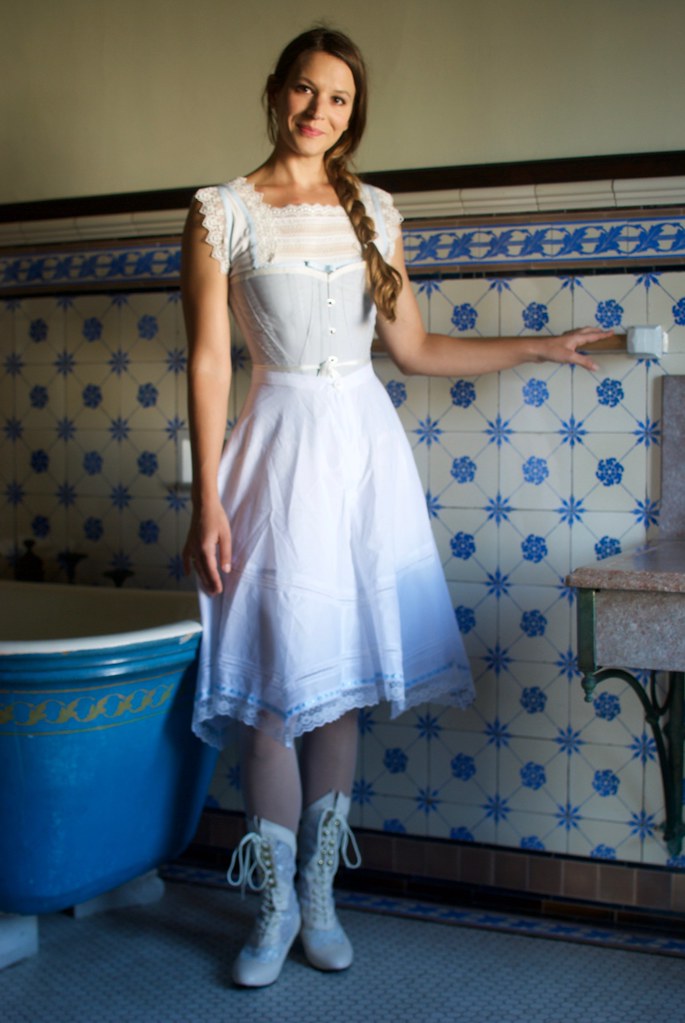
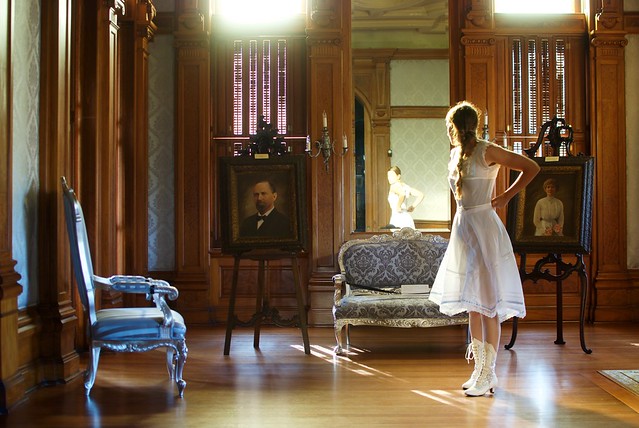
What is going on?!?!?! Why am I dressed like this?? But more importantly - why am I taking photos INDOORS?!?!?!

Has Hell frozen over?

Is it the End of Days?

Clearly I have some explaining to do... Get ready for a long post.  Grab some tea (or a beer). I'll wait.

Edwardian Undergarments

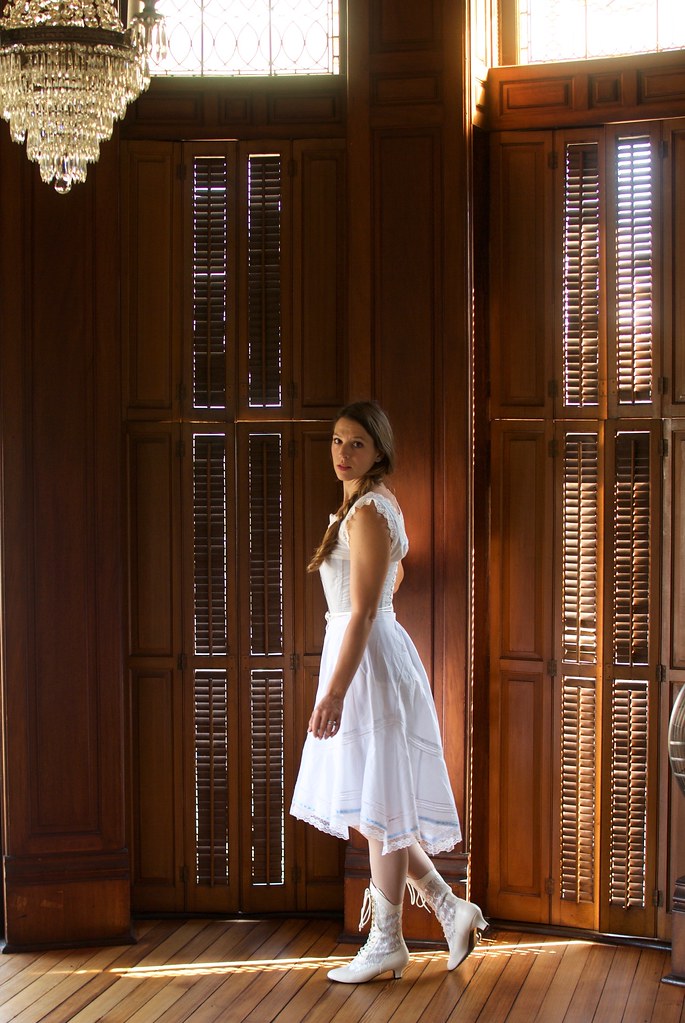
Okay, I get that this post probably comes as zero shock to anyone who follows me on Instagram, but for those of you that don't, let me introduce you to my historical costume.  Or at least the beginnings of my historical costume.  There will be more, because what you see here is just my underwear.  And while this involves more clothing than I wear in the middle of January, as a proper old-timey lady I wouldn't be caught dead in public while so scantily clad! 

So let's start at the very beginning (a very good place to start)...

My husband, Nick, works for the Galveston Historical Foundation, who every year hold a large event in December called Dickens on the Strand.  Perhaps you're wondering why on earth there is a celebration of Victorian England in Galveston Texas? A very good question. And one I don't have a great answer for. But as I understand it, the Strand in Galveston, which boasts some beautiful buildings from the mid 1800's, was basically abandoned and neglected and there was a big push in the 1970's to save some of the old buildings from demolition. So one of the things they did to raise awareness of preserving Galveston's historical architecture was to hold a Victorian celebration downtown, which was Dickens on the Strand.  Galveston is home to many festivals and celebrations, and they are particularly fond of ones where you get to dress up, so Dickens is right at home.  People come from all over dressed in their Victorian finest. Also their Steampunk finest. And their Pirate finest... the definition of "Victorian" is very blurry here...

Edwardian Undergarments

Last year, I was asked to fill in as a judge for the costume contest, a role I was more than happy to take on, as I've always had a soft spot for period clothing, and I LOVE judging people! (Just kidding. Kinda...) So at the eleventh hour I borrowed a costume from the Historical Foundation and attended my first Dickens on the Strand. And it was a blast.  However the entire day I felt like a fraud in my borrowed costume.  

I know I'm not alone when I say that I grew up reading Jane Austen and the Brontë sisters, Henry James and, well, Charles Dickens, that I'd rather spend my Saturday nights watching a period film - any period film - simply to ogle at the costumes - than go out and socialize with real people from my own time period, and the only reason I held on to Downton Abbey for as long as I did was to see Maggie Smith as Lady Violet.  Basically, my love for fashion stems from my love for historical fashion.  As an art student I always loved Art History for its ability to bring History to life, to literally put a picture to a historical moment, a political movement, to revolution, to cultural shifts.  I feel that fashion history does something similar in such an intimate way.  We all have a connection to clothing. 

What I'm trying to say here, is that I was more than a bit excited to have an excuse to make a historical costume! 

Edwardian Undergarments

But let's be real. Historical costuming is uncharted territory for me.  I've always been thoroughly practical with my personal sewing.  The goal has always been to build a handmade wardrobe, which I will continue to do.  Historical sewing is rather a different niche from the one I'm used to occupying in the sewing blogosphere!  So I knew I had to proceed with caution. 

First, I did my research.  I learned about the fashion of the Victorian period.  And I honed in on what interested me.  I found I was much more drawn to the styles of the 1890's through the turn-of-the-century.  Queen Victoria died in 1901, however she had really ceased to be a fashion icon before then. The styles I was more interested in were early Edwardian, or very very late Victorian.  This is also an era that I found to be very underrepresented at Dickens on the Strand, which definitely prefers the bustles of the 1880's (which I always think makes everyone look like a pair of curtains) or the hoop skirts of the 1860's.  These are also more true Victorian examples.  

But here's the thing.  Making a historical costume is a lot of work.  So I decided if I was going to put in all the work it better damn well be something I loved.  Which meant no curtain dresses for me! I found a pattern to work with which was a nice mish-mash of late Victorian and early Edwardian styles (more on that to come) and decided on Edwardian undergarments to accentuate certain features of the design.

Edwardian Undergarments

All of the patterns for my undergarments are from Truly Victorian.  I bought their Edwardian Underwear set - which came with a pattern for a chemise, drawers, and a corset cover - and the 1903 S-bend corset, which is based off of an actual corset from 1903.  

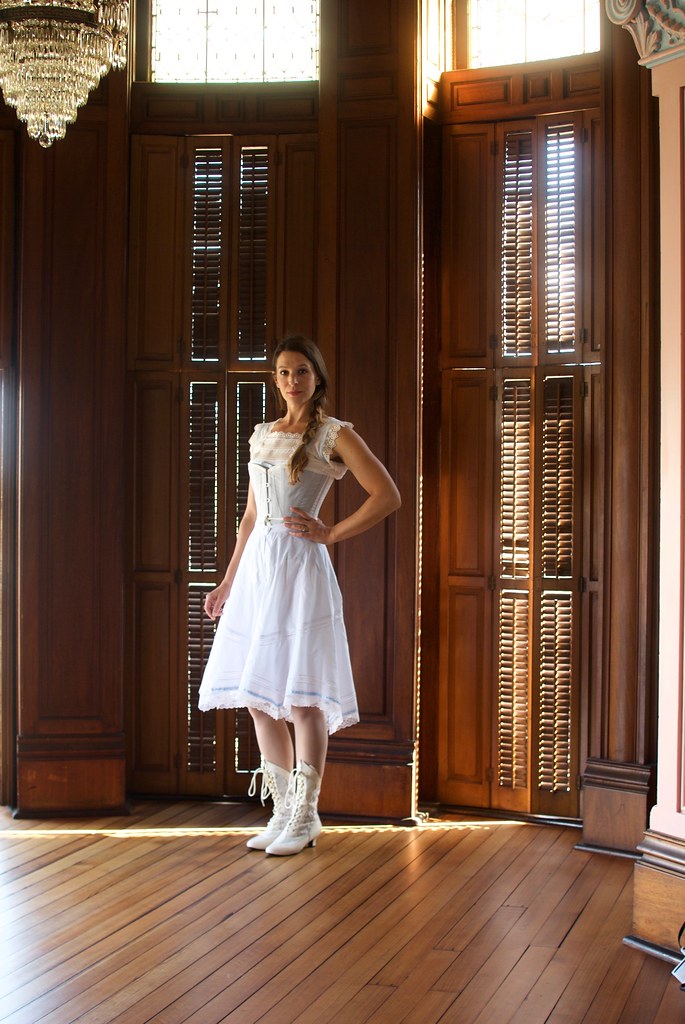
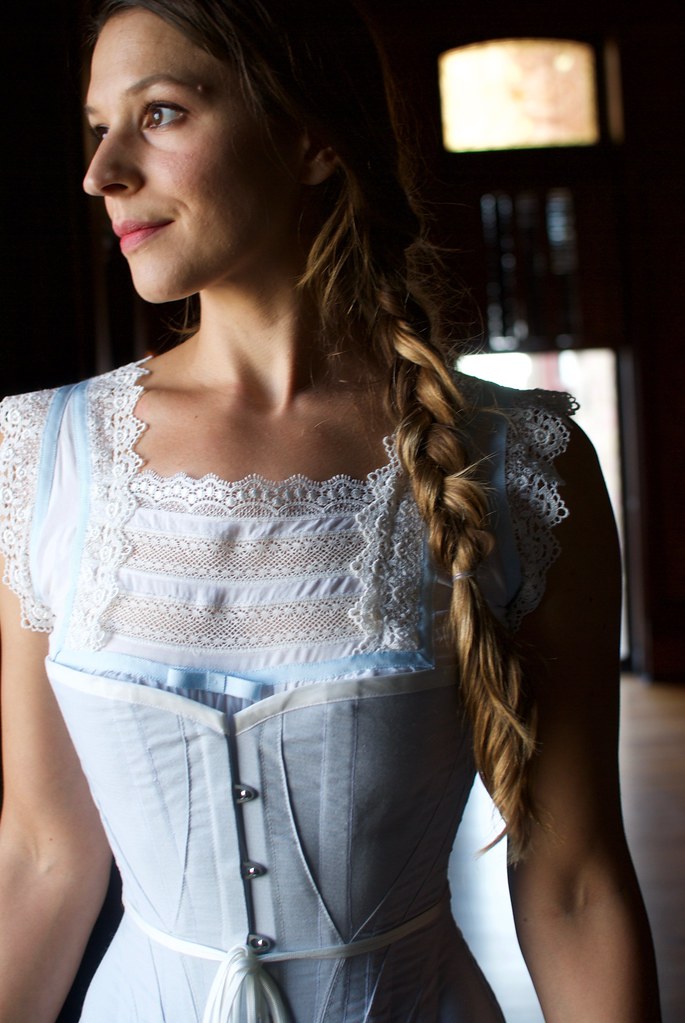
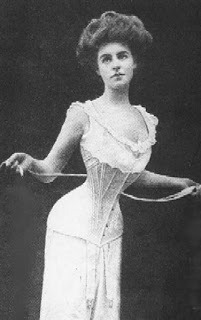
The Edwardian silhouette was quite singular, and just as it is today, undergarments were key in achieving the desired look (don't believe that this is still true today? Take a look at a push-up bra). Towards the end of the 19th century, women's bodices started to show a pronounced, full, low bust, called the 'pigeon-breast' or 'pouter-pigeon' which was accentuated by a nipped in waist (usually highlighted with pointed and arched belts) and skirts which were slimmer over the hips.  This silhouette became more exaggerated into the early 20th century, with bodices becoming even fuller and 'poutier' and skirts becoming even more slim, and featuring a trumpet flare.

Edwardian Undergarments

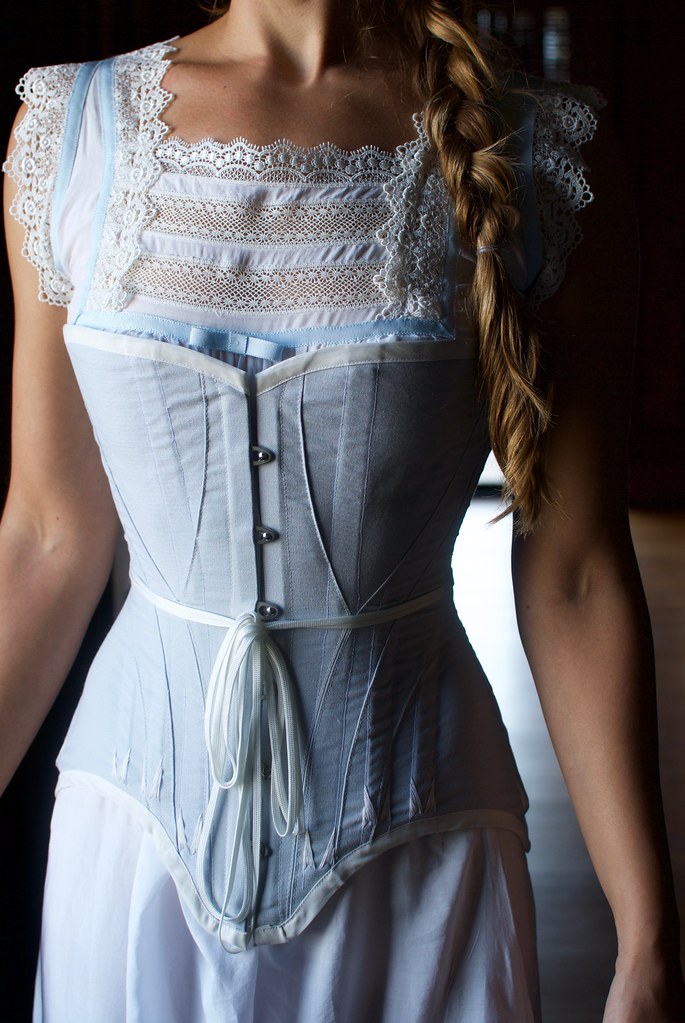
The foundation for this silhouette was the S-bend corset.  This style of corset differs greatly from the traditional hourglass corset of the Victorian era.  It features a straight front which subtly shifts the wearers posture so the bust pushes forward, and the hips and rear push backwards, creating an 'S' shape from the side.

There is much to be said about the history of corsets and the politics surrounding them.  I doubt there is a single item that gets pointed at as the symbol of women's oppression more than the corset.  Personally, I've always viewed corsets as rather democratic.  It's not like once they fell out of fashion so did unrealistic expectations of women's bodies! Instead, the post-corset era demands that women strive for an unattainable ideal through fad diets, exercise, or (perhaps most frustratingly) "good genetics" (#iwokeupthisway).  Which seems way more oppressive, and ultimately soul-crushing than saying "Here, strap this thing on your body, hold your breath, and pull these strings. You'll look great! Sure, you might get indigestion and constipation, but at least you can take it off at the end of the day."

Edwardian Undergarments

The s-bend corset was actually marketed as a "health corset" as it was designed to not compress the stomach or lungs as much as the Victorian hourglass shape.  When worn correctly, the s-bend corset nips in the soft part of the waist, then flares out over the ribcage and bust.  As I mentioned previously, the bust and hips would have been padded out to exaggerate the wearers shape, giving the illusion of a much smaller waist. 

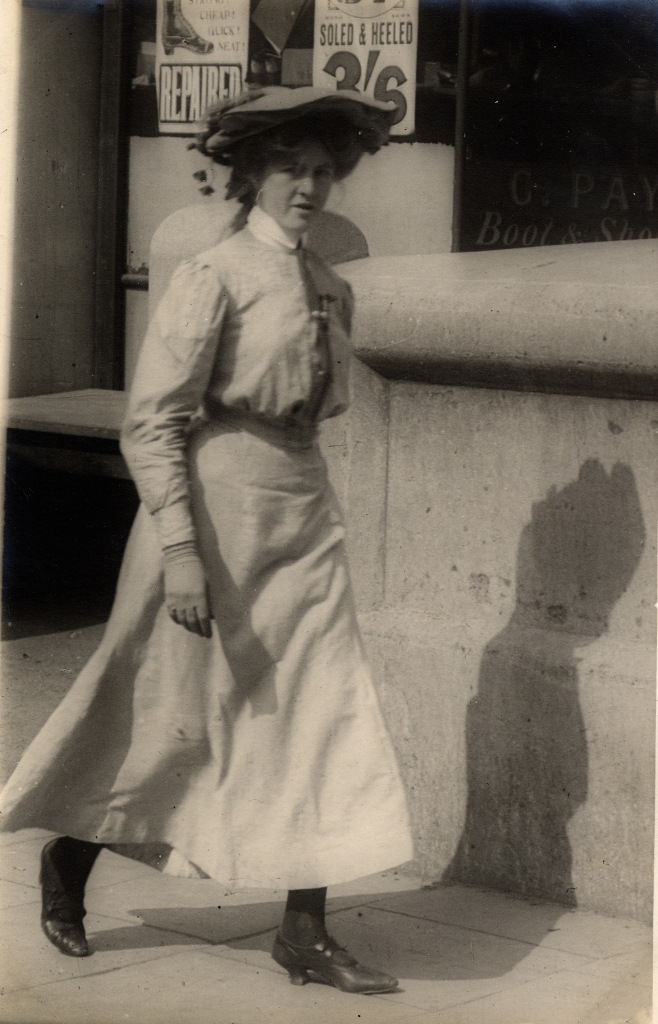
When you look at images of women from early photography and the turn-of-the-century it's important to distinguish between photos meant for fashion, or fetish purposes, which are almost always altered (images like this, or this) and photos of actual women going about life, or having their portrait taken.  When you look at the latter images it becomes clear that the average woman wasn't lacing her corset to extremes.  Sure, many factors contributed to women being on average smaller than women today (in both height and girth) but you also see a variety of proportions and body types that has nothing to do with corsets.

I obviously do not wear this corset with any regularity or for long periods of time, but I have found it to offer quite a lot of flexibility with size.  In the photos here my waist is about 1 inch smaller than my natural waist measurement.  I think it might look like more because of the way the corset distributes the width around the body, making it appear smaller head-on, but actually thicker from the side.  This is actually quite comfortable for me.  I've also laced it with no  reduction in my measurements, letting it just be a foundational layer that creates an exaggerated shape, and I've also pulled the laces as tight as I can, reducing my waist measurement to about 2 inches.  More than that just wasn't going to happen! I found that the 1 inch reduction was my happy place, where I feel comfortable enough in this to wear for longer periods of time, and so I've used this to base my measurements on for the rest of my costume.

I also haven't padded out my bust or hips, therefore I'm not really portraying an actual ideal Edwardian silhouette. But honestly, there is just a lot of details to consider when making a historical costume that some of the elements had to be overlooked or else I'd never get this done on time! Perhaps I will add to it in the future...

Edwardian Undergarments

I had a blast making this corset! From a strictly engineering standpoint it is a fascinating garment! I have no prior experience with corsetry, and this particular design is suggested for experienced corset makers.  Whoops. Well, all I can say is that I generally do best when I dive headlong into a project!

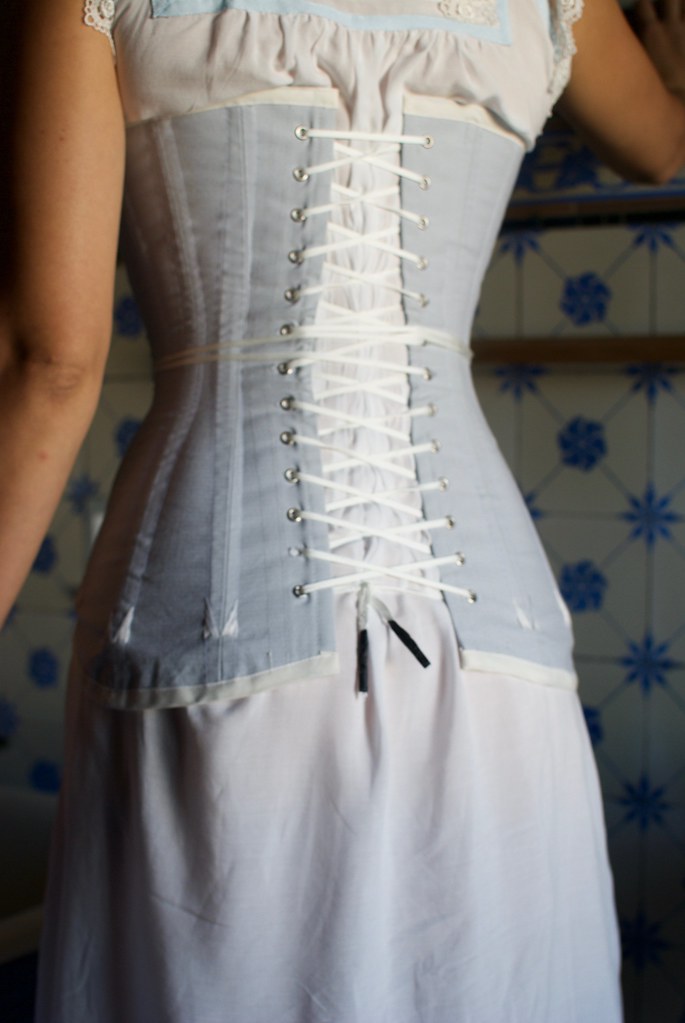
All the materials for my corset were bought from Farthingales Corset Making Supply.  The fabric is a blue-gray coutil and I used a 13 inch busk.  For boning, this corset calls for 1/4 inch spring steel bones, which bend front-to-back, but not side-to-side.  Two bones are placed side to side in 3/4 inch bone casing which I stitched down the middle to create two channels.  The corset is unlined, with most of the raw edges concealed by the casing, or else pinked to prevent fraying.  I bought my grommets from Gold Star Tools and I used their heavy duty press to both punch holes and set the grommets.  This worked well, however I think the hole punch was just a tad too big for this size grommet, and for this particular garment which needs to withstand a lot of strain.  There doesn't seem to be quite enough fabric for the grommet to "bite" into, so when I pull my corset tight the fabric strains around the grommet.  I don't think this will prevent me wearing it for costume purposes, however if I ever make another corset I think I will use a smaller size cutting die, or simply an awl to make the holes.

Edwardian Undergarments

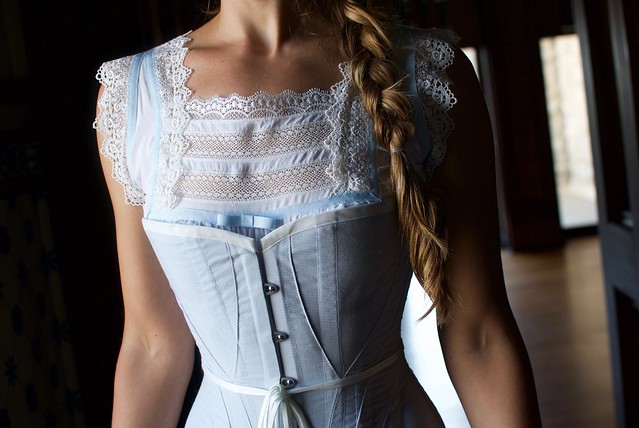
Typically, corsets from this era would have been adorned with lace and ribbon at the top, but I kind of liked the look of it plain, and I was also looking to cut corners where I could.  I did, however, make time to apply flossing to the bones, which are those little pointy embellishments you see along the bottom of the corset.  Flossing is a type of functional embroidery, meant to provide additional strength to the garment to prevent the bones from wearing through over time.  Again, this is really unnecessary on my corset as I'll probably only wear this maybe once a year, but I thought it was a pretty little detail and it provided an opportunity to learn something new, as I've never embroidered anything before! Flossing could get quite elaborate, particularly on Victorian corsets.  I went with the most simple design I could, as I was literally learning on the job.

  Edwardian Undergarments

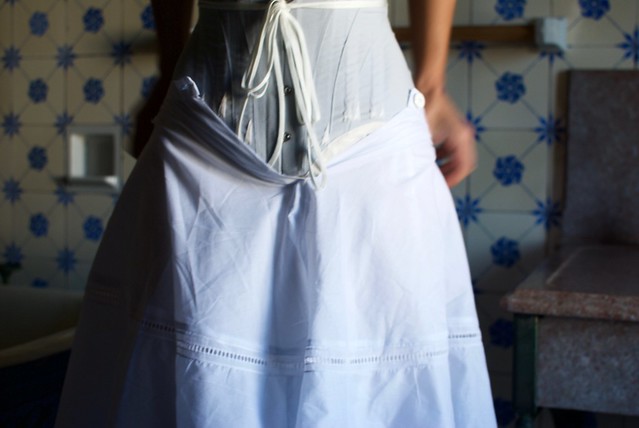
My chemise was actually the very first component that I made for my costume.  A chemise is like a long undershirt that was worn directly next to the skin and protected the corset, and the gown, from sweat, and body oils.  Women would have owned more chemises than gowns, and they would have been washed much more frequently than the rest of their wardrobe.  During the Victorian era, chemises were quite simple and very simply adorned, or completely plain.  However, underwear in general became frillier and frothier into the Edwardian period, so this was an excellent opportunity for me to learn my way around applying trims and lace insertion -- two techniques that I have never done before.

Edwardian Undergarments

I used a cotton-viscose blend batiste for my base fabric because it was incredibly soft and lovely and it would feel nice next to my skin.  Viscose obviously wasn't available as a fiber during the time period, but I had this fabric in my stash, and it does lend a lot of softness to the fabric.  Just as I occasionally had to cut corners with certain details, I also tried to source as many of the supplies from my stash as I could, because historical costumes ain't cheap! 

The blue ribbon is a cotton petersham. As you can see, I have a bit of a blue and white color scheme going on here! There are three types of lace on my chemise.  The wider, pointy lace edging is soft and made of cotton, and I chose it because a) I thought it was pretty and b) I thought it would feel nice, as sometimes lace can be scratchy.  This was my first time doing lace insertion, which is those strips of lace interspersed with fabric that you see on the yoke.  This was one of those techniques that I had always assumed involved some kind of witchery, but is actually really straight forward.  You simply stitch the lace down on top of the fabric using a zig-zag stitch along each edge.  Then you slice down the center of the fabric underneath it, press is open, then zig-zag over the lace edge a second time, and finally trim away with raw edge of the fabric on the wrong side.  The raw edge of the fabric is prevented from fraying by the zig-zag stitch.  Witchery it is not.  Tedious? Yeah, a bit.  It wasn't too bad on the chemise as I was only adorning a small area. 

I should also mention that the instructions for this pattern don't really tell you how to do any of this. They simply say something like "decorate as desired" or "finish with trim".  So I had to do some Google image searching to see examples of chemises.  Then some more googling to find tutorials on how to do lace insertion, how to miter a corner when applying ribbon trim, etc. Try googling "heirloom sewing techniques" and you'll find a lot of great tutorials for lace insertion, piping, tucks and other such old-timey embellishments.

Edwardian Undergarments

I love this photo, as it seems so scandalous, and yet I'm still wearing multiple layers of clothing!

These are my French drawers. Again, they differ from Victorian drawers as they have a much fuller, and shorter leg.  Often times the drawers were attached to a corset cover on top, making for a set of "combinations".  Spoiler alert: I didn't make a corset cover.  Nor did I make a petticoat. Again, maybe next year.  The French drawers feature a split crotch, to allow for the Edwardian lady to visit the outhouse without taking off fifteen layers of clothing in the process.  I suppose the split drawers also allow for easy access for other activities...?  Still, I'm not looking forward to using the toilet in this getup, as it's quite a lot of fabric to maneuver...

Edwardian Undergarments

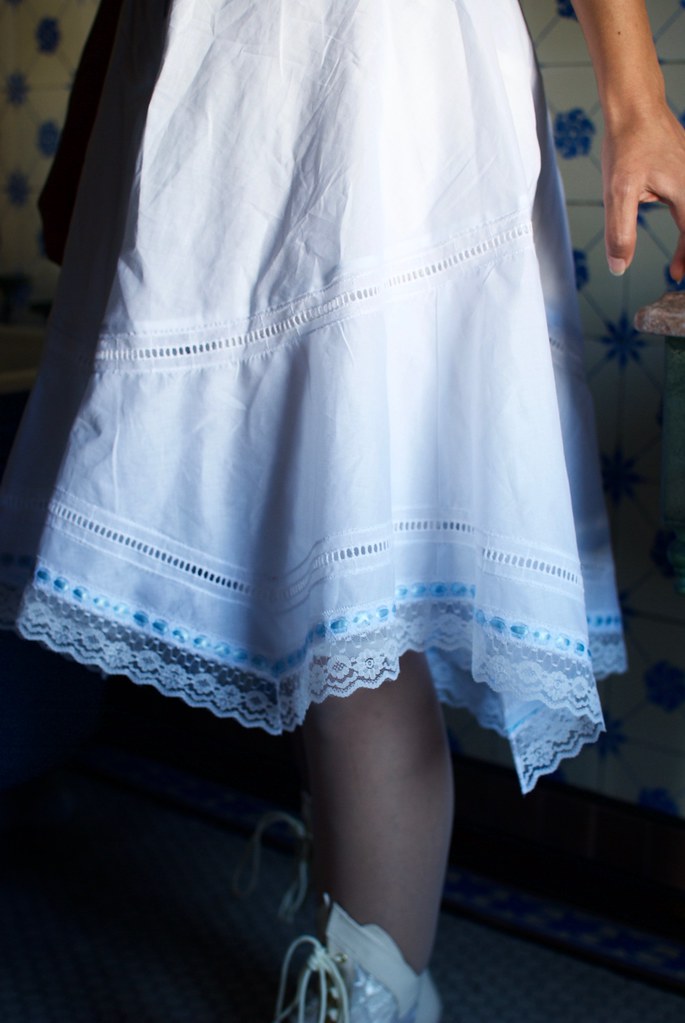
I used a cotton lawn for these, also from my stash. The drawers are, once again, embellished.  These drawers feature a curved hem, finished with a pointed flounce.  To highlight the style lines I used cotton faggoting insertion, applied in the same way as the lace insertion described above.  The flounce is finished with a row of faggoting insertion again, and then lace beading, and a wider lace trim.

These. Were. A. Pain.

Yeah, that was a lot of insertion. It took me forever. The lace edging was actually two separate trims that I had to stitch together first then apply to the hem.  The shaped leg and pointed yoke meant that I was having to get fancy with mitering the trims, which took some trial and error to get right.  And none of this will actually be visible in my finished costume...

Sigh.

But isn't it pretty?!?!

DSC_0340

On that note, perhaps you're wondering... Why??? Why go to all this trouble for something I'll only wear once, maybe twice? Why go to all this trouble for such an impractical garment? Especially when it's So. Much. Work.

Well, I've had a lot of time to think about this (while cursing over cotton faggoting).  The main reason I'm doing this is quite simply -- because it's fun.  Honestly. This has been the most engaging, challenging sewing I have done in awhile.  This is not to say that I don't love making modern things, but it's actually really liberating to sew something simply because you want to. With no practical concerns whatsoever.  Not to mention, a privilege. I've always loved indulging in a few fantasies, and making this costume has appealed to that side of me ten-fold.

The other reason is, as I said, for the challenge of it.  I've had to learn new techniques, research materials and methods, not to mention the historical research that has gone into it.  While some of those new skills probably won't translate to my modern sewing, some have already got my wheels turning for how I can incorporate them into something more wearable everyday.  I'm particularly enamored with the lace insertion. This is a detail which crops up a lot, as Victorian elements are always coming in and out of style.  I am envisioning making some poet sleeve blouses with lace detailed yokes...

So, if you've ever had a desire to make a completely impractical garment - Cosplay, a ballgown, a wedding dress - I highly encourage you to do it.  If for no other reason than to remind yourself why you love this craft to begin with.

DSC_0341

And THAT, my friends, concludes this mammoth of a post! If you made it to the end, bravo! Obviously I had a lot to say on the subject of historical costumes, and I hope I didn't bore you all to tears!

But, before I go I would be incredibly remiss if I didn't extend a few thank you's for this post.

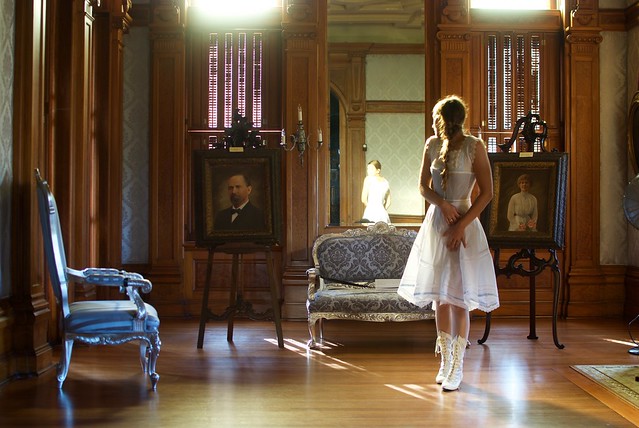
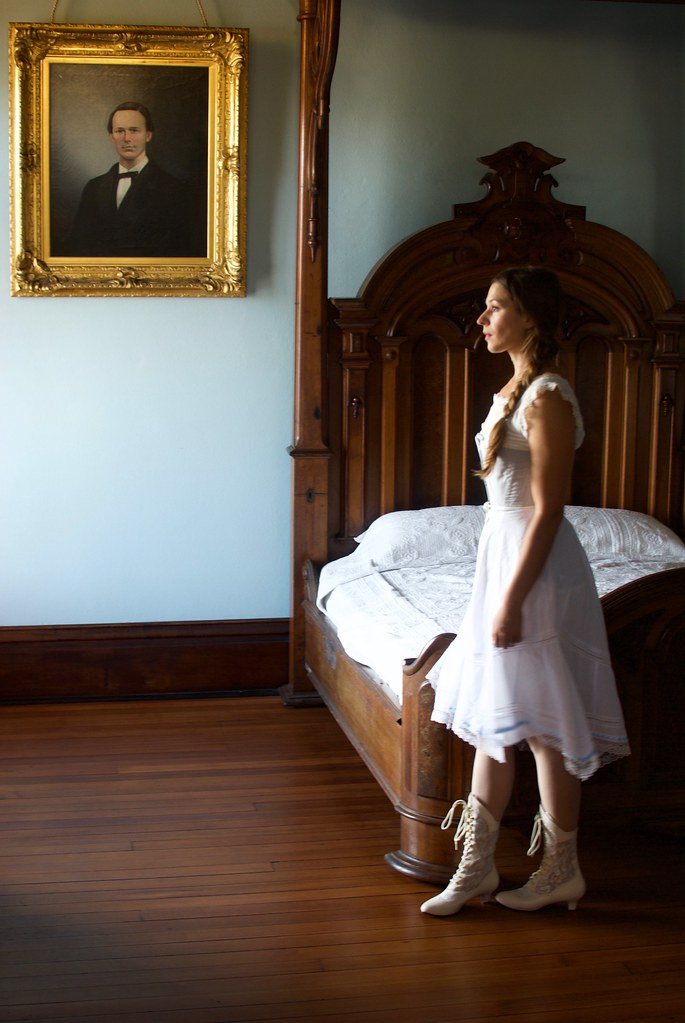
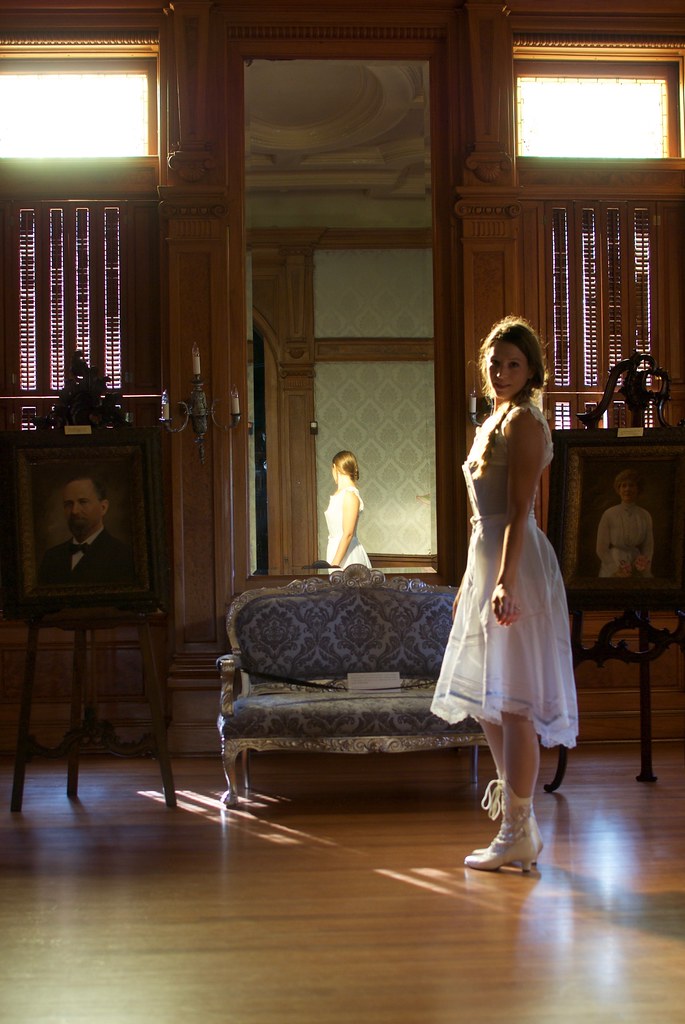
First, a huge thank you to the Galveston Historical Foundation for granting me access to one of their properties, Bishops Palace, after hours, to take these photos.  I don't usually spend my days swanning about in such luxurious interiors, so it was a treat to play dress-up and make-believe for a bit on this sunny Saturday afternoon.  If you're ever in Galveston, make some time to tour this gorgeous mansion.  Everything in here has been preserved to the original decorations, and all the furniture you see in these photos is original to the house. And these photos only show a small sliver of its beauty.

And finally, many many thanks to Nick for taking my photos, for getting me permission, for unlocking the doors, framing the shots, and only jumping out at me to scare me out of my boots a handful of times.  And, of course, for not laughing at me when people on the street were looking at me like I've lost my marbles. 

That's all folks! Stay tuned for Historical Costume Part II: The Attack of the Taffeta Skirt!

xx

10.29.2016

high visibility

Safety Orange Ponte | Named Beatrix Skater Dress

Hello from glorious Galveston!! This is truly my favorite time of year here on the Gulf Coast. Surviving our summers is like an extreme endurance sport, but once you're into October the humidity breaks, the breeze has a cool edge to it, and days are clear, bright and comfortably warm. I really do miss the defined seasons of the northeast, but there is a silver lining to every region, and I feel like these blissfully perfect Autumns are ours. 

Safety Orange Ponte | Named Beatrix Skater Dress

So... this dress. Where to begin with this dress? I'll be honest, I think I've written this post about 3 times and every time I keep erasing it.  This dress drags up a lot of conflicting feelings about my body for me.  And every time I sit down to write about it I find myself enumerating all the things I don't like about my figure, and it's just insane. No one wants to read that! Least of all me! So I will just say this -- wearing this dress puts me way outside of my comfort zone, but also kind of makes me feel like a badass.  It's a silhouette that I think I'd normally tell myself was "unflattering" on me and that I should avoid, but I liked it. So I made it. I made it in an arrestingly bright colored fabric that makes it impossible not to be noticed. And I wear it. On perfectly ordinary days. When I was feeling a bit bloated I wore the dress. I ate lunch in the dress. I slumped over at my desk in the dress. I wore normal undergarments and breathed like a human being. And it was fine. I even got compliments on the dress from random strangers.

Safety Orange Ponte | Named Beatrix Skater Dress

I don't like being told what I can do and what I can't do, what I can wear, and what I can't wear. It's why I've never lasted very long at any job that required a uniform or had a dress code. And I especially don't like it when I'm the one telling myself I can't do or wear something.  Oh yeah, Self? Watch me.

This dress may not be the most flattering on me in the ways that women are told we should look in order to be desirable - curvy (but only in certain areas), narrow (but only in certain areas), toned (but only in certain areas).  But you know what? I think my shoulders and arms look awesome in this dress. I love this color on me.  I love the opposing style elements of the mock turtleneck and the cut-away sleeves and the gored skirt.  I love that I love this dress and I'm wearing it despite my insecurities. And that's all there is to say about that!

Safety Orange Ponte | Named Beatrix Skater Dress

Well, obviously that's not all there is to say about it! This is a sewing blog and I should probably talk about the sewing! This dress came about because of a couple inspiring makes I'd seen by two of my favorite sewing bloggers: Erica Bunker and Noble & Daughter.  Erica made a dress out of this bright orange ponte from Mood Fabrics and the color and cut of it just really caught my eye.  Never mind that Erica looked positively fierce in it (but doesn't she always?) It was one of those makes that looked so good it deluded me into thinking I could look just as good if I copied her! Haha! So I did! Kind of. I bought the same fabric, and I was tempted to use the same pattern, the most outstanding feature of which was the mock turtleneck and cut-away sleeve.

Safety Orange Ponte | Named Beatrix Skater Dress Safety Orange Ponte | Named Beatrix Skater Dress

But then I remembered this Beatrix Skater Dress from Named Patterns, which had a similar sleeve/neckline action as Erica's dress, but with the addition of the fun, swishy gored skirt.  I've never made a Named pattern before, but I know they are well loved among the blogosphere.  However, I couldn't recall if I had seen many versions of the Beatrix dress out in the wild. So I googled it.  True to my suspicions, not many came up in the google image search, but one definitely caught my eye - the lovely Charlie's.  I'm so glad I searched for this dress, because I seem to have missed this post when she first wrote it, but it's such a wonderful post! Not only does Charlie look amazing in her dress, but her musings on "age-appropriate" dressing really hit home with me, as I was trying to sort out my own concerns with "figure-flattery" dressing.  

Safety Orange Ponte | Named Beatrix Skater Dress

The actual construction of this dress was a breeze, as knit garments often are. Especially with such a well-behaved ponte.  The instructions weren't too hand-holdy, but they were clear and concise, which was all that's needed, really. The only place where I deviated from the instructions was with the armholes, which instructs you to use bias binding to finish, but I simply turned and stitched using my sewing machine's triple stitch stretch setting.  There were a few places where some of my knowledge and experience with sewing garments made me think "but shouldn't we be doing this..." like with understitching the collar facing, or adding elastic to the waist seam. Neither of these were mentioned in the instructions, and despite my instincts I decided to follow the instructions as written to see how the dress turned out without these construction techniques.  Turns out, the dress is fine, but I still stand by my gut sewing instinct that understitching the collar would help it look a bit sharper, and that elastic in the waist seam would prevent the weight of the skirt from dragging down the bodice. However I hate the way elastic in waist seams feels, and understitching knits can be a chore. So, do it whichever way you want. The dress will still turn out wearable either way.

Safety Orange Ponte | Named Beatrix Skater Dress

So, as is so often the case with making things, this dress was really the love child of two other women's fabulous creations, smooshed together in my brain to make something that feels unique to me.  Thank you to Erica and Charlie, and all you wonderful makers out there for continuously inspiring me!

And if you've ever saw a design and inwardly sighed because you loved it so much, and felt instantly transported into a daydream where you were swanning about in said design, only to have the breaks slammed on your little fantasy by a nasty voice saying "but you could never pull off that look. That style is not for you." Then I implore you to give not two, not one, but zero fucks about that voice and wear what makes you happy, not what you think you should.

Happy Halloween, all you Queens.

xo

9.06.2016

sallie from the block

Safran Jeans

When I put on this outfit I wasn't totally sure if it was working - like, I wasn't sure if what I thought I looked like was representative of what I actually looked like.  Far too many times I've left the house thinking "hell yeah, I am one fine-ass lady" only to see a photo of myself, or a reflection in a window and realize "what the hell was I thinking?? I can't pull off a crop top..." or whatever.  To be fair, that false sense of confidence has gotten me through life pretty well - I think I do a pretty good job of fooling myself and, to a lesser degree, the people around me into thinking I am way cooler than I am. But sometimes I need a reality check.  So I do what I normally do and turned to Nick (note: while this is an outside opinion, it's a pretty biased one as a) he truly does think I'm a fine-ass lady and b) he might be a bit generous with the truth in order to, you know, avoid hurting my feelings, tactful guy that he is. But this still serves my purpose because, as I've noted above, I've been pretty happy in my self-delusion, and a biased outside opinion is really what I'm after).  So I asked him if I indeed looked as hot in reality as I thought I did in my head.  He told me that my shoes were unbuckled and flopping about and that made me look silly (I hadn't totally finished dressing when this conversation took place). Then he told me that if I had a pair of Timberland's I could pull off a "Jenny from the block" look, which basically told me all I needed to know. Any reference -- no matter how skewed or distant -- to JLo and her butt is good enough for me! 

Safran Jeans

And that, my friends, is the long-winded explanation of this post title! Don't you just love my ramblings? Isn't this what you come to this blog for? No? It's not? See, there goes that self-delusion again!

Fine, fine, fine! Let's talk sewing! Let me introduce you to my Safran jeans! This is the newest pattern from Deer and Doe.  They reached out to me, along with a few other ladies, a few weeks ago to see if I would be interested in making up the pants and blogging about them in exchange for an advanced copy of the pattern.  I always love a good pants pattern, and sewing jeans is actually one of my favorite things to make, and this pattern has some really fun details, so I said of course! And eagerly gathered my supplies.

Safran jeansSafran Jeans

I really love the high waist of these jeans, the cropped length, and the angled faux-welt front pocket. Those were the details that really sold this pattern to me.  Overall they are pretty light on classic "jeans" styling, and could easily be made into a cute pair of cigarette trousers should that be your inclination.  Me? I love a healthy dose of topstitching, so I went the whole hog with gold topstitching thread, which I think really pops on this periwinkle blue stretch denim I got from Mood.

The actual construction of these jeans was pretty easy and straightforward for me, having made a fair few pair of jeans in the past.  I followed the instructions for those front pockets, and from there I just sewed according to my own preference.  I glanced at the instructions for the fly front and wasn't too impressed so I followed my usual method - which at this point is a combination of Closet Case Files fly front instructions and Grainline Studio's (I prefer Grainline's order for attaching the fly facing, but like Closet Case Files' for getting the topstitching right).

Safran JeansSafran Jeans

I had a few issues with the fit of these jeans, however after looking at these pictures I'm wondering if its all in my head...?

First of all, let me just say that I am not a perfectionist when it comes to fitting anything, but especially skinny pants made in stretch fabrics.  Some wrinkling and pulling is part of the territory. Also, as a second disclaimer, my body has changed in the past year and I haven't totally got a handle on the fitting problems I might be encountering as a result.  And finally, I'm not a fan of picking apart my makes on my blog - nothing is ever perfect, and I'm okay with that.  But since I encountered various fit issues with this pattern I thought I would tell you about them.

Before sewing these together I basted them to test the fit, as it was a new-to-me pattern, and a new-to-me pattern company.  As I said, I can ignore some pulling and wrinkling on this type of pant, but what does bother me is obviously curved or twisting side and inseams, excessive bunching at the knees and waistline gaping.  I was experiencing all three.  Even though I feel like these pants are cut to accommodate a curvier rear end, I was experiencing a significant amount of gaping at the back waist.  That was easy to fix by taking a wedge out of the center back seam (although I still think I'm getting some excess fabric back there - those horizontal ripples are actually being caused by the waist being too loose and the waistband wanting to slide down).  But the real head scratcher here was in the legs.  My side seams were very curved towards the front of my thighs, and at the ankle the side seam wanted to twist towards the front of my ankle.  My first instinct was that I must have cut the pants off grain, but on further inspection I noticed that the inseam was perfectly straight -- if the pants were off grain the whole leg would be twisting, not just one seam.  The knee area was particularly uncomfortable as there was an excess of fabric bunching up and sort of rotating around my knee.  I'll tell ya, friends, I was stumped as to what was going on! I did what any modern sewist would do and took to Instagram to let my smarter sewing friends diagnose my problems for me.  The overwhelming consensus was that it looked like I needed a full calf adjustment (what?! that's definitely not a problem I've ever had before...) and also that the front thigh was too tight.  As these pants were already cut, any adjustments I was going to make had to happen within the 5/8 seam allowance. So I let out the back calf area and the front thigh area and it seemed to make some difference, but I still feel that slight twisting along the side seam, and it annoys me.

Safran JeansSafran Jeans

Just for comparison I laid my Safran jeans pattern over top of my Ginger jeans pattern (which fit me well) to compare, and the entire cut of the leg is totally different.  The Safran jeans are based on a much straighter block, where the Ginger jeans angle inwards from the hips to the ankles.  Not to get all anatomical here, but I think the more angled cut of the Ginger jeans mimics the natural angle of the femur in most women -- from a wider pelvis to a narrower knee -- than the straight cut of the Safran jeans. This, I think, makes for a straighter side seam, and less twisting and bunching at the knee. I don't think of myself as having full thighs or calves, but my body is undeniably more muscular than it was a year or so ago, and so my thinking is that while the Safran jeans are cut to accommodate a rounded rear end, they may not take into account a muscular thigh - particularly a developed quadricep.  Again, I don't think I have killer quads, but compared to the rest of my proportions (i.e. my waist measurement) they are fuller than this pattern allows for. Frankly, I think my booty to waist ratio was a bit more than this pattern was prepared for too! But thank goodness for stretch denim!

Safran Jeans

All in all though, these pants have been getting their fair share of wear.  As I said before, I love the high waist and the angled pockets, and the bright blue of this denim feels very fresh to me right now. The denim does stretch out after a full day of wearing, and it's most noticeable in the waist which starts to slide down, giving me the dreaded "load in her pants" look that can happen with high waisted jeans.  However, after a quick wash they are back to making me feel like a babe, so I'm ok with that! I think with a few tweaks to the shape of the leg this pattern could definitely see some future iterations. I love it in colored denim, and I just so happen to have some purple orchid colored denim sitting in my stash... Purple pants, anyone??

Hmmm... that might be that self-delusion talking again....


xx

8.26.2016

common welsh green

Mood Fabrics Viscose Crepe | Sewaholic Lonsdale Dress

Probably my dorkiest title to date. If you're not well-versed in the Potter-universe, this title refers to the species of dragon that a certain Miss Fleur Delacour had to pass in the first task of the Triwizard Tournament (Goblet of Fire). And yes, that is just a random fact that I am able to pull out of my brain at a moment's notice.  I often wonder what other things have been squeezed out to make room for all the Potter trivia I possess in my noggin.  This is probably why I can't deal with fractions...

In case I've never mentioned it before -- Hi, my name is Sallie Barbee, and I am a complete Harry Potter fiend.  Please don't tell me you are a Potter fan if you've only watched the movies. Please don't tell me you are a Potter fan if you've only read the books once (pshaw!)  If you've read the books more times than you can count, regularly have Harry Potter movie marathons (even if your heart will always belong to the books) and feel that the best parts of your personality have been shaped by Albus Dumbledore ... THEN we can talk! Just kidding. All types of Potter fans are welcome here. (That's a lie. Movie-only fans, please exit stage right, thanks).

Mood Fabrics Viscose Crepe | Sewaholic Lonsdale Dress

I blame my recent trip to Universal Studio's Wizarding World of Harry Potter for my recently inflamed Potter madness (I say inflamed rather than rekindled, because, as a true fan, the flame never goes out).  Honestly, I wasn't expecting to love it as much as I did. But as soon as I saw Hogwarts and turned the corner into Hogsmead I was overcome with emotion.  It really hit home what a huge influence those 7 books have had on my life.  They are what I (continue to) turn to when I feel stressed, or lonely.  They've got me through breakups and grad school and moving across the country. I listen to the audio books on repeat in my sewing room (I prefer Stephen Fry's reading over Jim Dale). I'm not ashamed to admit that in certain situations I've thought to myself "this is like that time that Hermione did this..." or "that's like when Ron said..." or pretty much anything Dumbledore said to Harry - ever.

Mood Fabrics Viscose Crepe | Sewaholic Lonsdale Dress

Okay, I can see you guys slowly backing away from my blog, smiling and nodding... But don't go! I swear I'm not crazy! Or completely lame. I just really love Harry Potter.  So when I came home from my trip to Florida and began working on this dress, all I could see in its pretty chartreuse and white pattern was dragon scales.  And it will forever, in my mind at least, be my dragon dress. (See what I did there? See? Yeah, bet you didn't think I was ever gonna turn this back around to sewing, huh?)

Mood Fabrics Viscose Crepe | Sewaholic Lonsdale Dress

This is the Sewaholic Lonsdale dress, view B, made up in Limeade/White Tribal Leaf Print Viscose Crepe Common Welsh Green Dragon Scale Print Viscose Crepe from Mood Fabrics, and it is this month's contribution to the Mood Sewing Network.  I've always loved the Lonsdale Dress. Honestly, I couldn't tell you what has taken me so long to make this pattern! Every time I see a version of it pop up online I inwardly sigh - I don't think I've seen a version of this dress that I didn't love.  I think I'm always a bit hesitant to make Sewaholic patterns because I don't typically identify with the pear-shaped body that the patterns are designed for.  The funny thing is, though, that while I mentally don't identify as pear-shaped, and I think physically one wouldn't call me pear shaped, my measurements would suggest otherwise! Just an example of how sometimes labeling our bodies as one thing or another can put us out of touch with the very real, uniquely proportioned body we live our lives in (me?! A pear?? But I always thought I was an apple!!!) Our bodies are not fruit, ladies, nor are they some other inanimate object (ruler anyone??).

Mood Fabrics Viscose Crepe | Sewaholic Lonsdale Dress

I'm stopping myself before I go on a longer rant about that. You're welcome. So for my Lonsdale dress I made a straight size 4 (truth be told my hip measurement does actually put me in a size 2, but the dress skims the hips so I wasn't too worried about it).  It actually ended up a bit loose in the bodice, particularly through the bust, but the fit is so forgiving because of the knotted front and adjustable ties that it's easy to just hoist the dress into a place that feels comfortable and go with it! I decided to use a lapped zipper insertion for the first time in, oh, forever.  Sometimes it's nice to pull out underused techniques, if only to remind yourself that you can still do them.

Mood Fabrics Viscose Crepe | Sewaholic Lonsdale Dress
Please excuse all the bruises on my upper back! I had no idea they were this bad till I saw the photos. Believe it or not, they are from loading barbells on my back...
The fabric was an utter delight to work with.  Viscose is quickly becoming a fiber I keep an eye out for.  Like rayon, it makes for a very breathable summer garment, and it seems to add a certain softness and drape to whatever fabric it's worked into.  This particular viscose crepe has a beautiful weight to it, while still maintaining a lovely fluid drape.  Perfect for a long, swishy skirt.  The crepe texture gives it an almost spongy hand and it has the softness of brushed cotton against the skin. Plus, it's opaque! Hooray for no linings! 

It was a bit of an odd purchase for me, because I would normally have steered clear of chartreuse-y greens, under the assumption that they would look heinous with my skin tone.  What possessed me to buy 4 yards of this, I'll never know! Perhaps it was some "Color Me Beautiful" era deity whispering in my ear, or maybe I was already subconsciously responding to it's dragon-scale charm? No matter, I'm so glad I gave chartreuse a go! Not only does it not do heinous things to my complexion - I actually think it's rather flattering! Especially with a punchy orange-red lip!

Mood Fabrics Viscose Crepe | Sewaholic Lonsdale Dress

This shoulder-baring style, and throw-on elegance feels so right to me for the sweltering late summer days.  The truth is, nothing is going to make you feel cool in this kind of weather, so the least you can do is throw on a bit of color, show some skin, and make the best of it! And this dress has that magic quality of making me feel feminine and flirty and put-together, even if I feel like I'm more ass-crack-sweat than girl at the moment...

And on that happy mental image, I think we'll call this blog post done and dusted! I hope you're all having a glorious August! And to keep with the Potter love of this post, I'll leave you with a few of Albus Dumbledore's choice words:

"Nitwit! Blubber! Oddment! Tweak!"

xx

8.01.2016

post-vacation grays

Mood Fabrics Summer Casual Separates

Phew! Is it just me, or has July really flown by in a steamy wave of hot, sticky, summer days? Seriously you guys... It's already August?! Honestly, I can’t complain, I spent a whole week of this past month vacationing with my family in Disney World – Mom, Dad, sister, two brothers, a sister-in-law, a brother-in-law, and six nieces and nephews all under the age of 8!!! It was the absolute best kind of chaos imaginable. Of course, me being me, I decided I had nothing to wear for said vacation and that I needed a whole new summer wardrobe a smooth 5 days out from my flight. And I had to make my dream capsule wardrobe because... duh! Completely rational. 

Mood Fabrics Summer Casual Separates

This is where I'd normally insert a little anecdote about how I drove myself crazy up until 4am the night before my flight, manically serging seams, and accidentally snipping holes in the crotches of shorts or something, but, actually, the whole thing went pretty smoothly. I finished all my sewing a day or two ahead of me leaving. I know. Totally undramatic ending to that tale. Either I'm getting better at this whole sewing thing, or I just hit a pretty good patch of dumb luck, because that scenario should have been a recipe for disaster!

I did have a few requirements for my last-minute mini vacation wardrobe, which I think helped make things go a bit smoother  – it had to be comfortable, it had to be cool (temperature-wise, though I wouldn’t turn my nose up at attitude-wise either) I had to be able to get on rides in it, and (most importantly) no shmancy new patterns! It either had to be an uncomplicated pattern, or a TNT pattern. Basically something that I could go on autopilot and whiz through without a lot of fussing with instructions or figuring out complicated seams, etc. This meant that I wasn’t making the most exciting of clothes, but, man, have they ever been getting a lot of wear!

Mood Fabrics Summer Casual SeparatesMood Fabrics Summer Casual Separates

I already shared this outfit on the Mood Sewing Network blog, but I'm hoping to share a few more of my vacation makes in the coming weeks. First up was another Grainline Studio Penny Raglan.  If you’ve seen me in the last three weeks, I’ve probably been wearing one of these tees! I am the proud owner of four already, and I just plan on adding more! They are truly my perfect casual top, plus they are dead easy to bang out factory style, so busting out 3 in one go was just about as time consuming as making one. The version pictured here is made in some lovely, drapey Heathered Gray Stretch Viscose Jersey. This fabric makes such a lovely casual top. It’s more opaque than tissue-weight jersey, but still has the same weightless, fluid feel.  It was the perfect pairing for the Penny Raglan.

Mood Fabrics Summer Casual SeparatesMood Fabrics Summer Casual Separates

I had been wanting a loose, casual woven pant to wear on those days when I not-so-secretly resent having to put on clothes (which is, like, everyday).  I’ve seen so many cute styles on blogs and social media, but for some reason I just couldn’t quite commit to a pattern or fabric.  Then one day, I don’t know what happened, but it was like something finally clunked into place inside my brain and I realized I already had the pattern and fabric sitting at home.  With a few minor adjustments to the shape of the leg, the True Bias Hudson Pants made the perfect casual pant I was looking for.  The true icing on the cake was this Rag & Bone Off-White/Black Striped Cotton Woven from Mood online. This is essentially a double gauze fabric, and if you’ve never worked with double gauze what are you waiting for?! It’s so stupidly soft. If I look a bit rumpled in these photos it’s because I’ve worn and washed these pants several times since making them, they are just that good.

Mood Fabrics Summer Casual SeparatesMood Fabrics Summer Casual Separates

True story: I actually bought a few yards of this fabric months ago, and then just last month, while perusing the Mood Fabrics site again, I saw it, forgot that I had already bought the same fabric, and bought some more. And I don’t regret it. You can really never have enough of such a great fabric.  To add visual interest to these pants I cut the pocket bands on the bias, and the waistband, and back pocket on the cross-grain to break up the vertical stripe.  The back pocket I actually added on whim, as it’s not an actual feature of the Hudson Pants, but I wanted something to break up the back view.

Mood Fabrics Summer Casual Separates

I usually have a strict “no pants” rule between the months of June through September, but these pants are so light and airy that they’ve been getting a lot of wear during these steamy days.
Hopefully if I can get my picture-taking and blogging act together I will have more of my quick vacation-wardrobe makes to share with you guys. I won't bore you with every iteration of the Penny Raglan that I make (you can tune into my Instagram for that) but I'll try to throw together another post on the more interesting stuff. No promises, though, it is the end of summer, and the beach is calling my name...

What have you guys been sewing to keep cool? Is anyone thinking about Fall *shudders* ? I'm a bit ashamed to admit that I've been daydreaming about some knitting projects - a sure sign that my brain is coming to the end of summer, even if the hot weather will be sticking around for a few more months!

xx

7.01.2016

hot fun

Mood Fabrics - CCF Sophie Swimsuit

Hello friends!!! First of all, I want to thank everyone for your kind words on my post about Lucille leaving us. I'm sorry I didn't respond to each of you individually, but please know that your thoughts and condolences were deeply deeply appreciated. It is such a comfort to know that so many of you can relate to the very real feelings of grief that we go through when a beloved pet passes.  I know it might seem silly, but writing that post helped me immensely to mourn my sweet girl and move ahead with her memory in my heart.

And as promised, I have been able to get back to what I love and what makes me happy - making and sharing my creative pursuits with you all! And first up is the Sophie Swimsuit from Closet Case Files! I've already shared this suit over on the Mood Sewing Network, but I'm excited to write about it here because I have lots of thoughts on it! So grab yourself a cup of tea (hot or iced) and get ready for a long post!

Mood Fabrics - CCF Sophie Swimsuit

I had actually volunteered to be a pattern tester for the Sophie Swimsuit, so the version I'm sharing is from the beta files.  However, I ended up backing out of the testing process after my dog died because I just wasn't feeling up to it. Heather mentioned she made some changes based on the testers feedback but I feel like the version I made is close enough to the finished pattern that it is safe to share.  I made View B - the high waisted bikini, and before you all ask, yes this version is supposed to have straps, and mine did, but I will explain the saga that led me to photographing it strapless a little later. 

Mood Fabrics - CCF Sophie Swimsuit

I'm just gonna come right out and say that I love this suit.  Especially the top.  Can I get a little TMI here for a second? Of course I can... it's my blog... I do what I want! As I'm sure I've mentioned before, I've been committed to working out regularly for the past two years or so now, and while it's been an overwhelmingly positive change in both my life and my body, one thing that I haven't quite been able to get a grasp on is my boobs. My boobs have majorly shrunk in the past few years and I'm totally flummoxed as to what size bra to wear.  I know I could go to a little lingerie boutique and have myself measured, but the truth is boutique bras are just not in my budget.  And yes, I could make my own bras, but my experience has been that the trial and error of getting a good fit with a bra pattern is a bigger waste of time and money than just buying a slightly ill-fitting bra off the rack.  So I've been buying my bras from Target, in the smallest size they have - a 34B.  I know I'm not a 34B but the fit isn't that bad, so I get away with it.  

Mood Fabrics - CCF Sophie Swimsuit

Enter the Sophie pattern... this is essentially a bra you can go swimming in, guys.  It is so supportive. And the sizing - while not the traditional A, B, C, D cup that you get with bras - is essentially the same. There are 5 separate cup sizes for every size.  I can't even imagine the nightmare it was to draft this, but I'm so glad Heather went the extra mile because it really pays off. You get the band size by measuring your underbust, so around your ribcage with all the air exhaled, then you take a comfortable measurement of your full bust (around the widest part of your back and over the fullest part of your breasts, usually the nipple) while wearing your best fitting bra. Subtract the difference between the two and you get your cup size.  So for me, my underbust measurement was 28" and my full bust measurement is 33".  That is a 5 inch difference which put me at a size 2 with a size 5 cup.

Mood Fabrics - CCF Sophie Swimsuit

This definitely gave me pause because it is so much smaller than my normal size in CCF patterns - I usually wear between a 6 or an 8, but I decided to trust the sizing and I'm so glad I did.  This is the best fitting swimsuit, bra whatever I have worn in recent memory! It's even more flattering with the straps as they help give that extra oomph, but even without it, this top wasn't budging.  I'm really hoping Heather does some tutorials on turning this into a bra because I need this in my life! Now you might be thinking that with my chest size support isn't really an issue, but guys, it is. Now obviously I do not have the experience that my larger chested sisters have, but what I do have is a rack that used to be pretty spectacular, but is now kinda deflated and saggy. Yes. TMI. Get over it. I need all the help I can get to hoist those girls up!

Mood Fabrics - CCF Sophie SwimsuitMood Fabrics - CCF Sophie Swimsuit

By now you're probably wondering what the heck happened to my swimsuit bottoms... Is this some lame action flick where the leading lady's clothes get artfully ripped throughout the movie to reveal more skin? No, no it's not.  I drafted an alternate pair of bottoms for my Sophie swimsuit, and while I completely understand that these are probably not to most women's liking I decided to share them nonetheless.  Surely I can't be the only lady out there who has a weird nostalgia for those high-cut legged bikini bottoms from the late 70's and 80's? You know, the kind that make you look like you have legs for days, and conjure images of a healthily athletic Christie Brinkley cavorting on the cover of Sports Illustrated Swimsuit Edition? Or a fierce Grace Jones? No? Only me? The rest of you are just remembering the perma-wedgie that said swim bottoms induce? Ok fine then... *takes teeny weeny swim bottoms and goes and plays at her own sand castle...*

Mood Fabrics - CCF Sophie SwimsuitMood Fabrics - CCF Sophie SwimsuitMood Fabrics - CCF Sophie Swimsuit

Honestly, I think both bottoms will have their place in my swim wardrobe.  The high waisted, fuller coverage bottoms will be awesome for pool parties, and family time, and the teeny bikini bottoms will be great for my alone time on the beach.

Mood Fabrics - CCF Sophie Swimsuit

As far as construction goes this swimsuit is really no different than making a bra and panties.  My one major tip is to label your two bottom cup pieces because they look super similar and it is easy to get them confused. Ask me how I know... After making two left cups (somehow... I'm still scratching my head about that one...) I cottoned on to this and cut a second pair marking the outer cup with an "O" and the inner cup with an "I" and also drawing arrows to signify which way was up.  I did this on both my foam pieces and my fabric pieces and construction went much smoother. 

With the shaped, three piece foam cups, the underwire channeling and all the elastic, this is most definitely the most complicated suit I've ever made, but it's totally worth it.  Honestly, none of it is that hard, it's just a touch finnicky at times.  If you're at all nervous about making this suit I highly suggest getting Heather's swimsuit workshop.  I'm actually thinking of picking it up just so I can feel like I'm sewing with Heather by my side...

Mood Fabrics - CCF Sophie Swimsuit

Sewing swimwear does require some special materials, so let's talk about those for a bit.  My awesome, graphic, broken glass print fabric is from, where else, Mood Fabrics.  It is 95% polyester and 5% spandex, making it great for swimwear and activewear.  I liked it so much I chose to use it all over, but the Sophie swimsuit definitely lends itself to color and print blocking.  My swimwear lining, underwires, underwire channeling, swimwear elastic, and G-hooks are all from Bra-makers Supply (the foam for the cups was in my stash, but I think originally it was from Bra-makers Supply too... or SewSassy...?).  Overall I'm really happy with the quality of all these things (especially the swim lining... it's niiiiiiice) EXCEPT for the plastic G-hooks. Oy vey...

Mood Fabrics - CCF Sophie Swimsuit

Let me tell you a little story of plastic hardware, a handmade bikini, a sewing blogger, and the hot, hot Texas heat... After finishing my Sophie bikini two weekends ago I decided to take it for a test drive to the beach, like you do.  No sooner had I set myself up in my beach chair, book in hand, the Gulf of Mexico stretching in front of me as far as the eye can see (and a thunderstorm brewing behind me, but let's forget about that part right now) when I bent over to get my water bottle and felt the back of my suit come undone.  I reached around and realized that my plastic G-hook closure had actually snapped off at the joint.  My straps on the suit criss-crossed in the back so the suit stayed on pretty well, and I actually sat back in my chair and read for awhile until the brewing thunderstorm, and my busted swimsuit top resigned me to call it a day.  Back at home I replaced the G-hook with one of the other several I had ordered, and decided to be more careful putting the suit on and taking it off, thinking that I may have bent the plastic in my behind-the-back struggling...

Fast forward to last weekend when I wanted to go to the beach, again, and shoot some blog photos while I was at it.  I put on my suit and, wouldn't you know it, one of the small G-hooks that attaches the strap to the suit front broke at the same joint.  I had extra so I quickly went into my sewing room and replaced it.  I had the car so I decided to drive out to a more secluded beach to take photos.  After lugging all my beach gear, and my camera and tripod, out to the spot in these photos I bent down to set everything down and pop! There goes the back G-hook I had already replaced! I was frustrated, but determined to get these photos, so I went back home, replaced the stupid plastic G-hook, examined the others for weak spots, then drove back out to the same beach, set all my stuff up, turned on my camera and.... no battery.  Nearly in tears, I drove back home, got the camera battery from the charger, grabbed another bikini top just in case, and drove back out to the beach.  Lugged all my shit to my spot, set up the camera and tripod and pop! One of the G-hooks on my other strap broke! So at that point I said fuck it, removed the straps from the bikini and shot the photos strapless! Thankfully the back hook lasted through the photo shoot and a quick dip in the water, but I've learned my lesson. No more plastic hardware! The only thing I can think is that these were just not equipped to deal with the amount of sweat, sunscreen and heat that I require from my swimwear.  I certainly wasn't putting them under undo stress!

Needless to say, I have an order for metal hooks already placed...

Mood Fabrics - CCF Sophie Swimsuit

Well alright cats and kittens! I think that's enough cheeky pictures of my bum and my cheesecake posing and rambling on about boobs and swimsuits and teeny plastic pieces for one blog post.  If you have any questions please don't hesitate to leave them for me in the comments! And I'll be back soon with a recent quick make!

xx