Showing posts with label galveston. Show all posts

11.06.2016

and now for something completely different...

DSC_0343

What is going on?!?!?! Why am I dressed like this?? But more importantly - why am I taking photos INDOORS?!?!?!

Has Hell frozen over?

Is it the End of Days?

Clearly I have some explaining to do... Get ready for a long post.  Grab some tea (or a beer). I'll wait.
Edwardian Undergarments

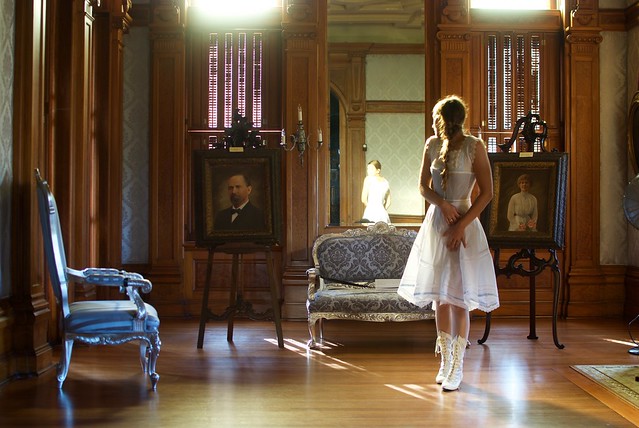
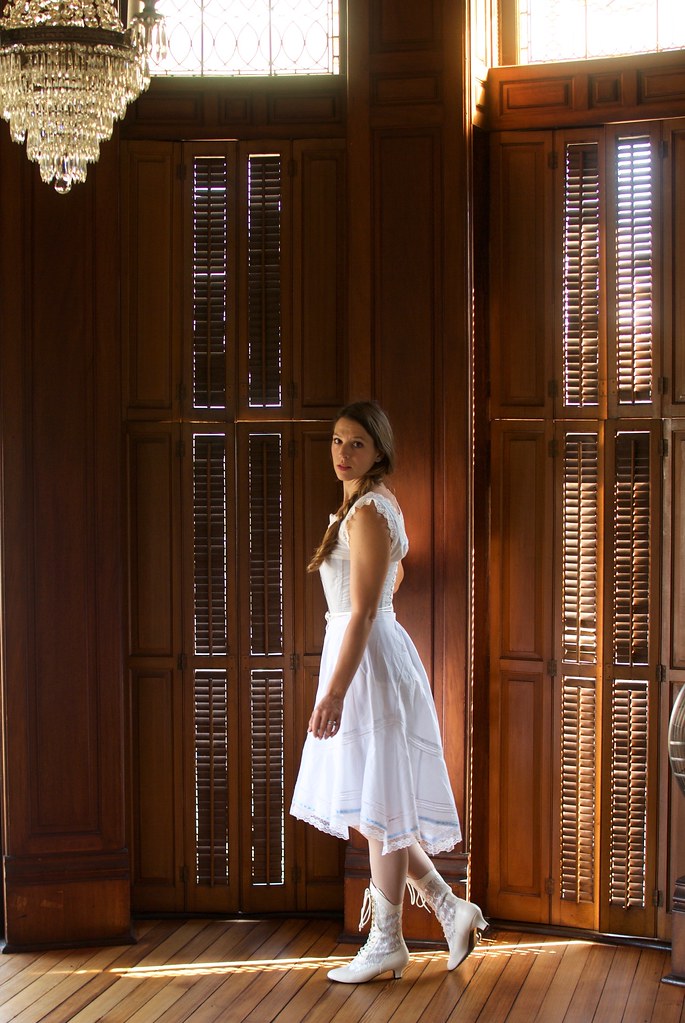
Okay, I get that this post probably comes as zero shock to anyone who follows me on Instagram, but for those of you that don't, let me introduce you to my historical costume.  Or at least the beginnings of my historical costume.  There will be more, because what you see here is just my underwear.  And while this involves more clothing than I wear in the middle of January, as a proper old-timey lady I wouldn't be caught dead in public while so scantily clad! 

So let's start at the very beginning (a very good place to start)...

My husband, Nick, works for the Galveston Historical Foundation, who every year hold a large event in December called Dickens on the Strand.  Perhaps you're wondering why on earth there is a celebration of Victorian England in Galveston Texas? A very good question. And one I don't have a great answer for. But as I understand it, the Strand in Galveston, which boasts some beautiful buildings from the mid 1800's, was basically abandoned and neglected and there was a big push in the 1970's to save some of the old buildings from demolition. So one of the things they did to raise awareness of preserving Galveston's historical architecture was to hold a Victorian celebration downtown, which was Dickens on the Strand.  Galveston is home to many festivals and celebrations, and they are particularly fond of ones where you get to dress up, so Dickens is right at home.  People come from all over dressed in their Victorian finest. Also their Steampunk finest. And their Pirate finest... the definition of "Victorian" is very blurry here...
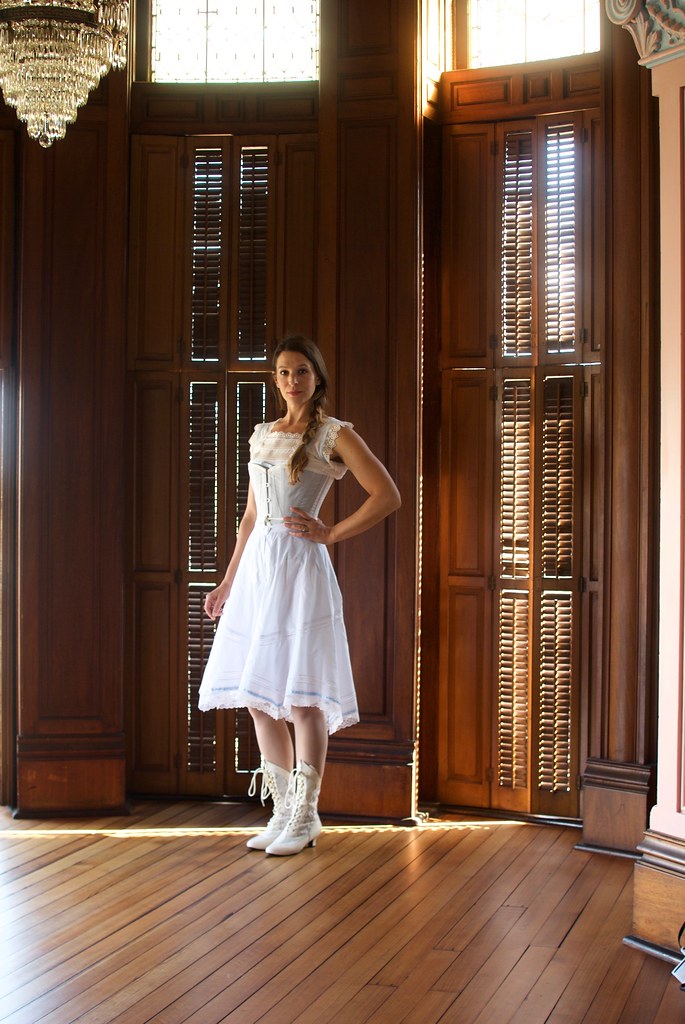
Edwardian Undergarments

Last year, I was asked to fill in as a judge for the costume contest, a role I was more than happy to take on, as I've always had a soft spot for period clothing, and I LOVE judging people! (Just kidding. Kinda...) So at the eleventh hour I borrowed a costume from the Historical Foundation and attended my first Dickens on the Strand. And it was a blast.  However the entire day I felt like a fraud in my borrowed costume.  

I know I'm not alone when I say that I grew up reading Jane Austen and the Brontë sisters, Henry James and, well, Charles Dickens, that I'd rather spend my Saturday nights watching a period film - any period film - simply to ogle at the costumes - than go out and socialize with real people from my own time period, and the only reason I held on to Downton Abbey for as long as I did was to see Maggie Smith as Lady Violet.  Basically, my love for fashion stems from my love for historical fashion.  As an art student I always loved Art History for its ability to bring History to life, to literally put a picture to a historical moment, a political movement, to revolution, to cultural shifts.  I feel that fashion history does something similar in such an intimate way.  We all have a connection to clothing. 

What I'm trying to say here, is that I was more than a bit excited to have an excuse to make a historical costume! 
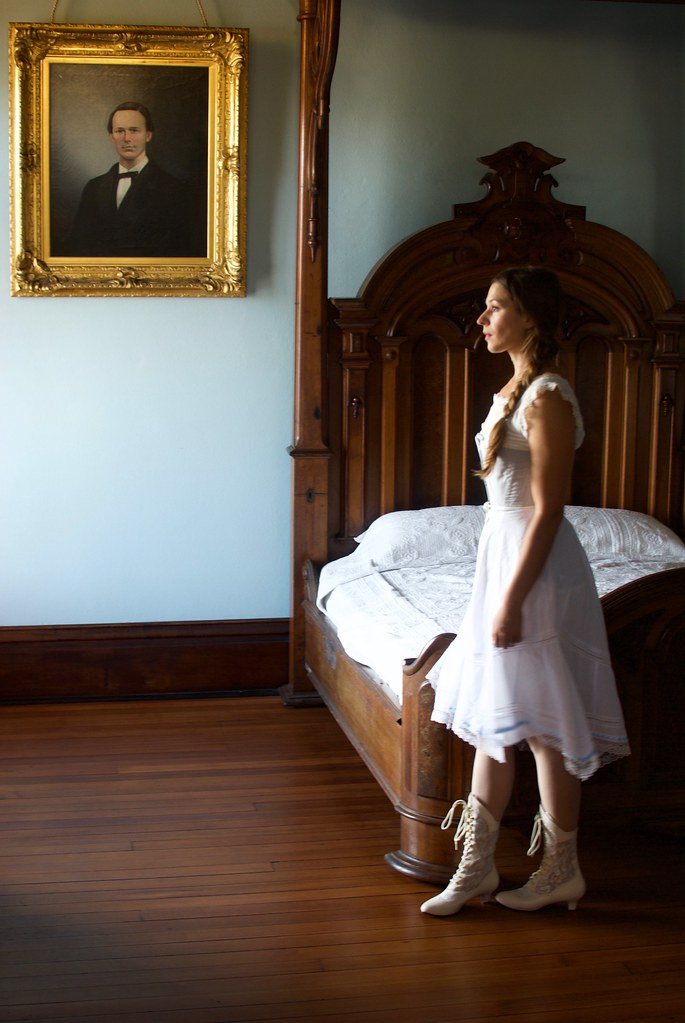
Edwardian Undergarments

But let's be real. Historical costuming is uncharted territory for me.  I've always been thoroughly practical with my personal sewing.  The goal has always been to build a handmade wardrobe, which I will continue to do.  Historical sewing is rather a different niche from the one I'm used to occupying in the sewing blogosphere!  So I knew I had to proceed with caution. 

First, I did my research.  I learned about the fashion of the Victorian period.  And I honed in on what interested me.  I found I was much more drawn to the styles of the 1890's through the turn-of-the-century.  Queen Victoria died in 1901, however she had really ceased to be a fashion icon before then. The styles I was more interested in were early Edwardian, or very very late Victorian.  This is also an era that I found to be very underrepresented at Dickens on the Strand, which definitely prefers the bustles of the 1880's (which I always think makes everyone look like a pair of curtains) or the hoop skirts of the 1860's.  These are also more true Victorian examples.  

But here's the thing.  Making a historical costume is a lot of work.  So I decided if I was going to put in all the work it better damn well be something I loved.  Which meant no curtain dresses for me! I found a pattern to work with which was a nice mish-mash of late Victorian and early Edwardian styles (more on that to come) and decided on Edwardian undergarments to accentuate certain features of the design.
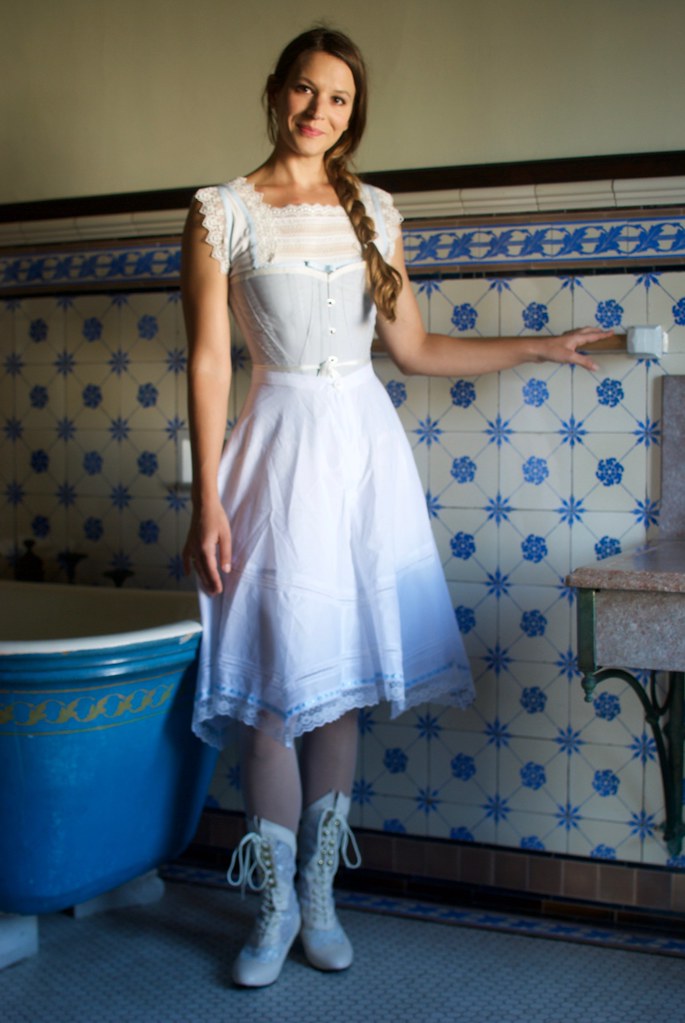
Edwardian Undergarments

All of the patterns for my undergarments are from Truly Victorian.  I bought their Edwardian Underwear set - which came with a pattern for a chemise, drawers, and a corset cover - and the 1903 S-bend corset, which is based off of an actual corset from 1903.  

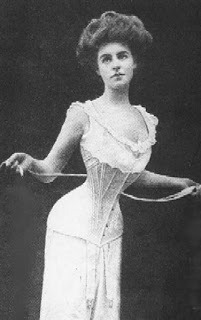
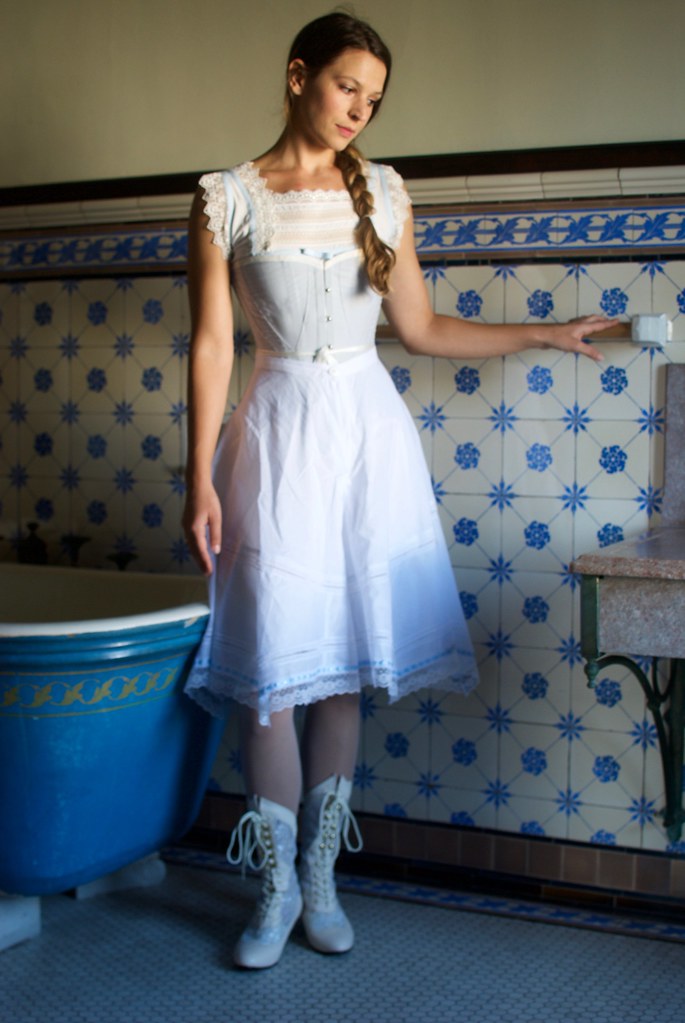
The Edwardian silhouette was quite singular, and just as it is today, undergarments were key in achieving the desired look (don't believe that this is still true today? Take a look at a push-up bra). Towards the end of the 19th century, women's bodices started to show a pronounced, full, low bust, called the 'pigeon-breast' or 'pouter-pigeon' which was accentuated by a nipped in waist (usually highlighted with pointed and arched belts) and skirts which were slimmer over the hips.  This silhouette became more exaggerated into the early 20th century, with bodices becoming even fuller and 'poutier' and skirts becoming even more slim, and featuring a trumpet flare.
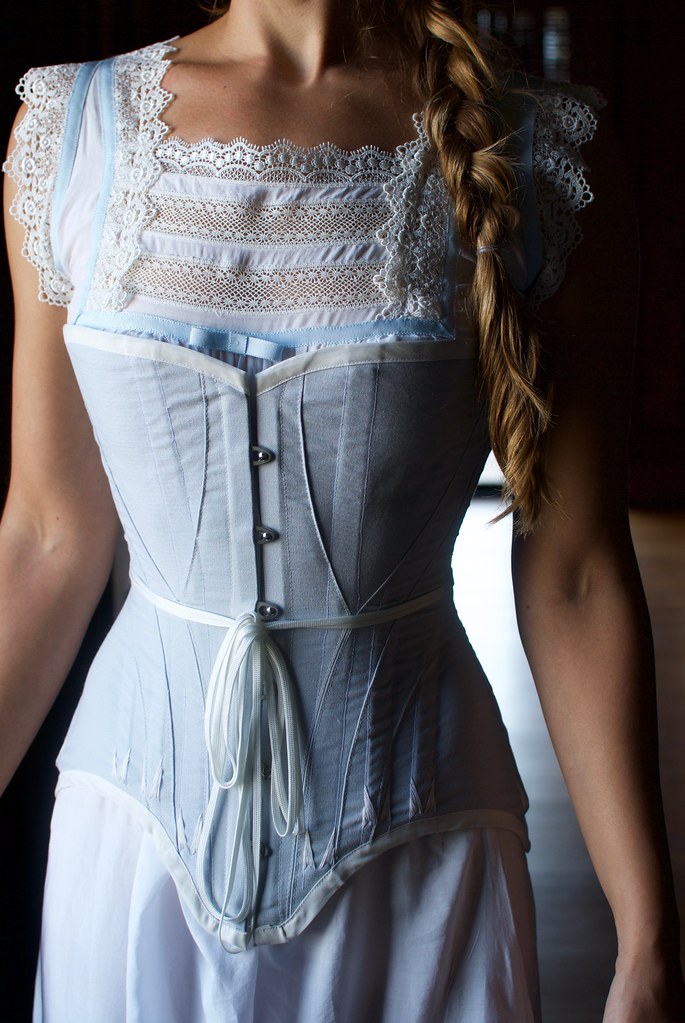
Edwardian Undergarments

The foundation for this silhouette was the S-bend corset.  This style of corset differs greatly from the traditional hourglass corset of the Victorian era.  It features a straight front which subtly shifts the wearers posture so the bust pushes forward, and the hips and rear push backwards, creating an 'S' shape from the side.

There is much to be said about the history of corsets and the politics surrounding them.  I doubt there is a single item that gets pointed at as the symbol of women's oppression more than the corset.  Personally, I've always viewed corsets as rather democratic.  It's not like once they fell out of fashion so did unrealistic expectations of women's bodies! Instead, the post-corset era demands that women strive for an unattainable ideal through fad diets, exercise, or (perhaps most frustratingly) "good genetics" (#iwokeupthisway).  Which seems way more oppressive, and ultimately soul-crushing than saying "Here, strap this thing on your body, hold your breath, and pull these strings. You'll look great! Sure, you might get indigestion and constipation, but at least you can take it off at the end of the day."
Edwardian Undergarments

The s-bend corset was actually marketed as a "health corset" as it was designed to not compress the stomach or lungs as much as the Victorian hourglass shape.  When worn correctly, the s-bend corset nips in the soft part of the waist, then flares out over the ribcage and bust.  As I mentioned previously, the bust and hips would have been padded out to exaggerate the wearers shape, giving the illusion of a much smaller waist. 

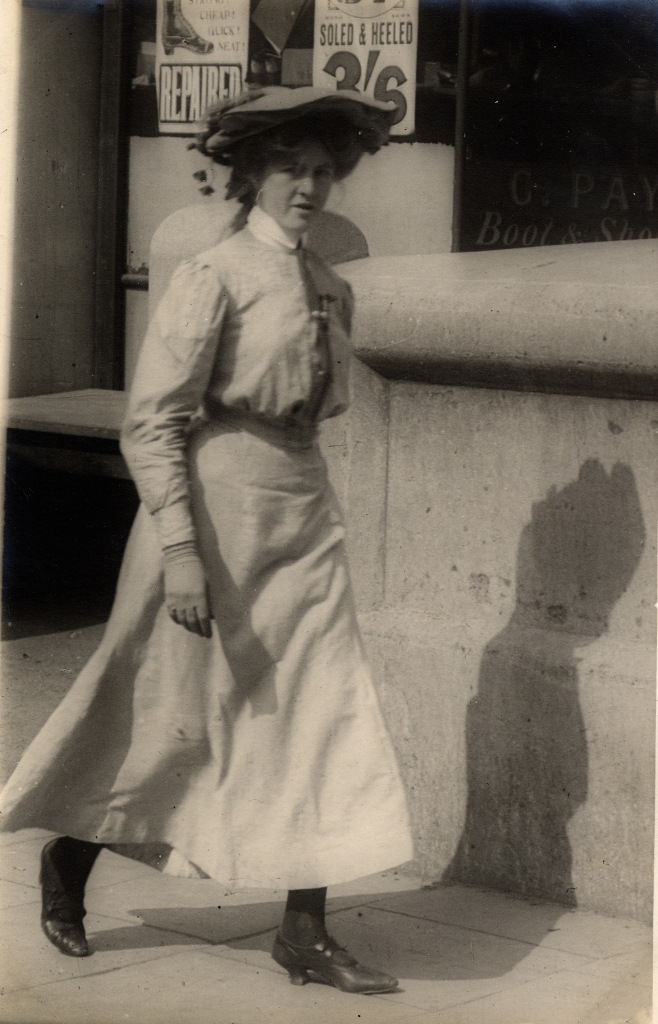
When you look at images of women from early photography and the turn-of-the-century it's important to distinguish between photos meant for fashion, or fetish purposes, which are almost always altered (images like this, or this) and photos of actual women going about life, or having their portrait taken.  When you look at the latter images it becomes clear that the average woman wasn't lacing her corset to extremes.  Sure, many factors contributed to women being on average smaller than women today (in both height and girth) but you also see a variety of proportions and body types that has nothing to do with corsets.

I obviously do not wear this corset with any regularity or for long periods of time, but I have found it to offer quite a lot of flexibility with size.  In the photos here my waist is about 1 inch smaller than my natural waist measurement.  I think it might look like more because of the way the corset distributes the width around the body, making it appear smaller head-on, but actually thicker from the side.  This is actually quite comfortable for me.  I've also laced it with no  reduction in my measurements, letting it just be a foundational layer that creates an exaggerated shape, and I've also pulled the laces as tight as I can, reducing my waist measurement to about 2 inches.  More than that just wasn't going to happen! I found that the 1 inch reduction was my happy place, where I feel comfortable enough in this to wear for longer periods of time, and so I've used this to base my measurements on for the rest of my costume.

I also haven't padded out my bust or hips, therefore I'm not really portraying an actual ideal Edwardian silhouette. But honestly, there is just a lot of details to consider when making a historical costume that some of the elements had to be overlooked or else I'd never get this done on time! Perhaps I will add to it in the future...
Edwardian Undergarments

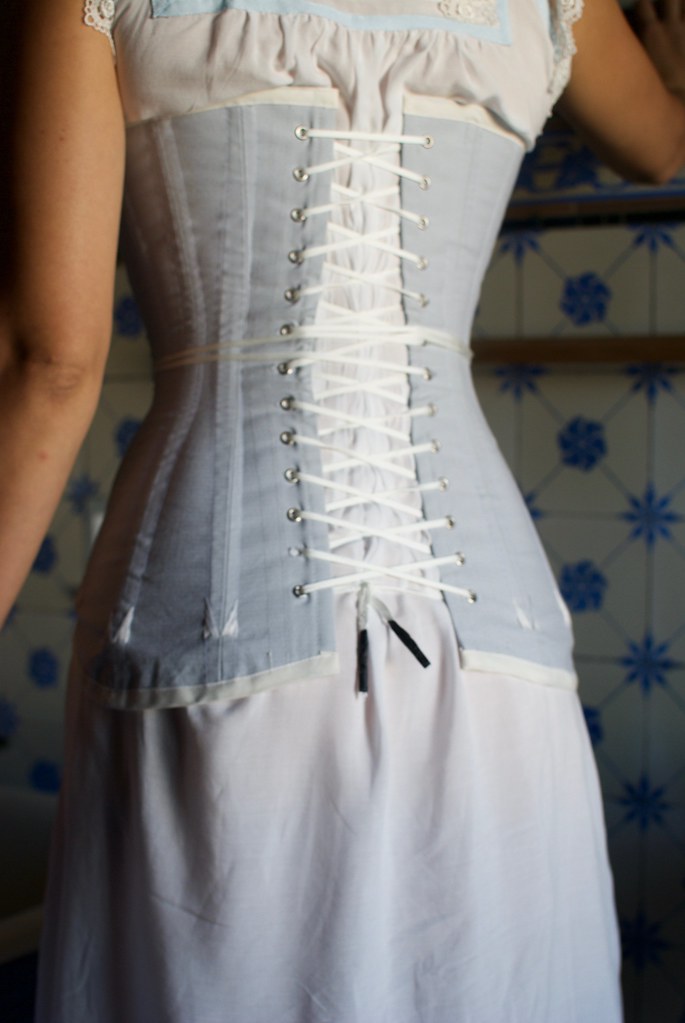
I had a blast making this corset! From a strictly engineering standpoint it is a fascinating garment! I have no prior experience with corsetry, and this particular design is suggested for experienced corset makers.  Whoops. Well, all I can say is that I generally do best when I dive headlong into a project!

All the materials for my corset were bought from Farthingales Corset Making Supply.  The fabric is a blue-gray coutil and I used a 13 inch busk.  For boning, this corset calls for 1/4 inch spring steel bones, which bend front-to-back, but not side-to-side.  Two bones are placed side to side in 3/4 inch bone casing which I stitched down the middle to create two channels.  The corset is unlined, with most of the raw edges concealed by the casing, or else pinked to prevent fraying.  I bought my grommets from Gold Star Tools and I used their heavy duty press to both punch holes and set the grommets.  This worked well, however I think the hole punch was just a tad too big for this size grommet, and for this particular garment which needs to withstand a lot of strain.  There doesn't seem to be quite enough fabric for the grommet to "bite" into, so when I pull my corset tight the fabric strains around the grommet.  I don't think this will prevent me wearing it for costume purposes, however if I ever make another corset I think I will use a smaller size cutting die, or simply an awl to make the holes.
Edwardian Undergarments

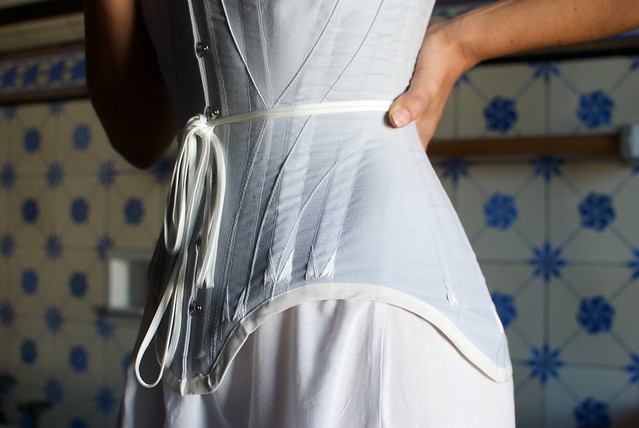
Typically, corsets from this era would have been adorned with lace and ribbon at the top, but I kind of liked the look of it plain, and I was also looking to cut corners where I could.  I did, however, make time to apply flossing to the bones, which are those little pointy embellishments you see along the bottom of the corset.  Flossing is a type of functional embroidery, meant to provide additional strength to the garment to prevent the bones from wearing through over time.  Again, this is really unnecessary on my corset as I'll probably only wear this maybe once a year, but I thought it was a pretty little detail and it provided an opportunity to learn something new, as I've never embroidered anything before! Flossing could get quite elaborate, particularly on Victorian corsets.  I went with the most simple design I could, as I was literally learning on the job.
  Edwardian Undergarments

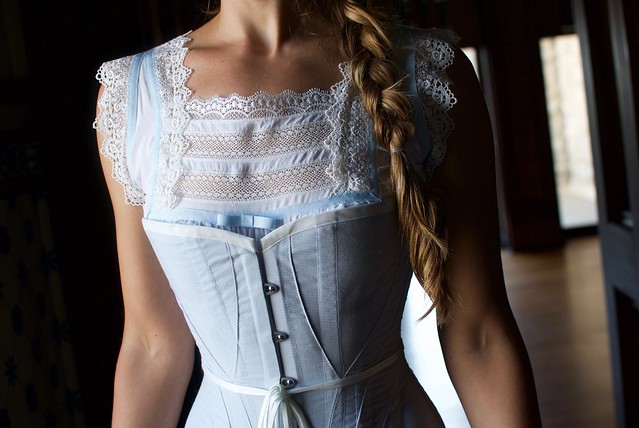
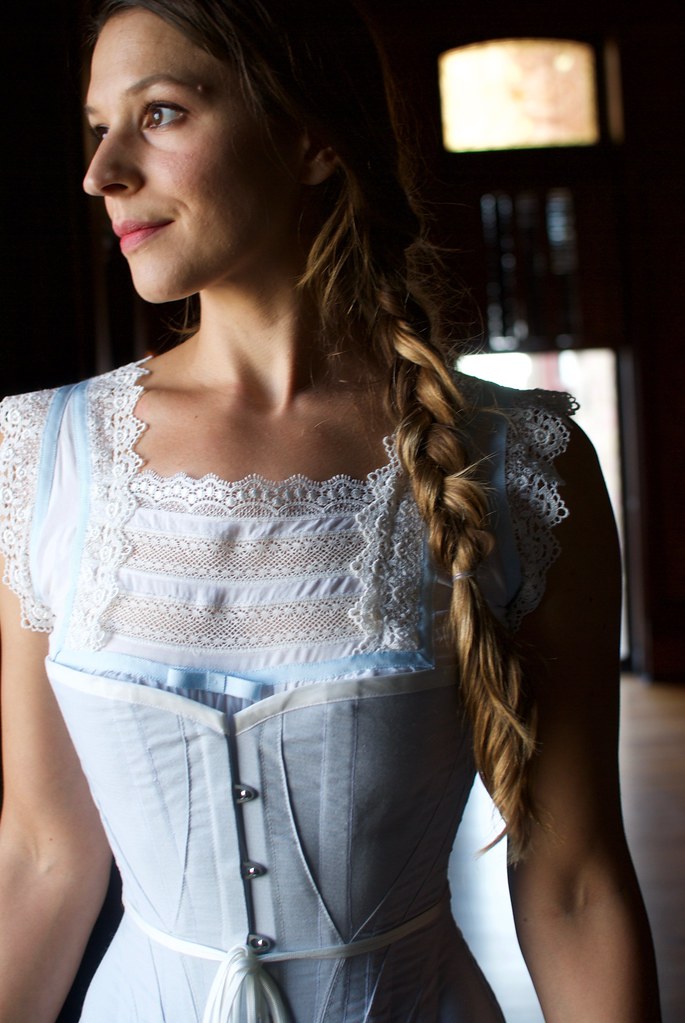
My chemise was actually the very first component that I made for my costume.  A chemise is like a long undershirt that was worn directly next to the skin and protected the corset, and the gown, from sweat, and body oils.  Women would have owned more chemises than gowns, and they would have been washed much more frequently than the rest of their wardrobe.  During the Victorian era, chemises were quite simple and very simply adorned, or completely plain.  However, underwear in general became frillier and frothier into the Edwardian period, so this was an excellent opportunity for me to learn my way around applying trims and lace insertion -- two techniques that I have never done before.
Edwardian Undergarments

I used a cotton-viscose blend batiste for my base fabric because it was incredibly soft and lovely and it would feel nice next to my skin.  Viscose obviously wasn't available as a fiber during the time period, but I had this fabric in my stash, and it does lend a lot of softness to the fabric.  Just as I occasionally had to cut corners with certain details, I also tried to source as many of the supplies from my stash as I could, because historical costumes ain't cheap! 

The blue ribbon is a cotton petersham. As you can see, I have a bit of a blue and white color scheme going on here! There are three types of lace on my chemise.  The wider, pointy lace edging is soft and made of cotton, and I chose it because a) I thought it was pretty and b) I thought it would feel nice, as sometimes lace can be scratchy.  This was my first time doing lace insertion, which is those strips of lace interspersed with fabric that you see on the yoke.  This was one of those techniques that I had always assumed involved some kind of witchery, but is actually really straight forward.  You simply stitch the lace down on top of the fabric using a zig-zag stitch along each edge.  Then you slice down the center of the fabric underneath it, press is open, then zig-zag over the lace edge a second time, and finally trim away with raw edge of the fabric on the wrong side.  The raw edge of the fabric is prevented from fraying by the zig-zag stitch.  Witchery it is not.  Tedious? Yeah, a bit.  It wasn't too bad on the chemise as I was only adorning a small area. 

I should also mention that the instructions for this pattern don't really tell you how to do any of this. They simply say something like "decorate as desired" or "finish with trim".  So I had to do some Google image searching to see examples of chemises.  Then some more googling to find tutorials on how to do lace insertion, how to miter a corner when applying ribbon trim, etc. Try googling "heirloom sewing techniques" and you'll find a lot of great tutorials for lace insertion, piping, tucks and other such old-timey embellishments.
Edwardian Undergarments

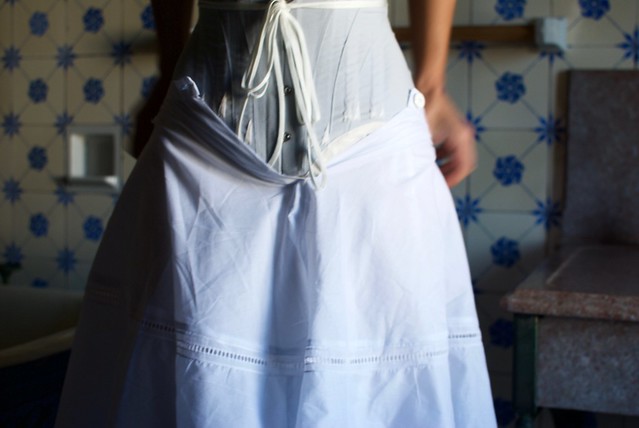
I love this photo, as it seems so scandalous, and yet I'm still wearing multiple layers of clothing!

These are my French drawers. Again, they differ from Victorian drawers as they have a much fuller, and shorter leg.  Often times the drawers were attached to a corset cover on top, making for a set of "combinations".  Spoiler alert: I didn't make a corset cover.  Nor did I make a petticoat. Again, maybe next year.  The French drawers feature a split crotch, to allow for the Edwardian lady to visit the outhouse without taking off fifteen layers of clothing in the process.  I suppose the split drawers also allow for easy access for other activities...?  Still, I'm not looking forward to using the toilet in this getup, as it's quite a lot of fabric to maneuver...
Edwardian Undergarments

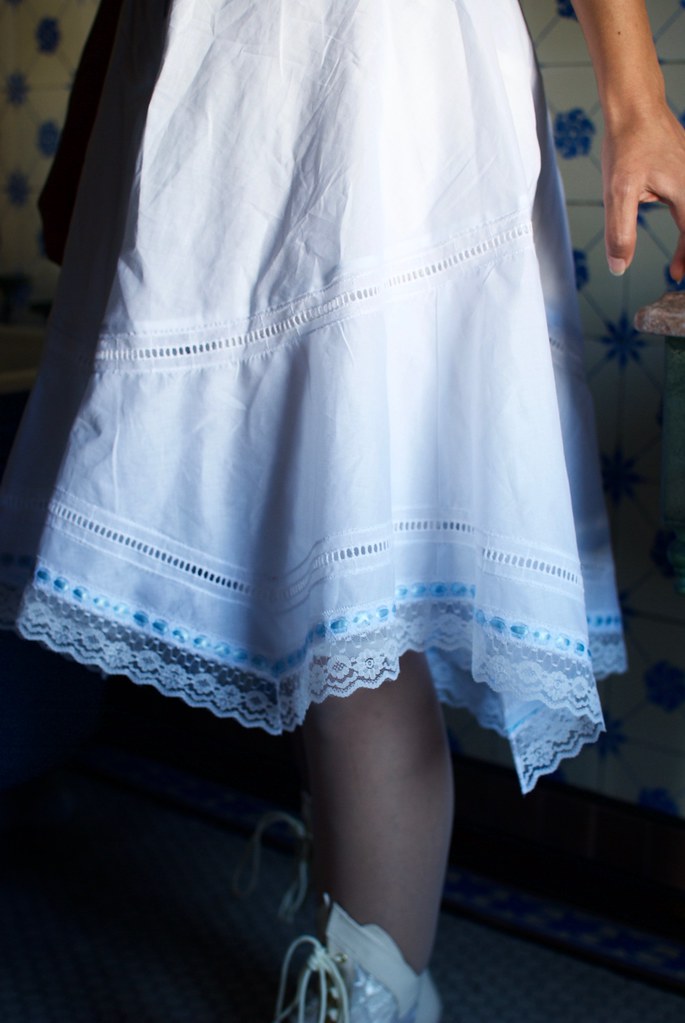
I used a cotton lawn for these, also from my stash. The drawers are, once again, embellished.  These drawers feature a curved hem, finished with a pointed flounce.  To highlight the style lines I used cotton faggoting insertion, applied in the same way as the lace insertion described above.  The flounce is finished with a row of faggoting insertion again, and then lace beading, and a wider lace trim.

These. Were. A. Pain.

Yeah, that was a lot of insertion. It took me forever. The lace edging was actually two separate trims that I had to stitch together first then apply to the hem.  The shaped leg and pointed yoke meant that I was having to get fancy with mitering the trims, which took some trial and error to get right.  And none of this will actually be visible in my finished costume...

Sigh.

But isn't it pretty?!?!
DSC_0340

On that note, perhaps you're wondering... Why??? Why go to all this trouble for something I'll only wear once, maybe twice? Why go to all this trouble for such an impractical garment? Especially when it's So. Much. Work.

Well, I've had a lot of time to think about this (while cursing over cotton faggoting).  The main reason I'm doing this is quite simply -- because it's fun.  Honestly. This has been the most engaging, challenging sewing I have done in awhile.  This is not to say that I don't love making modern things, but it's actually really liberating to sew something simply because you want to. With no practical concerns whatsoever.  Not to mention, a privilege. I've always loved indulging in a few fantasies, and making this costume has appealed to that side of me ten-fold.

The other reason is, as I said, for the challenge of it.  I've had to learn new techniques, research materials and methods, not to mention the historical research that has gone into it.  While some of those new skills probably won't translate to my modern sewing, some have already got my wheels turning for how I can incorporate them into something more wearable everyday.  I'm particularly enamored with the lace insertion. This is a detail which crops up a lot, as Victorian elements are always coming in and out of style.  I am envisioning making some poet sleeve blouses with lace detailed yokes...

So, if you've ever had a desire to make a completely impractical garment - Cosplay, a ballgown, a wedding dress - I highly encourage you to do it.  If for no other reason than to remind yourself why you love this craft to begin with.
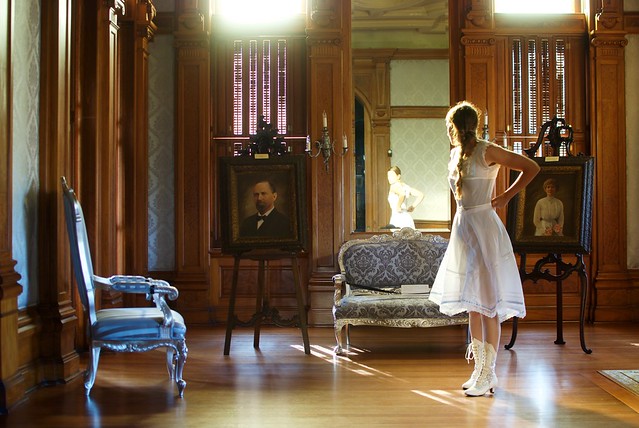
DSC_0341

And THAT, my friends, concludes this mammoth of a post! If you made it to the end, bravo! Obviously I had a lot to say on the subject of historical costumes, and I hope I didn't bore you all to tears!

But, before I go I would be incredibly remiss if I didn't extend a few thank you's for this post.

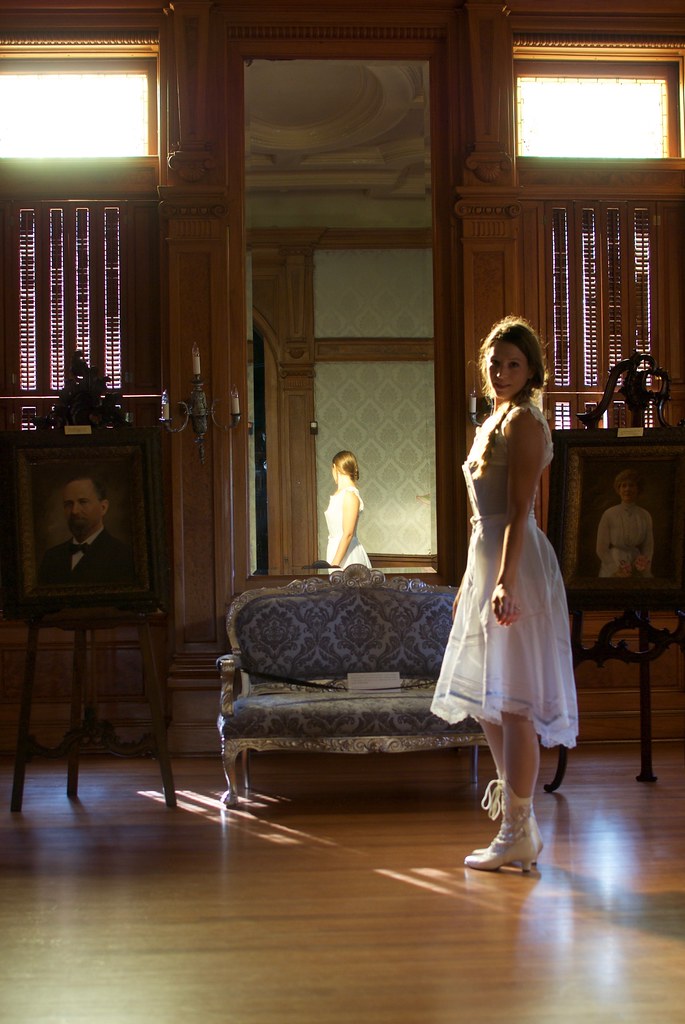
First, a huge thank you to the Galveston Historical Foundation for granting me access to one of their properties, Bishops Palace, after hours, to take these photos.  I don't usually spend my days swanning about in such luxurious interiors, so it was a treat to play dress-up and make-believe for a bit on this sunny Saturday afternoon.  If you're ever in Galveston, make some time to tour this gorgeous mansion.  Everything in here has been preserved to the original decorations, and all the furniture you see in these photos is original to the house. And these photos only show a small sliver of its beauty.

And finally, many many thanks to Nick for taking my photos, for getting me permission, for unlocking the doors, framing the shots, and only jumping out at me to scare me out of my boots a handful of times.  And, of course, for not laughing at me when people on the street were looking at me like I've lost my marbles. 

That's all folks! Stay tuned for Historical Costume Part II: The Attack of the Taffeta Skirt!

xx

11.06.2013

roseate spoonbill

DSC_0030

I can't say I've ever had a particular affinity for birds. Growing up, the only birds I could actually identify were Canadian Geese, of which there were an abundance of.  I also got pretty good at identifying goose poop... of which there was also an abundance of... Which is why it's pretty remarkable that these days I'm able to recall the names of a lot of our feathered friends that I see about.  Galveston has some pretty spectacular birding, and I guess it's the sort of thing that just rubs off after spending time in a place.  But of all the birds I see about, there's really only one that I get super excited about when I spot it, and that's the Roseate Spoonbill.

I remember the first time I saw a Roseate Spoonbill I was driving across the causeway that connects the island to mainland Texas, and out of the corner of my eye I saw this flash of pink in the sky.  It was shortly after we had moved to Galveston and I remember coming home and saying to my husband (not totally sure if I had imagined the whole thing or not) "Nick, I think there are pink birds here..." He, of course, already knew about the pink birds, being much more... well... just generally better informed about these things than I am.  To me, living in a place with such technicolor fowl flapping about, makes me feel like I'm in the most exotic place in the world, even if it is just costal Texas.

DSC_0037DSC_0052

So why am I waxing romantic about pink birds today? I swear there's a reason, and that reason does indeed tie into one of my two newest makes. So let me introduce you to...

My second Archer, made up in a silk crepe de chine.  This silk started it's life as plain white, and I was truly this close to leaving it white, because there is something pretty classic about a white, silk, button-up shirt, is there not? But I felt like maybe I could love it a little bit more if it was, I don't know, a little pinker.  So I dyed it.  Easy peasy.  Just a one step, good ol' fashioned, dunk-it-in-a-bucket-and-swish-it-around dye job. I mixed just the teensiest amounts of chocolate brown and coral pink dye (both from Dharma) to get the color I was aiming for.  And the color on my mind, my inspiration, was the pale shade of rose that the Roseate Spoonbill displays on it's soft, downy feathers.  See? Told you I had a point with all that bird nonsense!!

DSC_0039

As this is my second time making Grainline's Archer, I won't go into too many details here (to read about my first Archer, go here). And while I wear my first Archer a ton (like, multiple times a week, sometimes) I did make some changes to the pattern this time around to get the fit closer to how I like my button-ups.  I've been very jealous of the fit on all of Andrea's Archers, and so decided to take a page out of her book and decrease some of the width through the shoulders (I used this tutorial) and take in the side seams a bit at the waist for a more feminine shape.  The changes were subtle (only half an inch at the shoulders and about an inch at the waist) and I think my finished shirt keeps some of the 'boyfriend' vibe that I love so much about this pattern, while making it just a bit more flattering on my body.  Score. 

DSC_0029DSC_0028

Sewing this was also one of those experiences that sewists simply live for.  Everything came together absolutely gorgeously, the silk pressed beautifully, and because this shirt has so many sweet little details on it, it was one of those makes where you can actually see that you've made progress with your technique.  Very satisfying indeed.

DSC_0051

I also made up Tessuti's Suzy Pants pattern in this navy and white patterned silk crepe that I scored while in NYC.  I can't remember the name of the store, because I was in such a post-blogger-meetup euphoria that I wasn't really paying attention, but I do remember that I spotted it and immediately thought, "Suzy Pants".  I've been obsessed with Kelli's Suzy's since she posted them, and felt like they would make the perfect transition pants for fall.

I had already made one of Tessuti's patterns (here) and found them to be perfectly delightful to sew with.  I think much like Kelli, I was drawn to the Suzy pattern because they closely resemble a lot of the pleated, lightweight trousers that I've been seeing a lot from ready-to-wear lines.  While I probably could have done the work and converted my beloved Built By Wendy pants pattern to this style, it was much much easier to just download the Suzy pattern! I made these in a size XS, based off of my measurements and the finished garment measurements, and the fit was just what I was hoping for, loose, but not baggy. I also took a page from Kelli's book and made my Suzy's with a flat-front waistband and just elastic in the back.  I tapered the leg towards the ankle, and cropped the length, as well. I always think a tapered leg looks most stylish when it's cropped, plus, now they're the perfect length to wear with my fall/winter staples - my black booties! 

DSC_0030DSC_0028

I made these a few weeks ago, now (they go together super quickly) and have worn them at least twice a week since (and sometimes I change into them when I get home from work, because they are just that comfortable). So I guess that is testament to how much I love them? My husband kind of chuckles at me when I wear them and refers to them (fondly I'm sure...) as my fancy Zubaz pants.  I mean... I guess they do sort of have a '90's Mom' vibe (maybe in a cool way???) but definitely not a bad 90's pants vibe... right?? Right???

DSC_0031DSC_0044

Man, taking blog photos is just always awkward, right? Today the weirdos were in particularly rare form (or am I the weirdo in this scenario... so hard to tell...) While I was darting back and forth between my posing and adjusting the camera I noticed that there was some old dude in a BATHROBE standing on his porch watching me!! Just, like, leaning up against the post, giving me an eye-full of his silvery chest rug.  So I say, "Hey there" and kind of wave, and dude just growls at me in the thickest Russian accent, "Are you Russian?? You look like you could be Russian..."  Um. Huh? So I smile and say, "No, I'm not Russian"... And my man just keeps on standing there, smiling and staring!! Thus, the incredibly uncomfortable look on my face in that second-to-last picture! So finally I ask if I'm bothering him, and he says 'no' and goes back inside (to continue to creep at me behind his lace curtains...) but not without leaving a strong whiff of heebie-jeebies in his wake! Granted, I was taking pictures on the sidewalk right in front of his house, so, yeah... not really sure who's the bigger weirdo in this scenario... I mean, I did just shame a dude off his own porch so I could take pictures for my sewing blog on his private property.... Like, clearly  the robed Russian is the weirdo... right? Right...?

xx

2.05.2013

stargazer

DSC_0079DSC_0035

This was my last make of 2012. I don't know why it took me so long to get it photographed and on the blog... actually I do know, but I'm too embarrassed to say! 

Sigh... you guys, I can't keep secrets from you! So this is what happened: I made two of these dresses right before Christmas - one for me and one for a friend. Only I seemed to miscalculate my yardage and I didn't have enough fabric to make one of the belts. No biggee, I thought, I'll just give my friend the belt and then dye some fabric to match for mine. So off her dress went in the mail (I gave a little sneakery peekery in this post) and there mine sat, un-hemmed and belt-less (and dare I say sad and forlorn?) until... oh... this weekend. Guys, I am not big on having UFO's hanging about my sewing room. I'm much more of the "finish what you started" type of sewer - for better or worse - so it was killing me that this dress was just sitting there, gathering cat hair. You see I did dye fabric but somehow it came out a crazy color, and I was genuinely stumped! So finally I gathered every last teensy scrap of this fabric I had lying around and cut out as many rectangular pieces from it as I could and made a belt out of it! I think there's something like nine sections to this belt. It actually turned out to be quite long! Wraps around twice... who woulda thought...? Lesson learned: never underestimate your scraps!

DSC_0045

This is my second time making Victory Pattern's Satsuki Dress. My friend saw the black one I made last fall and said she liked it so I thought I'd give her one as a gift. But since I'm not a totally selfless seamstress I also made one for me. This time I lowered both the front and back neckline and added about an inch of length (to make it bike-riding-appropriate... sorta). I lowered the back neckline at my friend's suggestion, so now you can wear it as a v-neck or backwards as a boat-neck. I lowered the front "v" based on my own preferences, and also confirmed my suspicions that, even given the opportunity to wear a different neckline on the same dress, I'll always choose a v-neck! It's just more comfortable and, I think, flattering on me!

DSC_0080DSC_0061

The fabric is hand dyed and painted by yours truly. It's a silk noil from Dharma Trading Co. I worked the same way I did the last time I hand painted fabric, laying out the continuous yardage and working directly on it. Unfortunately (or fortunately...? or just totally unpredictably...?) this created little bit of a variance in color and design throughout the length of fabric. Like the good person I am, I cut my friend's dress from the parts of fabric that I deemed the "prettiest" and made mine from the leftover, slightly odd parts. Not that you can really tell in these pictures, but the back has a totally different feel from the front. One of the good things about letting a project sit for as long as I did is that you can start to see it in a new light. I felt like my friend's dress had a very pretty sort of Japanese floral feel to it, almost landscape-y. Mine, however, I felt looked a bit more like I was about to go to a Grateful Dead concert. Nothing against DeadHeads, but it's not really my look.  However, give me few weeks and a bit of critical distance and now I feel like the dress is more celestial than stoner. 

This was the first time I worked with silk noil and I'm really pleased with it. After the first washing it was a bit stiff - and smelled oddly of fish - but in the second wash I used a fabric softener which brought back some it's drape, and the fish smell... well... I think it's faded...? It sewed up really really easily and pressed like a dream. The texture is kind of nubby and rough, but also somehow really comfy against the skin. I feel like this dress is as comfortable as a sweatshirt dress!

DSC_0075DSC_0081

I actually set out to take these photos twice. As usual with me, I get a pretty strong idea of how I want my photos to look and I just knew that this dress would look amazing photographed at the South Jetty - a concrete path that juts out from the East end of the island into the Gulf. The day was overcast and the colors were perfect. And best of all - no one was there!! 

Yeah, but my camera battery was dead. Foiled by the blogger's worst enemy!! So round one was a bust.  But! I was not about to be dissuaded so easily. I went home and recharged and set out again later in the day. Unfortunately in the time I was away some fishermen found the jetty, too. We only gave each other a few dirty looks before we decided to just ignore each other. However, while I was taking pictures I became a bit distracted because quite nearby, this started happening:

DSC_0086

Dudes, that is someone getting their life saved!!! No joke, the helicopter rolls up, lowers down, then I see one figure descending into the water in a rope, and when they pull him back up again he's got a second person with him, flailing around in his flippers! I'm assuming since the be-flippered person was flailing that they were still alive... dead people don't flail do they?

To be honest, by this point there was quite a crowd gathering around and I didn't stick around to see what happened. You see, I generally think that if I'm being pulled out of the sea by the coast guard and I may have just survived a near-death experience, the last thing I would want is a crowd of people around to witness it! 

Okay, true story time - so I grew up going to the beach every summer (Wildwood, NJ woot woot!!) and am generally a pretty strong swimmer. My parents and grandparents made sure we all knew how to be safe in the ocean. Before I could swim I knew how to do the dead man's float and what to do if I was caught in a riptide (you swim parallel to the shore people!) Anyways, you get the idea! So one summer I go out into the water by myself and start swimming for a sand bar a bit out in the distance. As I'm swimming I hear lifeguard whistles, but I figure it's no biggee, probably for people that were swimming too far out. I make it to the sand bar, climb out, turn around and see a lifeguard hurtling at me through the water! Apparently I had been caught in a current that had pulled me way far off from the point I entered the water! (P.S. I would've figured this out when I decided to make my way back to shore, and could've like, you know, walked back to where my towel was...) The lifeguard insisted I hold on to his red-hot-doggie-looking-flotation-thingy and he made me come back in to shore, right then, where - wouldn't ya know - a huge crowd had gathered! You guys... I was mortified!! I was, like, 20 when this happened!  And the lifeguard was cute, of course! I mean, maybe I really was in real danger and I didn't know it, but mostly I was embarrassed! 

By the way, I don't think my story has anything to do with this guy getting saved by a helicopter - just maybe tangentially related...? You know... water saving stories and all that...? Yeah? No? Maybe... just a little?

Alright, folks, I'm out!!! Have a good Sew Grateful Week! And know that I am sew grateful to all you readers and for this lovely sewing community I've found myself a part of. 

xx

1.09.2013

because, i mean, why not?


Yes, yes, yes, I know that we are now a full week into 2013 and all this New Years Reflection bullshit is soooooo last week... but what can I say? I'm a chronically late person? Or just slow? Ah well, better late than never I say!

There is actually quite a lot that I am proud of in 2012, and I'd like to take a second to recognize a few of the good things that have come my way in the past year, sewing related and non. After all, New Year's is the time for self-reflection, even if the time for reflection is reaching the end of its shelf-life and starting to stink up the fridge...

Let's start with some life reflections, shall we??

Almost exactly a year ago I began working at a new job here in Galveston, TX. This has made a huge difference in my life. One of the reasons I've been so slow about writing a post about my job is that it is actually kind of difficult to explain what I do. The relatively straight-forward explanation is that I am the program manager for a small art non-profit here on the island. We are a fully funded artist residency and we also have a small project/gallery space, which I am in charge of along with the director. In fact, the director and I are in charge of everything, because we are the only employees (the director is also the co-founder) so basically we run a very small, but ambitious operation.  I'm incredibly grateful that I get to work in an extremely creative environment, with someone I enjoy, and that my work is varied and meaningful to me. I've worked a lot of terrible jobs in my time (that stint as a secretary at a tax firm was a particularly low point...no offense to secretaries, or tax accountants, and, besides, I'm pretty sure the feeling was mutual...) so I'm particularly grateful that I am actually challenged and excited by my work, rather than feeling like I'm just slogging through the week in order to get to the weekend. As I said, the difference it has made in my personal life throughout the last year is huge.

This past August my husband and I moved house, yet again. This time just to a different neighborhood, same city, but it still marks the 4th time I've moved in the last 6 years (since my undergrad) never staying anywhere for more than two years. I really sort of love Galveston in all of it's weirdness and I'm happy to be staying here for the foreseeable future. Our new place is spacious and wacky and charming and ugly all at the same time, and Nick and I have been having a good time making it feel like home, even on a shoestring budget.

Which leads me to - Nick! I could write a novel here, or say nothing at all. I'll try not to be toooo sappy (for his sake). He's really my backbone, the one who's holding this bag of tricks together. We've been married every single day of 2012 (our first FULL year of marriage! Yay!) and it's our relationship, more than anything else, more than the job, or sewing, or the blog, that has made me feel so very grateful for this full and loving life I get to live. 

Now are you ready for some good sewing/blogging reflections? I feel like I can be a bit more succinct with these...(ppfftt!!! Who am I kidding??)

As I was putting together the images for this post I had a lot of fun thinking about how sewing has changed my life, like really had a major impact on my life in a very real way.

- I buy way less and am a far more discerning consumer when I do. 

- Looking at the images above I really like how you can see my own personal style begin to develop and become stronger.  I feel like through sewing I've been able to really focus on clothes that make me feel good, that help me to feel like my absolute best version of myself. This is something I hope to really continue to nurture in 2013.  

- This is kind of piggybacking on the previous thought, but I feel like making my own clothes has really helped me conquer some body-image issues I've had in the past. I always hesitate to talk about this because it is so personal (ppfft!! This is already an insanely personal post!) but it's also something that I feel very strongly about. Oddly enough, since I began sewing my wardrobe I've become far less critical of myself physically and I feel more at home in my own skin than I've ever been. You could certainly chalk this up to getting older, or being in a loving, stable, healthy relationship - but I really suspect sewing has had a hand in this (as well). 

- I feel like this past year I conquered a few of my goals for sewing. I tried with all my might to sew a hard-working, practical wardrobe, and all in all, out of 21 (really 22 but I haven't got around to posting the last make of 2012...woops) garments made I really feel like the majority of them get a fair amount of rotation in my wardrobe. The all star, of course, is my jeans. Those babies get worn at least 5 days out of the week. I'm wearing them right now. I wear them all the time. So much, in fact, that I believe I need to make a new pair in 2013. I also began experimenting with dyeing and handpainting my own fabric, which was a long time goal of mine. I enjoy adding that extra personal touch to my clothing, and I hope I can find a way to improve on my methods in the upcoming year.  I'm also proud that, really, looking at all those clothes up there, all of them are wearable, finished beautifully on both the inside and out, very few corners were cut, and most have stood up to repeated washings and wearings. Way to go, handmade wardrobe. Way. To. Go.

- 2012 is the first full year that my blog has been a big part of my life. I sort of started it half-heartedly back in 2010 (I think...?) not really sure what I wanted it to be and eventually I gave it up.  Once I became more engrossed in sewing it just became natural for me to want to share it and connect with a community and so I started up the blog fresh in the fall of 2011, decidedly more sewing-centric. I know everyone says this, but I am just so amazed by all the wonderful people I've been able to connect with over the past year.  Many of you I care about just as much as any of my friends that I get to see in the flesh, and I sincerely hope that our paths will cross in 2013! (Oh how I'd love a blogger meetup!!!) So to all of you, dear readers, I don't say it enough, but thank you thank you thank you! I'm so grateful to have discovered your blogs, shared in your stories, oohed and ahhed over your beautiful creations, and connected with people who share my same passion. 

You guys, I'm feeling a bit mushy!! I wanted to list out some real hard practical goals for 2013, but I seemed to get lost in all my reflections! No matter how old and moldy they might be! And I think this post is long enough for today. Congratulations if you made it all the way to the end. Your medal is in the mail (just kidding). 

Thank you again for a great year, and here's to 2013!! Woot! Woot! Can't wait to see what you all have in store. 

All my love,

Sallie


9.26.2012

witchy woman

DSC_0020

Oof! I swear the sewing blogger gods did not want me to get this post up! They were just throwing me one curve ball after another. However, I'm trying to do less whining in this space so I won't really go into detail...

Oh what the hell... I'll just tell you the worst of it - my bike was stolen yesterday (this is the 5th bike in the matter of two years...seriously) and my bike was my number one source of transportation (and I loved it) sooo... boo!

Alright! Thats that off my chest! Lets talk about this dress shallll we? This is the Satsuki Dress from Victory Patterns made up in black silk crepe de chine.  When the new collection of Victory patterns came out I, like many other sew-ers out there, kinda went apeshit. I seriously felt like Krisitann had been digging around inside my brain, making notes on my deepest wardrobe desires.  I believe I even uttered the following phrase aloud, while gaping at my computer screen: "Holy shit,Victory Patterns! Get outta my head!!" I am, if nothing else, extremely eloquent.


DSC_0016DSC_0032

Oddly enough, the pattern I was most drawn to was this simple, kimono inspired dress - labeled for beginners. You guys. I can't even tell you how many little mistakes I made while sewing this up. Like, so many. Which is ridiculous because the pattern was printed perfectly and the instructions were beautiful and clear and easy to follow... basically my difficulties were in no way the fault of the pattern - I'm just really dumb sometimes.  I'm blaming it on it being that time of the month and moving on. Are you with me on this one?

Since I've been living in Texas I've found autumn to be a very difficult season to deal with.  I feel that growing up in the northeast I've been hardwired to think in terms of four seasons, and there seems to be some seasonal depression thats just in my bones.  Here in Galveston the weather has certainly cooled off some, but its still hotter than many places get during the height of summer. I mean, I spent both of my weekend days at the beach...

I'm really not complaining about the weather - I love the balmy falls and mild winters of East Texas. And for the first time in my life my feet are actually warm(ish) for the majority of the year! But what I'm trying to get at is that I'm struggling with incorporating a fall feeling into what is essentially a summer wardrobe. I feel like this dress hits the nail on the head for me. It's still light and breezy (thanks silk!) but there's a certain moody quality to it that seems far more appropriate for October than it does June.

DSC_0027

And having nothing to do with any of that... If you've ever looked at my pictures on this blog and wondered if I just wander around posing in front of other people's houses... you would be absolutely correct! I've pretty much overcome my awkwardness at being spotted preening by myself in front of a camera, and on the rare occasion that someone actually asks what I'm doing I usually just mumble something about being a photographer and give them a stink eye of such magnitude it could fumigate an entire city.  

But every so often I get caught doing something totally weird that even I have to slink away from with my tail between my legs. These photos, for instance, were basically taken in someone's driveway. No, I have no idea who's house it was - I just liked their trees, okay?! The owner of said house opened his front door to let the cat out and spotted me crouching in his driveway, right by his car, fiddling with my camera settings. It was my turn to receive some serious stink eye. I tried with all my might to look like it was the most natural thing in the world for a girl to be squatting in someone's driveway, dressed like she's got a hot date (at 5pm on a Wednesday) and taking photos - presumably - of some gnarly bit of curb as I grabbed my stuff and scurried away.

And on that note, hope you're all having a lovely week!

xx

7.15.2012

nick's dress

DSC_0040

gosh! the weather has been so dreary here lately that this late afternoon sunshine left me feeling slightly giddy. like someone just told me i got to have chocolate for dinner...

i'm calling this dress "nick's dress" even though it would probably be more appropriately known as simplicity 1880, or perhaps the "2-in-1 dress" or hell even "sunni's dress".  because this dress is, obviously, all those things. but i'm going to call it "nick's dress" because my husband picked out the fabric, and because he likes it. iron clad reasoning. 

DSC_0033DSC_0060

i have to admit that i don't usually consider myself a purple person - actually i believe this dress stands alone as the one and only purple item in my closet. but while at a fabric store in houston - when we were picking out fabric for my husband's shirt - i mentioned that i wanted fabric to make some easy summer dresses. we happened to be standing by the bolts of linen and i believe i lazily stroked one and said "linen might be nice...or maybe a lawn..." and my husband, sensing what i'm sure was about to be an endless back and forth and hemming and hawing that could, really, last hours, grabbed this slubby purple number and said "how about this?!! this would look really good on you!" and you know what... i agreed. so good eye, nick. i know you just picked it to get me out of the store faster, but it just may be my new favorite color.

DSC_0037DSC_0036

this dress is a little different for me. it may not look like it, but its far more vintage-y than what i would normally wear. you see i have a long standing struggle with vintage and retro styles. i love them, but they don't always love me (can i get a hell yeah from any other thick waisted sisters out there who can feel my pain??!?!) but this dress didn't seem so literally vintage and i do love me a wrap dress (even a faux wrap - as the case may be) and maybe, really, this was all in my head anyway...

so i made the damn dress. i lurked sunni's sew-along in the most lurky-lurksome ways and made the damn dress. the construction is so thoroughly covered in the sew-along i won't go into any of it here, but i made a straight size 10 without making a muslin (eek!! totally living on the edge over here at sallieoh...) i had measured all the pattern pieces before hand and had an inkling that the waist might be a smidgen tight (see above, re: thick waisted) and lo and behold! it was. but only a smidgen. so i sewed each of the side seams at the waist with a 1/4 inch seam allowance and tapered it back to 5/8 inch. the waist is still snug, but not in an uncomfortable way. just in a squish-you-in-to-make-you-look-like-you-have-curves sort of way.  i'd like to make this dress again (because despite all my bitching, i really really love it) and when i do i'll make sure to add 1/2 an inch to the waist in the flat pattern.

DSC_0045DSC_0046DSC_0050
i never noticed that weird wrinkle above the zipper until i looked at these photos! doh! also - can you tell which foot no longer has a big toenail?

the only snag i hit during construction was with the zipper. i installed this pretty little purple invisible zipper and it was weirdly hard to get in (a problem i don't normally have) and then when i went to zip it up the zipper pull got stuck at the waist seam (what is it about waists today?) and i pulled and pulled and pulled and broke the effing thing off!! so pissed. however i gave myself a break and then groped through my stingy notions stash and found a long ass white invisible zipper i had probably got for some forgotten project and put that guy in there figuring, hey, its invisible. and it is. except for the pull (and where it gets a bit tight at the waist but lets just ignore that for the sake of my vanity) so now it looks like i got some armpit jewels. its all the rage...

DSC_0018DSC_0016
ignore that part where the bias binding doesn't meet the waist. just ignore it!

i got a little crazy in the notions aisle of jo-ann's searching for hemming tricks and bias binding for the neckline. and by crazy i mean i bought something in a contrasting color! holy beans! she's lost her mind! i had just enough fabric to cut out the dress minus facings so bias binding around the neck was my only option. i don't have a lot of experience hemming this circle-y of a skirt and i think i didn't want to fiddle around with a narrow hem (and the resulting burnt fingers) so i bought some hem lace in the same teal color as my binding and hand stitched it down, which didn't take as long as i feared it would. i rather like the prettiness it lends to the inside. 

i wore this dress to a recent opening at my gallery and felt like quite the lady all night. even the part where i was shoving my face with barbeque. total lady.  but this story doesn't have a completely happy ending. i'm very sad to report that the little citrine crystal necklace i'm wearing in these pictures met its demise while bending over my tripod (and catching the necklace on something and jerking my head up quickly. i can't tell you how many necklaces have died this way). this makes me very sad because, while i don't really really believe that crystals have powers or anything - there was something about this one that gave me a certain energy... 

and now that you all think i'm a crazy i'll say goodbye. i'm going to go have chocolate for dinner. 

xo

5.23.2012

ikat, youkat

DSC_0011

okay, so this one may not be for everyone. but i'm okay with that.

internet, meet my blanket dress. this is the dress i'm not really sure how i've lived without for this long. blanket dress, you complete me...

i'm sure i've mentioned on here before how much i love a dramatic silhouette. i'm not especially shy of volume. once when i was at a coffee shop in philly wearing a particularly voluminous skirt, a fabulous grey haired lady, herself draped in copious amounts of fabric, came up to me and told me how much she loved my volume. thats what she said, "honey, i love all your volume".  i've long been convinced that the woman was my future self, come back to encourage me to pump up the volume...

note taken, future self. note taken.

DSC_0005

DSC_0009

this is mccalls 6553 made up in a lovely ikat fabric from b&j fabrics online.  the pattern was ridiculously easy to sew. the sizing is very generous - i made the smallest size, and i'm pretty sure it could accommodate a wide range of figures in its generous folds. i even think it could double as a maternity dress, should i ever decide to go that route (no, mom, don't get your hope up!)

i used leftover silk from the lining of my birthday dress to make the facings and pockets. and rather than try to fiddle with gathering the fabric for the assymetric hem i just serged it and left it raw. i rather like the way it looks. it adds to its overall blankety-ness.  it also closes in the back with a single button. i made a covered button with one of those dritz kits. it looked like it would fall apart in two seconds, but surprisingly it held quite nicely, and adds an extra little upholstery flair.

the pattern came with a wide sash which would help to reign it in, but, call me crazy, i rather liked it billowing free!

DSC_0016

DSC_0020

DSC_0048

also, i can't believe that its been almost 10 months since we've been living in galveston and i've been blogging regularly and this is the first time i moseyed on down to the beach to take pictures! what took me so long?

i don't have too much more to say about this dress! i might be a kook - but i love it and i'm 100% positive that it will be getting lots of love and wear. i'm also pretty happy with this pattern, so I think I'll make it up again.  maybe in a drapey jersey...

xx