Showing posts with label fabric. Show all posts

4.27.2014

flower power

Mood Fabrics/Floral Silk/BHL Anna Dress

Well guys, spring has definitely sprung around these parts! And I for one could not be happier about it! This week also marks the end of what was a really busy couple of months for me at work, and I finally seem to have shaken off the respiratory infection that had been plaguing me (thanks antibiotics!) Yay!! So all in all, we're in high spirits around these parts!

What with the warming weather and more free time to actually enjoy it, I seem to have one thing and one thing only on my mind - silk dresses. Making them. Wearing them. Living in them for the next nine months... That and long, lazy, bike rides. Preferably paired together. At sunset. Sigh... paints quite a picture, doesn't it?

Mood Fabrics/Floral Silk/BHL Anna Dress

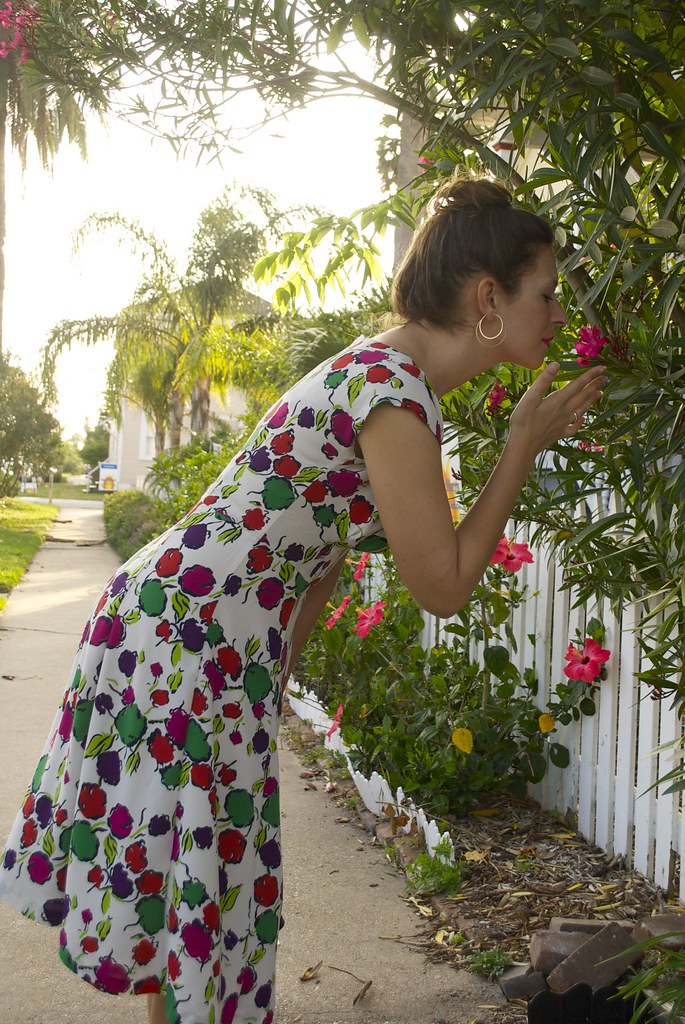
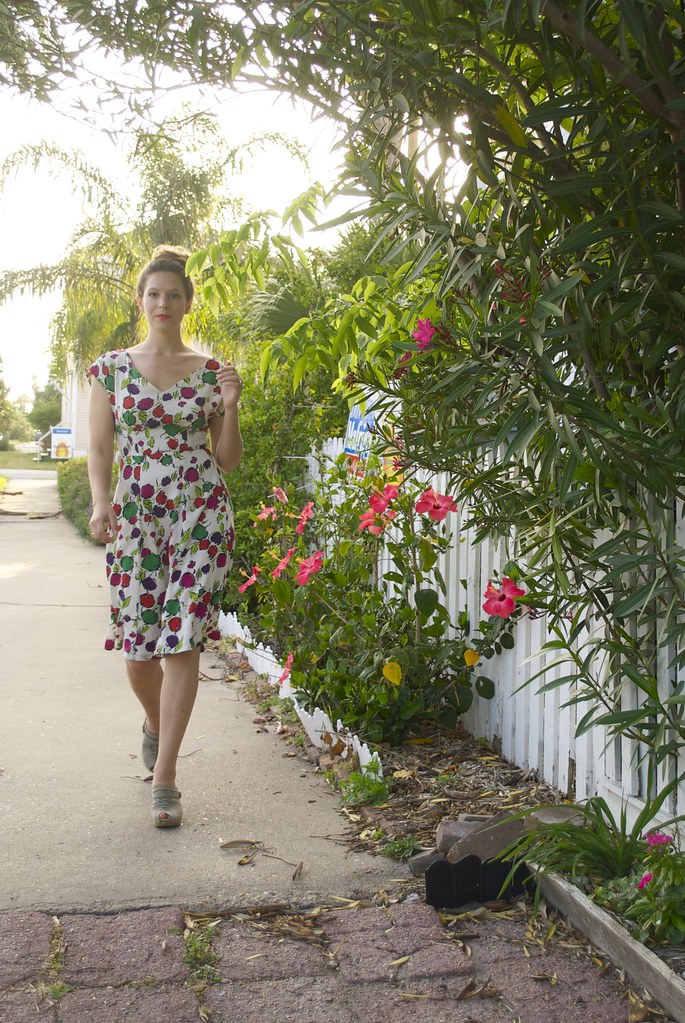
For this months Mood Sewing Network make I was irresistibly drawn to this gorgeous floral crepe de chine from Mood Fabrics online. Silk crepe de chine is one of my all-time favorite fabrics to sew with, and to wear. It has a bit more 'grip' than many of it's slippery silk counterparts, making it easy to handle, but it still has that lovely, fluid drape that you want from lighter weight silks.  And it's breathable, which is an absolute must in my hot and humid climate.

Mood Fabrics/Floral Silk/BHL Anna Dress

I absolutely adored the floral print of this fabric! It's so bright and playful, it made me instantly happy! I find the color palette to be sort of unusual and unexpected (magenta and poppy red, royal purple and inky black, viridian green and chartreuse... all on a soft, off-white background). It also reminded me a bit of vintage prints, but I couldn't decide what decade - 30's? 40's? 70's?? Maybe 70's-does-40's? (The consensus on the Mood blog was 70's-does-40's, which incidentally, is one of my favorite time period mash-ups!)  I don't normally go for a vintage look, but there was something so timelessly feminine about this print that was just calling me.

Mood Fabrics/Floral Silk/BHL Anna Dress

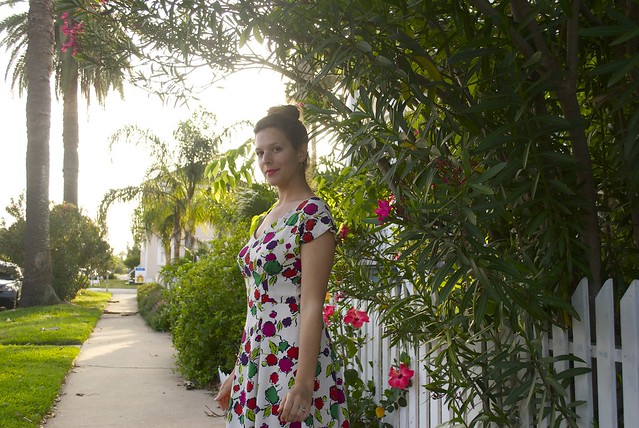
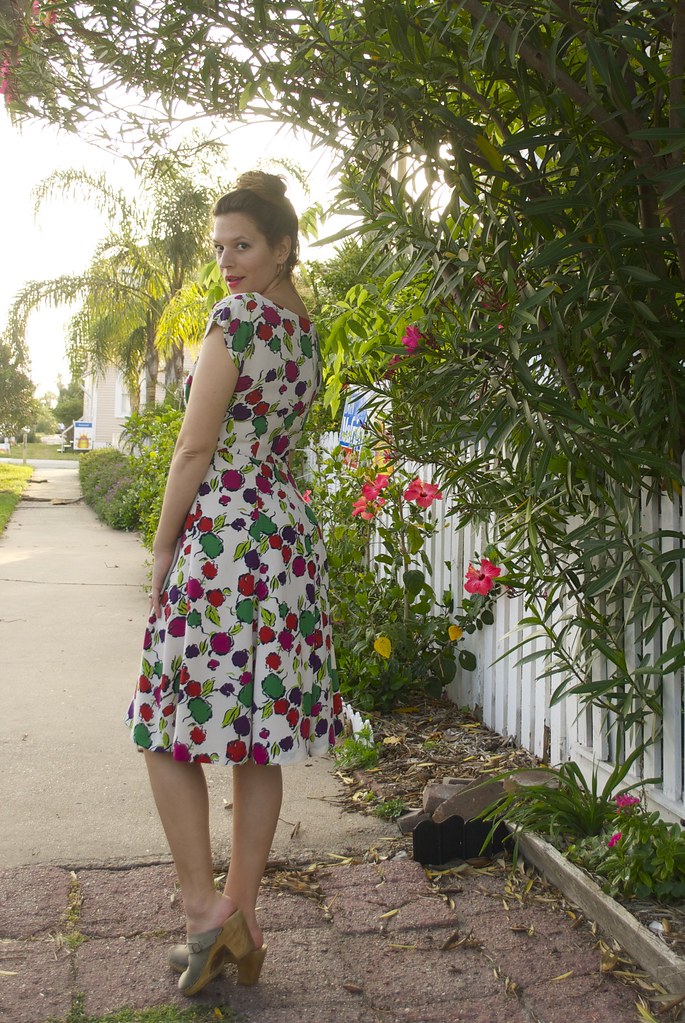
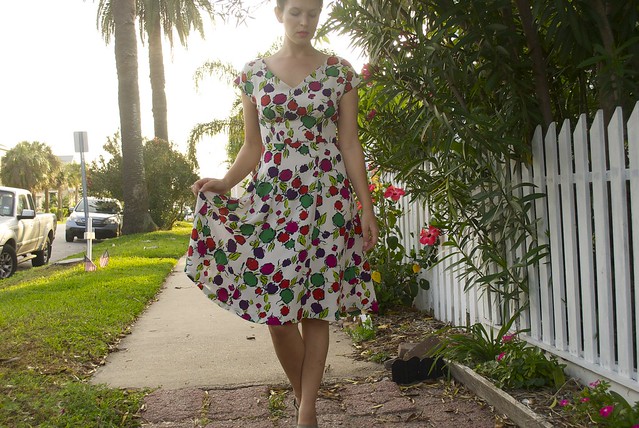
I thought it would be nice to pair this fabric with a pattern that also had a bit of a vintage vibe, without going totally overt, and felt like By Hand London's Anna dress totally fit the bill. I love this pattern - it's like all the best parts of being a woman rolled into one dress! This is my second time making the Anna dress (here's my first). For this version I opted for the v-neck and the shorter hem. However, rather than just chopping the pattern off at the knees, I kept the hem width of the maxi-version and adjusted the skirt panel pieces to compensate. This way I maintained maximum skirt swing-y-ness (very important for those warm breezes!)

Trust me on this one, this pattern hack sounds way more complicated than it actually was. I'm not saying that what I did was the right way to go about this - but, hell, it worked. Which is really all I care about. What I did was lay tracing paper over the skirt panel pieces, trace off the waist seam and grainline, and make a mark along the grainline the length that I wanted my new skirt pieces to be (I did 27 inches). Then I slid the tracing paper down, along the grainline, until my new hem mark lined up with the original maxi hem line, traced the maxi hem line and connected that to the waist seam, ignoring the original side seams. Done and done! 

Mood Fabrics/Floral Silk/BHL Anna Dress

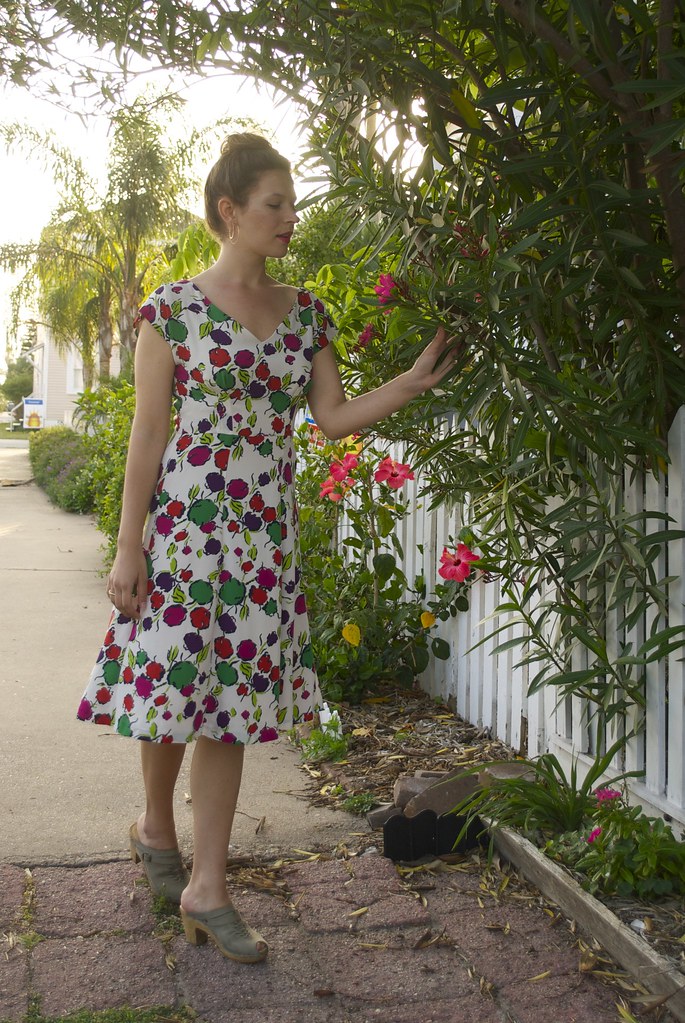
One of the reasons I went with this silhouette and skirt length is because it's reminiscent of one of my all-time favorite handmade dresses, my purple linen Simplicity 1880. I love that dress. It's the dress I grab when I want to look pretty, and it's been my go-to dress for such a variety of occasions - weddings, parties, holidays, work events, and just regular old work days. That dress is a work horse. So I felt like it was time that I listen to my own closet and try to get more dresses like that in there! As I was sewing this dress up I could tell that it was definitely going to be giving my purple dress a run for it's money as my new go-to dress! I've already worn it to an opening at my gallery this past weekend and it was, as I suspected, perfect. It took me all the way through prepping for the opening (which entails buying assloads of beer, wine and ice, lugging it around and filling coolers, climbing up ladders to adjust lights, cleaning, hauling trash, etc. etc. etc...) to the opening itself, where I'm greeting people, serving wine, making chit-chat, and generally playing hostess. And you know what, I got so many compliments on this dress! She's a winner!!

Mood Fabrics/Floral Silk/BHL Anna Dress

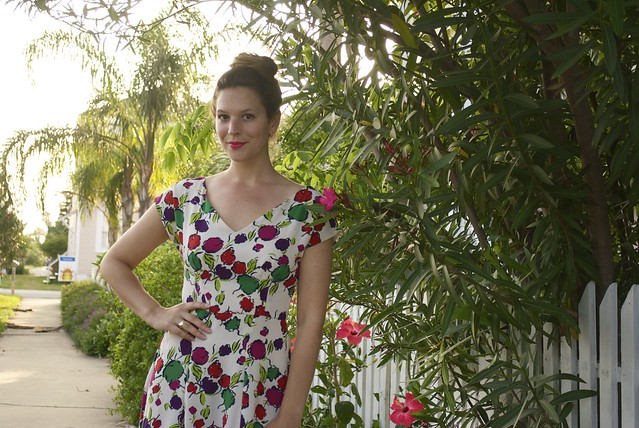
I reinforced the v-neck with silk organza strips, which helped a little with gape-age, however there is still more gape than I would like. Perhaps I should have eased the v-neck to the silk organza a bit? Ah well - ya live, ya learn.

I also lined the entire dress with silk habotai, because the floral fabric was ever-so-slightly sheer. Silk habotai (or china silk) is a wonderful lining fabric, especially if you're like me and like to keep your silk dresses silky - inside and out! The habotai I used was from my stash, but Mood has an awesome collection online in, like, every color imaginable. And I don't know about the fabric stores where you live, but silk habotai at my local fabric store is sooo much more expensive than what they sell it for at Mood - that's including shipping, and there is much less variety. But probably the most economical source for silk habotai (and, really, any silk fabric) is Dharma Trading. Of course everything there comes in either white or black, but if you feel like getting crafty with some dye, you can make it any color your heart desires!

Mood Fabrics/Floral Silk/BHL Anna Dress

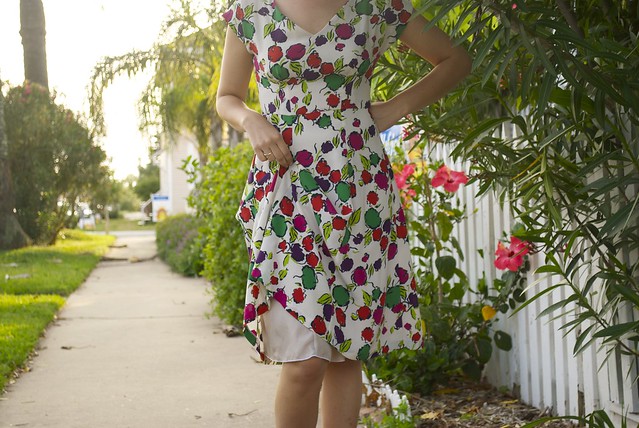
And because I always like to learn new tricks, even on patterns that I've made before, I decided to try my hand at using my machine's blind hem foot for the floral silk. Can you believe I've never used that little gadget before?! That's one of the reasons I love sewing - there's always something new to learn! I'm not totally sure if this type of hem was ideal for this type of skirt and fabric, but eh... it worked (moral of this post). Anyway, I love how clean the hem turned out, and it saved me so much more time than if I had hand-picked it myself. For the skirt lining I just used my serger's rolled hem function. I always feel like I'm cheating when I do this, but it's just so quick and easy, it's hard to resist!

Mood Fabrics/Floral Silk/BHL Anna Dress

Let's talk real quick about caring for silk garments. I feel like this is something (or maybe one of many things?) that always intimidates people from buying, sewing and wearing silk. You guys may have noticed that I sew with silk a lot, and, as I said, silk crepe de chine is my number one favorite fabric of all time. I wouldn't be sewing all these silk clothes if I wasn't actually wearing them, and with wearing your clothes, comes washing your clothes (unless, of course, that's not your thing, in which case, you do you...) For the record - I never go to the dry cleaners. I can't afford it, and I don't like all the icky chemicals. I wash all my silks at home. In the washing machine. The key is to prewash your silks the same way you intend to care for the finished garment. So I usually wash on cold and hang dry. Occasionally I'll throw my silk in the dryer (I did that for the habotai lining of this garment) and it works out just fine, but typically I won't continue to care for my finished silk garment this way. Although every so often one of my silkies accidentally ends up in the dryer, and it usually fares okay. In her recent post about silk jersey, Lauren noted that the color and sheen can dull a bit when you wash and dry your silks. This definitely can happen, though it's not too dramatic, and in my experience, this mostly occurs in the dryer, which is why I usually hang dry. But I'm all for throwing your silks in the dryer if that's more convenient for you, just make sure to do that when you prewash too!

And for any of you non-sewers out there, this is also how I care for store bought silk clothes as well - machine wash cold and hang dry. Silk is an amazing fiber, and not nearly as delicate as people think.

Well, there you have it! I can't wait to wear this dress on the balmy summer nights that I know are right around the corner! What sort of fabrics have you thinking of warm weather?

1.30.2014

welcome to the jungle

Mood Fabrics Carolina Herrera Brocade Pants
Hi ya'll!  So I know the weather has been pretty much crazy all over, and I totally don't envy all you northeners and your frozen eyeballs, but man, here in Galveston it's pretty much been driving me in.sane. One day it's in the 60's, the next it's in the 30's... oy! What's a girl supposed to do? Or, perhaps a more pertinent question: What's a girl supposed to wear? I just can't get a grip. Is it gonna be warm(ish) or freakishly cold? Am I gonna be pelted with sleet on my bike commute, or showered in sunshine? (I know, I really can't complain, but I'm gonna do it anyway.) (Also, is there any worse way to start a blog post than by complaining about the weather? My life is officially boring. I have nothing of interest to say anymore... apparently!)

Mood Fabrics Carolina Herrera Brocade Pants
Since I don't have any good chit-chat for you today, let's just jump into the meat n' potatoes, shall we?? I'm super excited to be sharing my first make for the Mood Sewing Network with you guys today - a pair of cropped trousers made with this fantastic Carolina Herrera coffee and white brocade! Generally speaking I like to let my choices in fabrics dictate what I'm going to make, since I'm a huge sucker for interesting textiles, and being let loose on Mood Fabrics' online inventory was like a crack addict being let loose on... I don't know... a pile of crack? (Ugh. Lame! What's with me today??) In the end, I decided to stick with a garment item I know I'll wear a ton (in this case, pants) but to challenge myself to use a fabric I've never worked with before. Which led me to Mood's amazing collection of brocades. Brocades you guys. How had I never explored these delicious fabrics before??

Mood Fabrics Carolina Herrera Brocade Pants
There were so many gorgeous brocades that were tempting me (like this one, and this one) and I could imagine them all as a fancy-pants pair of... well... fancy pants! (Gah! I did it again! I am need of a writing intervention!) But in the end I was sold on this incredibly unique polyester brocade.  It's truly unlike anything I've ever seen! Now normally I avoid polyester like the plague (in my climate, polyester usually means a prickly, sweaty mess), but Mood's description of this fabric as having an "abstract basketweave texture and ikat pattern" that is "simultaneously edgy and elegant" made me feel like passing this over simply because it is a synthetic would be a fabric tragedy of epic proportions. Also, I feel like somewhere along the line I heard someone much smarter than me say that modern synthetics get a bad rap based on the downfalls of their predecessors (read: every awesome late 60's, early 70's dress you ever thrifted that coated your back in sweat and hung on to your BO like it was it's job) but that new technologies are making synthetics almost as breathable as natural fibers. (I could have made all that up in a dream, but it sounds legit, right?) And let me tell you what, I'm so glad that I didn't let my fiber bias dissuade me from this fabric!

Mood Fabrics Carolina Herrera Brocade Pants
Okay.  I will admit that when this stuff arrived on my doorstep I may have wondered if my envisioned fancy pants may not end up looking more like crazy pants.  But then I wrapped the fabric this way, and that (like you do) took a couple of deep breaths, consulted my ever-wise gut (pfft!), and decided, no, these were gonna be some awesome pants. This fabric has a really wonderful texture - basketweave is one way to describe it, my husband keeps saying it looks like birch bark - and yet it's not stiff, or scratchy or bulky, or even difficult to work with. I cut my pants out on the cross grain because I really liked the way the pattern looked running down the front of my legs. Vaguely reptilian, but more geometric. I spent a little bit of extra time working with the pattern placement on these, making sure that each leg was a mirror image and that the strong horizontals and verticals met up.

Mood Fabrics Carolina Herrera Brocade Pants
I'll be honest, after getting my hands on this fabric, breathability really wasn't at the forefront of my concerns. Since this brocade definitely has some weight to it, it was pretty clear right off the bat that these would be winter pants, and I think the fabric worked great for that (although I could also see it making a really tremendous spring dress coat). And I have to say, I was truly surprised by how nicely this fabric presses, given it's texture and also that it's a polyester (I've always had miserable luck getting poly's to hold a crisp press).  This fabric just might make me rethink my polyester-ban!  I even left the pants unlined because the fabric felt fine against my skin. I did use some silky rayon bemberg lining in a lovely royal blue, also from Mood (here), for the pockets and to bind the inside of the waistband and leg hem, to add a pop of color to innards. I love little touches like that. However, you'll just have to take my word for it, because I forgot to get a shot of the insides. All other seams were simply serged and pressed flat.

Mood Fabrics Carolina Herrera Brocade Pants 
I used Ralph Pink's Cigarette Pants Pattern in a size US8/UK10 for these. It was my first time using this pattern.  I liked the overall shape of the pants in the illustration - the trouser pockets, front fly, single-welt back pockets, and cropped length - but overall, sadly, I'm not in love with this pattern.  I think the main issue is just that they were not made for my figure. They turned out insanely huge through the hips and legs when I sewed them up as directed (like, clownishly huge) and I had to take them in a ridiculous amount along the side seams, seat, and really anywhere I could get at them without having to totally undo some tricky areas (like the fly). This threw off some of my carefully strategized pattern placing along the seams (bummer), and also rendered those cute trouser pockets almost completely useless! I can just fit my hand in there! And to add to my frustration, the finished waistband feels just a mite snug (obviously Mr. Pink is designing for a much curvier lady than me!) I based my size choice off of my body measurements as listed, which was taking a bit of a leap of faith, since I usually choose sizes based on finished garment measurements, however there were none to be found! In this case, some finished garment measurements would have been extremely useful! I was also kind of bummed out that the pattern sizes weren't nested, so I only received the one size with my purchase.

Mood Fabrics Carolina Herrera Brocade PantsMood Fabrics Carolina Herrera Brocade Pants
But all pattern woes aside, I still think these pants turned out really great! I really love the combination of pairing an unexpected fabric with a basic, classic pattern to make an exciting statement piece to add to your wardrobe.  These pants pair great with a lot of the neutral tops in my closet, and they automatically make the outfit way more rock and roll! (As you might have guessed from my blog title, every time I look at these pants, this song keeps playing in my head, and I get an urge to do the Axel Rose shimmy... rather inexplicably really...) Now I just need a few more cold days so I can actually wear them!

xx


12.17.2013

go go girl

DSC_0045

Seasons Greetings from Galveston, TX! This week I'm preparing to make the yearly trek back East to spend the holidays with family, which means putting in long hours at work, doing ass-loads of laundry, cleaning the house, boarding the animals, and trying to eat up anything perishable in the fridge.  Thank goodness I got all my holiday shopping/gift-making finished up this weekend! Truthfully, I've been on a bit of a holiday roll as of late, which is quite odd for me. Usually I have absolutely zero Christmas spirit until I step foot in my parents bedecked house a few days before Christmas.  But this year I'm starting to feel it, and it's kinda nice! 

DSC_0042 DSC_0035

I think part of the reason for all my holiday cheer has to do with the fact that it's actually been cold enough in Texas for it to feel like winter.  Yes, yes, I know I'm sporting bare legs in these photos, and that's because, well, it warmed up again... but believe me when I say that it was actually and truthfully legitimately cold just a few short days ago! And since 90% of my wardrobe is warm weather garb, I found myself in the same position I always find myself in when the cold finally decides to strike in these parts - with nothing to wear! 

I've often joked that I'm part reptile because it seems that whatever the temperature is outside, that's the temperature of my body (and that's why I'm most comfortable at, oh, say 90F). I have seriously got to be the most cold-natured person I've ever met! My husband will back me up on this since he has been subject to my alarmingly cold feet and hands (and legs and arms and...) for quite some time now. So you can imagine me, a few weeks ago, feeling completely unprepared during our first cold snap, huddled in a blanket in front of my computer, numb fingers scrolling through pages and pages of online fabric stores and muttering to myself through blue lips and chattering teeth "woooollll.... neeed woooool"...

DSC_0040 DSC_0041

As soon as my paycheck was in I was ordering this dense, smooth, medium weight, 100% wool knit from Mood. And, oh man, did this stuff deliver! It was exactly what I was looking for - comfy like a knit, but oh so cozy. Some crosswise stretch, but pretty stable (no lycra), it doesn't wrinkle, but it pressed like a dream, and zero itch. Truthfully. I'm pretty sensitive to itchy wool, and I can wear this stuff against bare skin all day without wanting to claw it off me (although I like to layer, because, see above - re: reptilian blood). And it's black. I don't know what it is, but I have been feeling very 'black all over' with my clothes lately, so expect to see more black on this blog before the season is over!

I knew exactly what I wanted to make with it too. This is the Saiph Tunic from Papercut Patterns' new Constellation Collection - a gorgeous group of patterns with some really standout pieces.  I was pretty tempted by a few of them, but then my eyes clapped on this simple, beginner pattern, and well.... it was love at first sight. I mean, a boxy, shapeless shift of a dress?! Be. Still. My. Heart! It had "Sallie" written alllll over it!! 

DSC_0051 DSC_0048

Actually what really drew me to this dress was some of the pretty details, like those French darts at the bust, and the inseam pockets.  There is actually some subtle shaping in the dress, making it much more elegant than wearing a giant rectangle. And while I'm not super passionate about pockets in dresses (I can go either way) I do love when they are a design feature like they are here. 

I made this in a size XS, but I did a real mental dance about whether I should go down a size or not because of the roomy fit and the knit fabric.  In the end I decided to go with my measurement size because I didn't want those bust darts to end at my collarbones, and I was too lazy to lower them.  The fit is definitely roomy, but I don't regret making this size. Honestly, if I were to make it again I would probably cut the same size, but maybe narrow the shoulders. The only alterations I made to the pattern was to add 1 inch of length to the bottom hem band piece because I wanted to be able to wear this as a dress, not as a tunic (as the name suggests) and I took about 1/4 inch of height out of the sleeve-cap to reduce the ease, because I was using a knit (otherwise the sleeve-cap ease would have been perfect as drafted).

This was super easy breezy to sew up.  I finished the cuffs and hem by interfacing them first with some knit fusible and then using my twin needle to topstitch them - makes for a really neat finish.  And I alternated between using my sewing machine set to a long-ish (3.5) straight stitch and using my serger to sew the seams.  Most of the major seams (side seams, hem band) were done on the serger. I used a random white button I had in my stash for the back closure (I think it gives a subtle 'Wednesday Addams vibe') but, really, you don't need it - this is one that can slip right over your head. I stabilized the shoulder seams with a bit of clear elastic, but if I were to make this in a knit again I would also stabilize the front band seamline/pocket openings.  I don't mind the way they droop a bit here, but I dream of them sitting nice and flat and giving a really crisp, architectural feel.

DSC_0043

I've already blabbed to my husband, my boss, and anyone else who I can get to stand still long enough to listen, about how I need, like, three more of these dresses in my wardrobe and then I would be a happy (winter) camper! It's just as cozy for curling up on the couch as it is for sitting at a desk, or gardening, or doing the myriad of other things that I do in my day to day life.  I just wish Mood had this   wool knit in other colors (like a bright red! or ivory - like the sample garment on Papercut Patterns website!) but I'm thinking of trying it out in a ponte next. Does anyone have experience working with ponte? What's the cozy-ness factor?

As you can see, I had a little helper with me while I shot these photos.  I thought the presence of Lucille might mitigate some of the weird comments and stares I tend to get when I take blog pictures. It's been my experience that people do not mess with you when you're accompanied by a large black, menacing looking dog, even if she is a big softie. I tried to get a good picture of the two of us, but unfortunately poor Lucille wasn't feeling so good. Shortly after this she started eating grass and vomiting! Poor puppy! Better out than in. (Don't worry, it was nothing serious, just random dog barfs...)

So here's a picture of me posing like weirdo, and sweet Lucille, looking rather green around the gills, to wish you and yours a very happy holiday! I hope your days are filled with lots of good food and even better company! (And perhaps a little sewing-related giftie or two to close out 2013?) See you in the New Year!

xx

10.21.2013

last gasp

DSC_0067

I want to thank you all, so much, for your kind words on my last fabric post! I'm having such a wonderful time experimenting with dyes and seeing where I can push them and how I might make them my own, and it's been such a joy getting to share that process with you! And you've certainly given me a ton to think about in terms of where all this fabric dyeing might lead...

DSC_0054DSC_0029

I also have to acknowledge all the crazy good suggestions you guys had for what this fabric should become! You guys seriously have amazing vision, and I wish I could have taken every. single. one of your suggestions (wouldn't that have been an awesome post!?) 

But, as you can see, I ended up sticking to the original plan and making an Anna.  One of the main reasons for this being that Heather Lou sent me this pattern as part of our hand-dyed-silk-maxi-dress-love-fest earlier this summer, and it just seemed to complete the karmic circle of good-feelings too perfectly to use this pattern with this fabric. And if there is one thing I believe in, it's karmic circles. And silk. Yes, I am a fervent member of the Church of Karma & Silk... any other believers out there?

DSC_0083DSC_0109

I also really wanted to make my Anna before our weather turned too cold for me to enjoy it, because if ever there was a pattern for Summer 2013, I believe it is the Anna.  This pattern just feels so very now (yes, I realize that for most of you in the northern hemi summer is already a distant memory, clouded over by wafts of pumpkin spice everything, but in my little corner of the world I'm still enjoying the last few gasps of warmish temps before fall finally decides to settle on us). When I was in NYC I had the wonderful privilege of getting to eyeball not one, not two, but five Anna's in the course of three days! That, my friends, is an excellent example of a pattern going viral.  And, yeah, I wanted in. So consider this my late entry onto the Anna train.

And, boyohboyohboy am I glad I boarded that train! I was actually nervous about this dress - if you can believe it.  I worried that the tummy-hugging silhouette wouldn't be particularly flattering on me, since I generally try to drape myself in volume around those middle parts. I actually made two muslins of the bodice before I cut into my silk, something I haven't done in quite awhile.  I couldn't quite make my mind up between two sizes - a US6 or a US8.  Both, technically, fit. And looked fine. But the 6... well... it left no one in doubt about where I store my chicken and waffles ifyaknowwhati'msayin... So I went with the 8, and I'm very pleased that I did.  I think the dress is still miraculously flattering and feminine and sexy while still allowing me to breathe and, ya know, have organs. 

DSC_0096DSC_0082DSC_0076

So let's talk about some of the nitty-gritty, shall we? One of the benefits of being the last person in the blogosphere to make a pattern is that you get to learn from everyone else's experience.  So even before I made my muslins I was aware that this pattern had some issues with gaping at the back neck, and I was able to use Ginger's clever little adjustment to take out excess fabric there (though the back neck still gapes a bit if I stand up 'yoga-straight'...) I also took Oona's advice and skipped the pattern facings and instead used a bias strip facing to finish the neckline.  I had also heard everyone bemoan the miles of french seams and hand finishing that this dress called for. I heard it. And I chose to ignore it. Instead I serged my edges (I know... such a rebel) and....!!! Get this... I topstitched my thigh-split! Say What?!?! It's true. And before you all come at me with pitchforks and buckets of tar, lemme just say: It. Works. Fine. I would especially recommend this if you are making your Anna out of a solid colored fabric. Total time saver. Perhaps not the invisible finish some might desire, but dudes, I finished this dress in a day. 

Cue the horrible construction shots in heinous indoor lighting... 

DSC_0030DSC_0031DSC_0032

The one area where I did go a bit overboard on was the zipper.  I hate the feel of zipper tape against my skin, so I debated drafting a facing for the back opening, but I felt like that would really only work neatly if I included all the facings, and I had already decided to go the bias route. So instead I cut strips of my silk and bound the zipper tape in those before I inserted it into the dress. Now, no scratchy zipper tape ruining the delicious feeling of all that silk against my skin! As for my invisible zipper experience as a whole? I have no complaints. Inserting zippers into super lightweight fabrics like this silk is always a bit funky. But I interfaced the seam allowances around the zipper and it went in like a charm, and, I think, looks just about as neat and clean as can be expected.

DSC_0101

Nick took these pictures for me, which is always a bit of an adventure.  I usually end up with some absolutely stunning shots, and then I get some funny ones like the shot above. I can only assume he was getting bored with my posing and preening and the distraction of a really big boat was just too tempting! (P.S. Thank you, Nick! You're such a good sport! I love you!) 

Well, since finishing this dress I've already worn it to two events and plan to wear it to another this week. It's actually pretty amazing how this dress can go super fancy or more daytime-casual with just the slightest change of shoes and accessories. Love it! But now I think it's time for me to focus on some fall weather sewing... sigh. It's time. Goodbye summer!

xx

10.01.2013

floral

DSC_0031

Can we just talk about this dye-job for a minute? I decided this fabric was so special that it deserves it's own dedicated post before I start hacking into it.  (Ouch. It hurts my heart just thinking about that!)

DSC_0030

This is just a smidgen over four yards of a light weight silk crepe de chine, dyed up in a pretty, autumnal palette of navy, dusty rose and gold (it may not feel like autumn here, but that doesn't mean I can't sneak some fall colors into my palette!)  Perhaps some of you spotted this post by the ever glorious Heather Lou? If you haven't, I highly suggest you give it a read, as it tells the beautiful story of two friends and ten yards of silk (shouldn't all great love stories begin and end with a crap-ton of silk??) 

Anyway - the short-short version goes something like this - Heather sent me ten yards of silk, half of which I dyed for her and shipped off to Canada (like a mother bird sending her young fledglings out of the nest: a bit teary, but bursting with pride) and the other half I kept for myself.  You see, I work for silk. Heather then commenced to make the most breathtaking dress ever imaginable with said silk, and I sat on my half, hemming-and-hawing as I am wont to do.


DSC_0029

So what does this silk have to do with Heather's silk? Well. Everything is a learning process with me. See, while I was working on Heather's silk (the interior dialogue of which sounded something like this: "Expletives expletives expletives.... omigod no.... cursing cursing cursing... I've f*cked it up!!! Okay... wait... maybe if I... alright... okay... that's better... yeah... okay... this might not be so bad... OMIGOD I LOVE THIS!!") I discovered through sheer accident that when you mix sodium alginate (used to thicken dyes to a more 'paint-like' consistency and reduce the 'bleed' effect) with your dyes that it also acts as a very subtle resist - meaning other dyes will not run right into it and muck up the color.  You can, of course, buy commercial resists, or use a wax resist (typical in batik fabrics) but I was interested in the fact that this would allow me to still do a one step dye job - no washing between layers - and, best of all, I already had all the necessary components!

DSC_0035

So I brewed up the idea of painting a floral(ish) motif and then painting by hand the negative space around it - allowing the thickened dyes (pink and yellow) to act as a resist, and thereby also preserving some of the white of my fabric.  In this way I was able to create the effect of a lighter design on top of a darker background color.  

But, still, it's always trial and error with my dyeing experiments! I thickened the pink dye more than the yellow, so there is some bleeding happening along the edges of the design. I actually don't mind this at all - I think it's a really lovely element to this fabric, but still, unplanned. Also, since the dark blue color was literally painted in by hand (with a much too small brush, might I add! I might need to remedy that soon...) it takes on a slightly mottled appearance - again, just a little quirk of the handmade!

DSC_0033

It's actually quite funny to see these fabrics in real life, because my hand changes as I work down the yardage - becoming more relaxed and maybe trying out a few different design ideas.  In the beginning I'm always over-thinking and over-working it! You can see this in the image above: on the right, you have what looks, to me, like a hydrangea cluster, and on the left you can see what it slowly morphed into... perhaps something one might see underneath a microscope?

DSC_0038

You can tell I love this silk very very much, because when I'm in love with a fabric I go all Pre-Raphaelite up in this shit! 

Now... the real question is - what to do with it? I had my heart set on an Anna, but after swanning about with it draped all over me I'm beginning to lose my resolve... Is this begging to be turned into something else? Does anyone else see this silk and immediately think it must be turned into a certain pattern? Or am I just, once again, over-thinking this? Inquiring minds want to know...

xx

9.24.2013

art teacher


DSC_0059

I know! Two posts in one week!! Craziness! And the excitement doesn't end here... hint hint...

So, do you guys remember your art teachers growing up? I was really lucky to have some wonderful art teachers (one of whom was my Mom - hi Mom!!  I might be biased, but she was my favorite!) and while I may have found my way into a creative field all on my own, I definitely would not have had the amount of confidence and wherewithal to pursue my degrees in Painting without the support and encouragement of my art teachers.  I mean... I certainly wasn't getting any encouragement to continue on with math or science... so, I'm glad someone saw something in me!

DSC_0062

But this post isn't just a testimonial to the importance of arts education in public schools (although don't get me started...) It's about some of the other effects that art teachers had on me.  I'm talking about style here.  One of my style inspirations is always some kind of mish-mash of all my art teachers.  There's just such an amazing, eclectic mix of professional/bohemian, practical/elegant, modern/vintage vibes going on with the art educator set! Not to mention a (typically) keen eye for color, proportion, and texture.  

This jacket feels like something that one of my art teachers (or maybe just my Mom...this is a good thing) would have worn.  There were lots of sneak peeks of this make in my last post because I literally wore it every. single. day while I was in NYC.  I have to say - up to this date - this might be one of my favorite handmade additions to my closet.  It's just seriously cool.

DSC_0063

A few months ago, Colette from Tessuti contacted me to see if I'd like to review one of their patterns.  Have you guys been keeping up on the patterns that have been coming out of there? Really great stuff. Basics with a twist - definitely my kind of thing.  And also the sort of garments that would be flattering on a wide range of women, both age-wise and body-type.  I chose to make the Tokyo Jacket - a loose, unstructured, kimono-inspired jacket that works well in lighter, drape-ier fabrics.  I could just tell immediately from the line-drawings and the pictures on their site that this would be my kind of thing.  I love clothing with a somewhat Japanese aesthetic, and a dramatic fit. I will also be ordering the Suzy Pant as soon as payday comes... hello favorite new fall pant!

It took me a little while to get around making this jacket - mainly because I couldn't quite wrap my head around making a jacket, no matter how lightweight, when the temperatures were over 100 degrees! But with the approach of fall I decided it was time to delve in, and boy am I glad I did! This seems to go with everything in my closet!


This was one of those times that I had a really clear idea about what kind of fabric I wanted to pair with the pattern.  I knew as soon as I had the pattern in my hands that I wanted to make this out of some kind of shibori-dyed fabric, to highlight the kimono silhouette.  I used some silk noil (the same stuff I used to make this dress) and tried a itajime-shibori technique.  This basically means that the fabric was folded and then used some kind of shape-resist to prevent the dye from penetrating all the way through.  I was dyeing about 2 1/2 yards... you guys... that was a lot of folding! I can't totally say if my process was legit-shibori (I'm an internet learner) but I loved the outcome!

I didn't use a traditional indigo dye bath, but instead just used my trusty Dharma procion dyes.  Believe it or not, this dye color was supposed to black! That just goes to show you how unpredictable dye colors can be! It turned out more of a gray-ish blue with (though you can't see it in these pictures) an almost pink-ish haze around the blue.

DSC_0076

My yardage of this silk noil was pretty narrow, so I had to fold it on the cross-grain in order to cut the pattern pieces.  My one regret with this jacket is that I did not follow my gut and cut the back piece on the fold (the instructions were to cut two).  There was just no way I was going to get the pattern to match up at that center back seam otherwise.  But like many things, this felt like a bit of a bummer at the time, but after wearing it around for a whole weekend, it really doesn't bother me (we'll call it a 'design feature').  Next time...

So the pattern! I requested a paper pattern because I was feeling a bit burnt out on all the printing and taping of digital patterns, but these patterns are available both ways.  They have a handmade look to them which is pleasant - like a pattern your friend drafted for you.  Everything matched up perfectly and the fit was spot on. I made a size S based on my measurements.  Obviously this jacket is very roomy so I probably could have made an XS, but when a garment like this is designed to have excessive ease I like to follow the designers size suggestions so it fits how they envision (interestingly enough, this is the total opposite to when I'm making a more fitted garment - then I base everything off of the finished garment measurements).

DSC_0079

The instructions were impeccable! So, so thorough.  I didn't run into any problems sewing this up! The pattern says it is for Intermediate to Super-Advanced sewers, but honestly, based on how descriptive the instructions are I think a beginner-intermediate sewer could handle this, no problem. The trickiest part (in my opinion) was the pockets, and this was simply because they come together in a way I have never quite seen before, but I just trusted Tessuti and followed the instructions and lo-and-behold! Perfect pockets! 

I had the bare minimum of my yardage to make this  jacket, so I opted to do the cuffs and pocket trim in a contrast fabric.  This was one of the other reasons it took me a while to finally make this jacket - I was searching for the perfect trim fabric. You know, that mythical fabric that will just magically take this jacket from "awesome" to "amaze-balls"..? Well I found it, but it wasn't in any of my local stores.  


You see, I really wanted to have this jacket ready for my trip to New York, so I ended up rooting around in my scraps until I found something that struck my fancy - leather! I had left-over cream lamb-skin from making this jacket, and leftover black pleather from making these pants, and after a brief consultation on Instagram I followed the overwhelming advice to go with cream and I was off and away! And, wow, you guys I am  so glad  I took your advice and went with the cream leather! It just looks, and feels (and smells) so luxe! I added a small ribbon of trim along the collar to separate the collar from the body of the jacket, and to balance the other leather accents.  Those little bits of leather are really what makes this jacket extra-special to me. I just love the combined textures of the nubby silk-noil and buttery soft leather... mmmm.... Side note: this has totally renewed my love of sewing with leather... I am already scheming... many schemes...

DSC_0080

So yeah! I'm super excited about this jacket!! A huge 'thank you' to Colette for sending me this pattern, and for always being such a huge supporter of this sewing-blog community! 

And now... for something extra exciting!! Tessuti is giving away one Tokyo Jacket pattern to one of my readers!! If you're in the Northern hemisphere, this jacket will make a great layering piece for fall - and if you're about to enter spring, this is the perfect lightweight layer to throw on over a sleeveless shirt (or, in my case, jumpsuit!) Basically - transitional weather perfection! 

Leave a comment with an email address where I can reach you - extra points if you make me laugh - and I'll choose a winner at random... oh... say... next Monday, September 30th at 8pm?  Sounds like a great way to cap off September! 

xx