Showing posts with label nick. Show all posts

6.10.2014

nick's jeans

DSC_0019
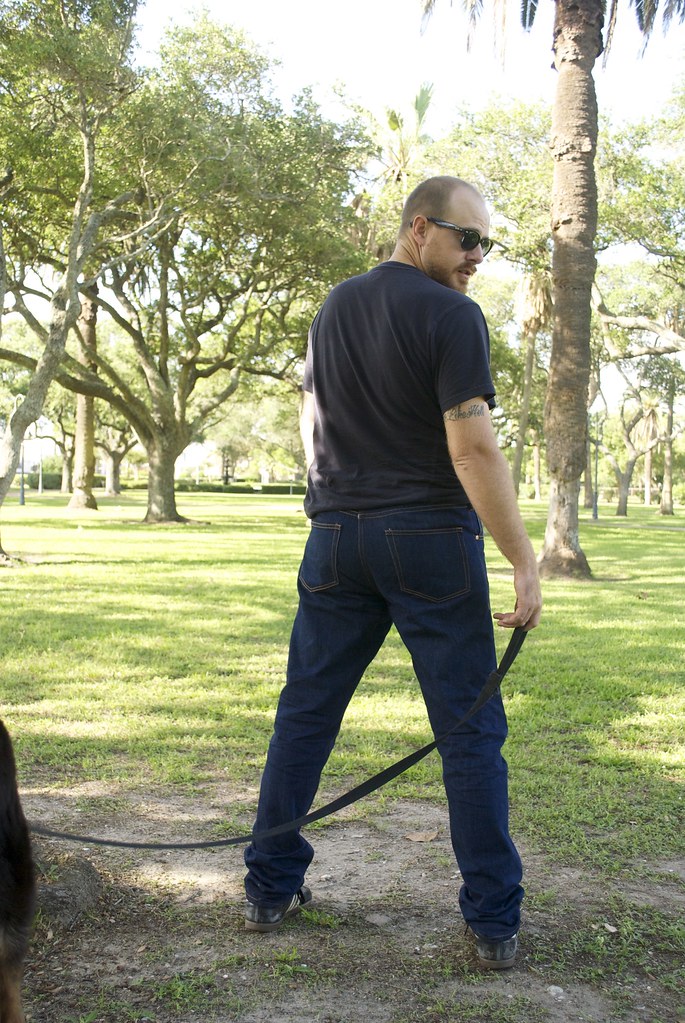
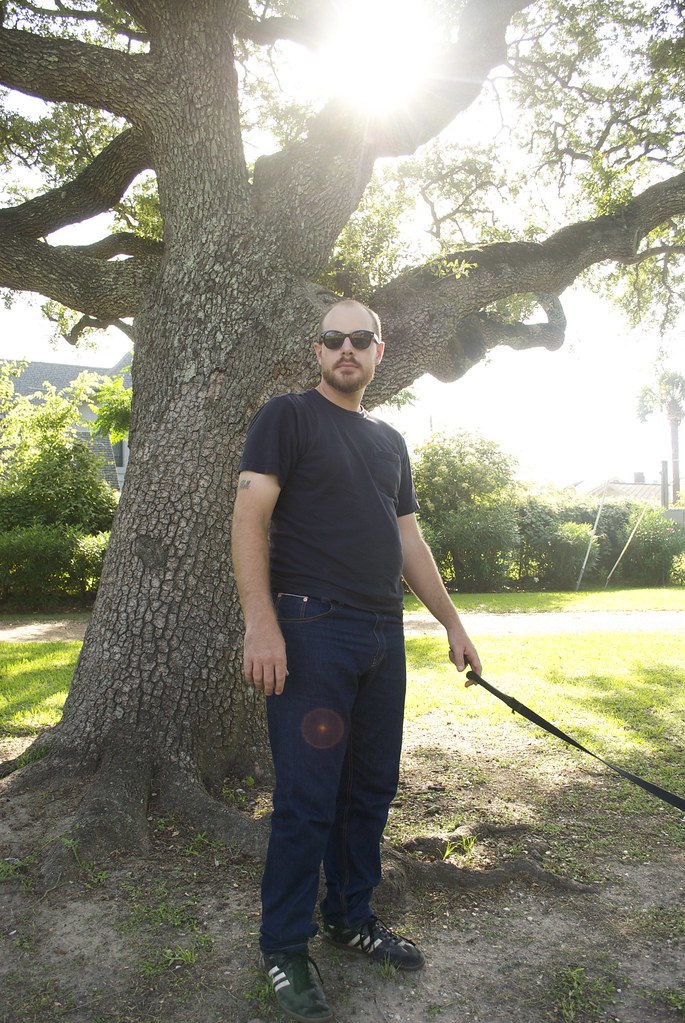
This is Nick doing his best Bruce Springsteen impression... *swoon*
Alternate post title: How To Objectify Your Man.

Hi there! I hope you guys aren't sick of looking at jeans yet, because (un)fortunately for you, I'm not sick of making them! I figured since I  got some good jeans-sewing-momentum going with my last pair, I might as well take advantage of it and make good on a promise to Nick to sew him a pair, too.

Now, I don't need to explain my selfish-seamstress ways to ya'll - I know I'm in good company here! But, this past Christmas I bought Nick all the goods - denim, thread, buttons, rivets - for me to make him his very own pair of jeans. And then proceeded to not make him jeans for the next six months! Seriously, I am the worst gift-giver in the history of ever. The fact that I made myself a pair of jeans before his... well... I was starting to feel like if I didn't get on it soon it would just end up being one of those things that gets brought up 20 years from now in an argument ("yeah, like that time you said you were going to make me jeans...") And really, it's not completely unselfish sewing - brownie points with your husband never hurt anything!

DSC_0004

But the jeans! The jeaannnnssss!!! I made Nick a pair of pants back in November using the Jedediah pants pattern from Thread Theory with the intention of using them as a wearable muslin for a jeans pattern. We discussed a few changes he wanted - like a smaller back yoke and higher back pockets, and I felt confident that I could adjust the pattern to make it more of a jeans style, which mainly meant changing the shape of the front pockets. However when I went hunting for denim, I really decided that only selvedge denim would do for my guy.  I bought the 13.5 oz Cone Mills Selvedge Denim from Taylor Tailor's Supply shop (love that guy!) I love the look of a classic, no-nonsense jean on a man - and it's really Nick's style, too (go figure). I felt like selvedge denim would make a great classic looking jean, but still give that extra special little 'something'.

DSC_0009

However, that presented a bit of a problem.  If you're unfamiliar with selvedge denim jeans, typically the selvedge - which usually has a contrasting color (this denim has a white and red line) - is used for the out-seam of the leg, which means that the pattern must be completely straight along the out-seam. This meant that I was going to have to make some much larger alterations to the Jedediah pattern, and, truth be told, was one of the main reasons I procrastinated on this for so long. I was really worried that shifting the pattern that much would cause the pants to fall weird. However, I bit the bullet and just decided what the hell, and gave it a go! And it worked out, so phew!

IMG_1233IMG_1234IMG_1235

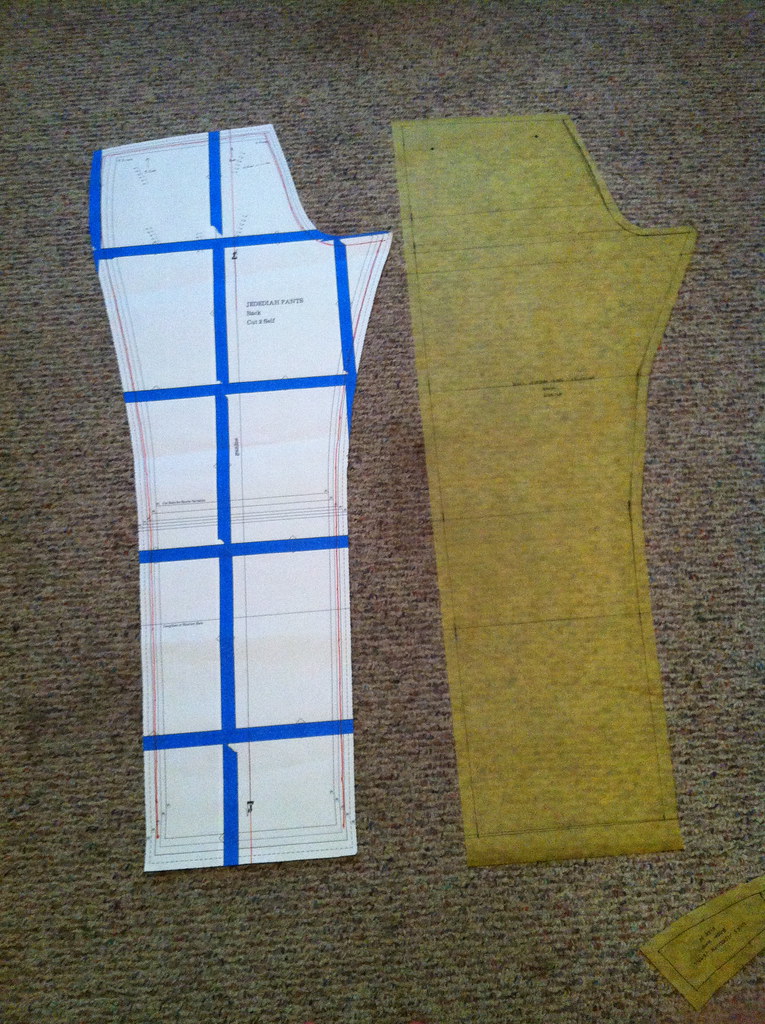
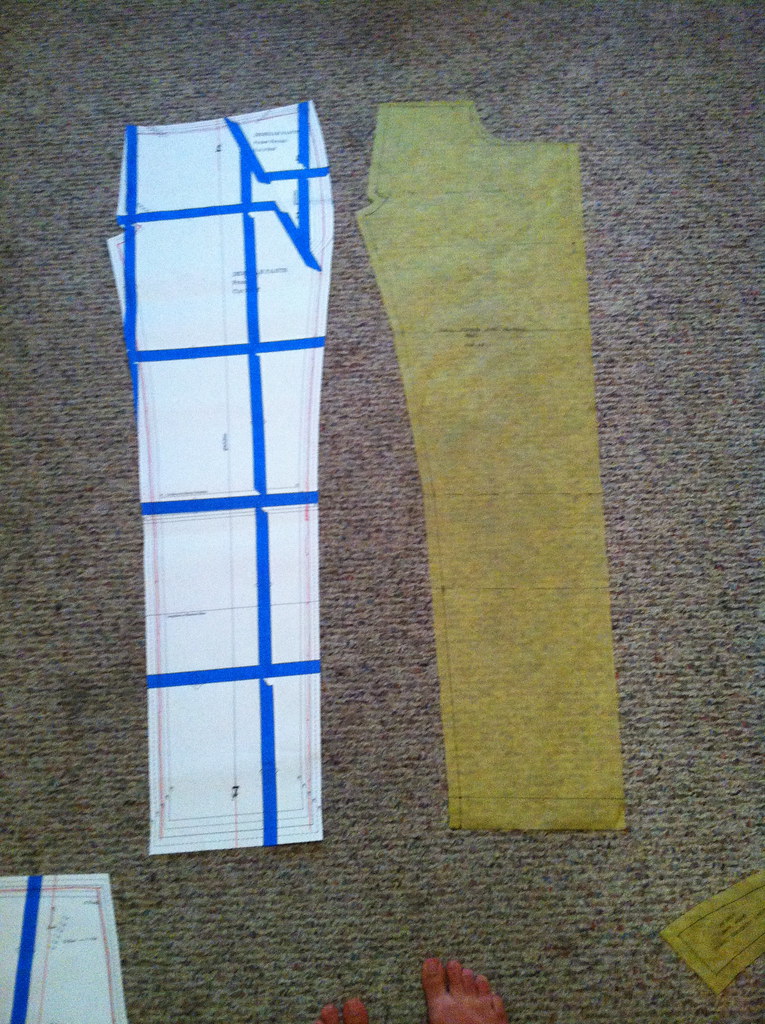
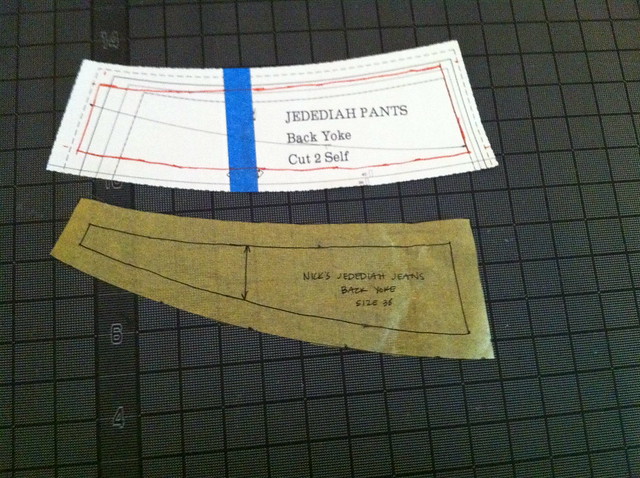
(Apologies for the nasty carpet in my sewing room... I swear it's clean, just old) Hopefully you can see in these photos the difference between the original Jedediah pants pattern on the left, and the altered "Jedediah Selvedge Jeans" pattern on the right. Basically, I measured the distance between the new, straight, out-seam and the original, curved, out-seam at different key points along the length of the leg (high hip, low hip, crotch, thigh, knee, etc.) and shifted the inseam over the corresponding amount.  You can also see how much I changed the yoke piece, too. I measured an old pair of Nick's jeans to get this shape, then transferred the amount I cut off of the yoke to the top of the pants backs.

DSC_0009
DSC_0018

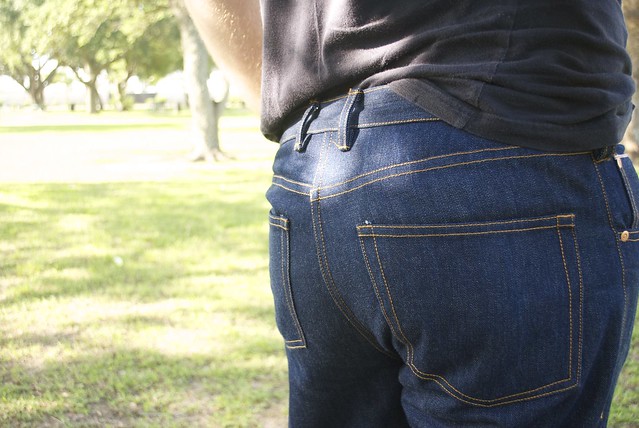
I may have taken a smidgen of width out of the hip/butt area while making all these adjustments, but I swear it was for a good reason! I felt like after wearing, Nick's Jedediah khaki's tend to get a very saggy seat and I thought that might help solve the problem. But I think instead it just made the jeans tight in allll the right places!! Bwahahahaha! Accidental WIN for this lucky lady!

While I don't know that this iteration is Nick's 'perfect jeans pattern', I actually really love the way they turned out. Next time (ha!) I would like to take a bit of width out of the waist in the back because I think that might actually be the cause of the saggy seat. And I might consider taking a tiny bit of width out of the legs, although Nick is pretty happy with the way the legs fit as is.

But let's take a look at some of the details, because with jeans, it's alllll about the details!

DSC_0014

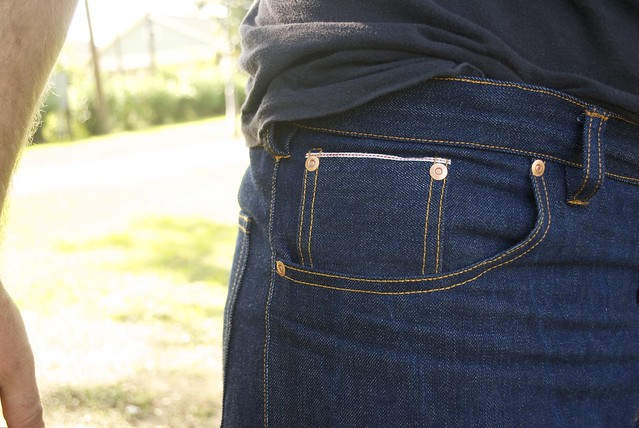
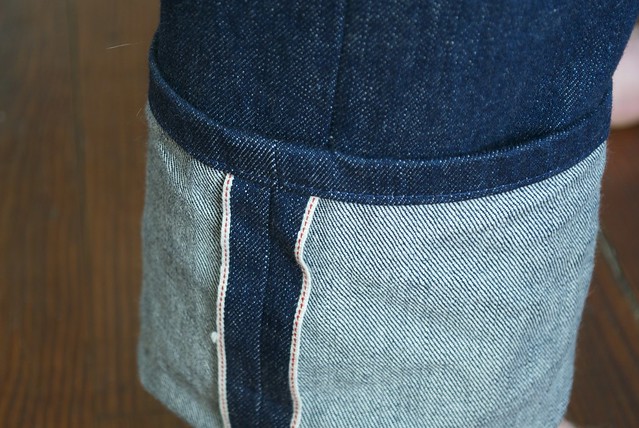
I stole a lof of ideas for these from Taylor Tailor's totally drool-worthy jeans. Here you can see the coin pocket which uses the selvedge edge as a nice design feature. Also prominent in this photo is some of my less-than-perfect topstitching! I was really worried about sewing such thick denim on my conventional sewing machine (an older model Singer HD) but it actually handled it like a champ through most of the process - until I got to the belt loops... oy vey. My machine doesn't love belt loops on a good day, but it was just not. happening. with these! I ended up forgoing my usual bartack method for the belt loops and instead just did a few rows of straight stitching. We'll see how well they hold up.

DSC_0016

For the back pockets I copied an old pair of Nick's jeans. Everything that could be sewn with a flat-felled seam was sewn with a flat-felled seam. Including the back rise and yokes, which results in a charmingly, slightly off 'v' where the two yokes meet.

DSC_0012

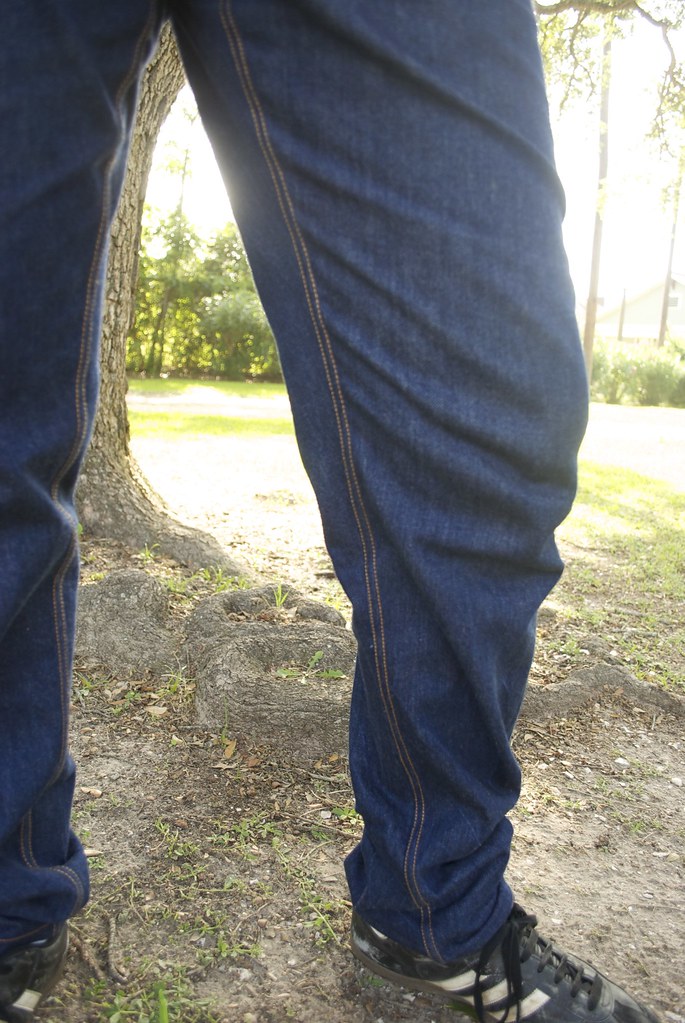
If love were a seam, it would be 72 inches of painstakingly, hand rolled, flat-felled inseam!

IMG_1248

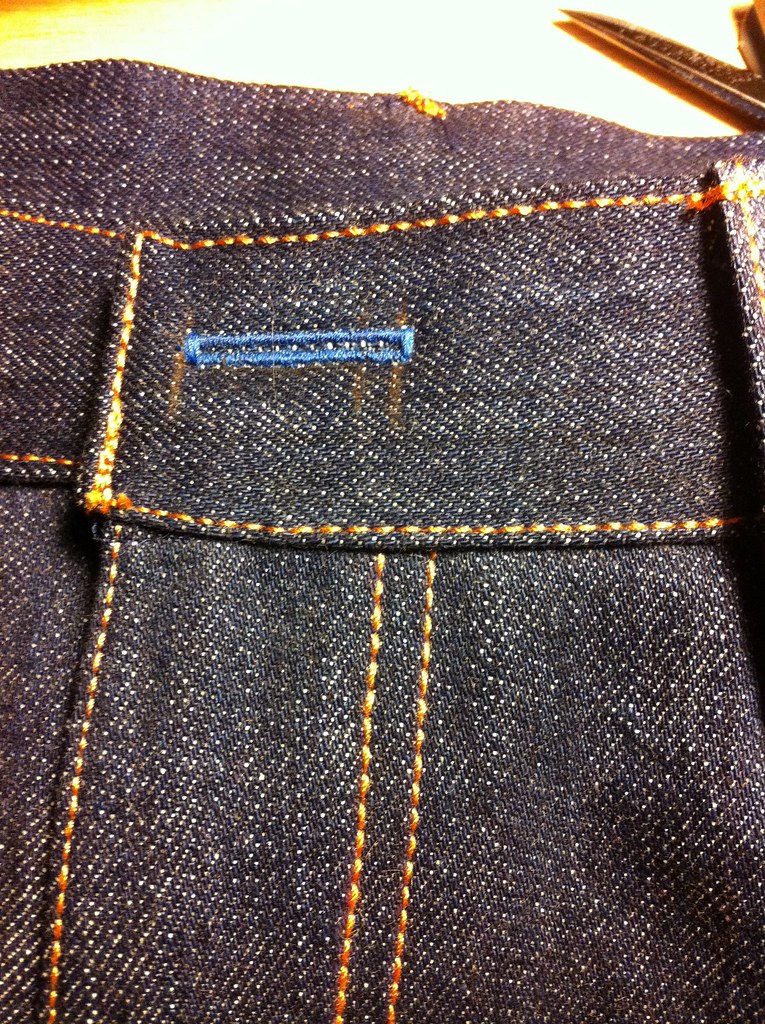
And, oddly enough, one of my favorite details is this little cobalt blue buttonhole!

DSC_0025

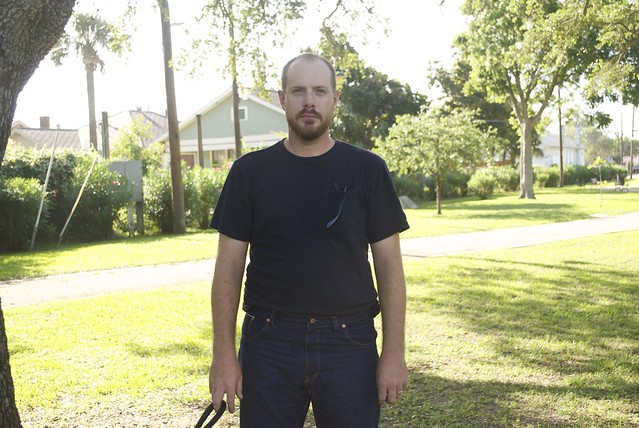
I gave Nick strict instructions to limit the amount of washing he gives these jeans. Indigo dyed, 100% cotton denim like this is known for it's ability to break in and 'mold' to the wearer, creating beautiful fades with time. I'm actually quite smitten with these jeans, to be honest! So smitten that I'm itching to make myself a pair, too! But don't worry, I'll take a jeans-sewing break for now and make something else for a bit to end the denim monotony that's been going on around these parts!

And now, because it's my blog and I say so...

DSC_0030

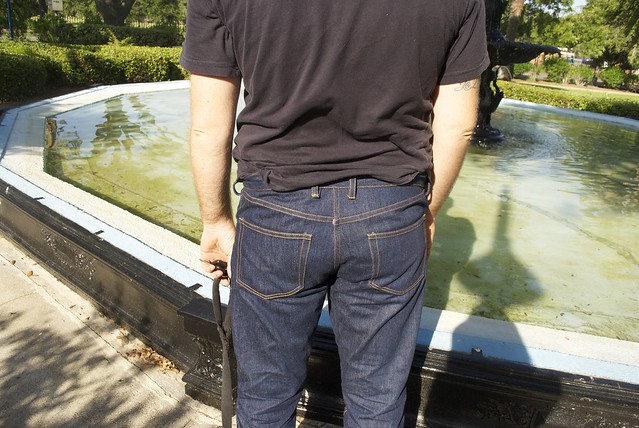
Let's take one last look at that tush!!

Seriously... dude butts do not get enough screen time on this blog!

xx

11.27.2013

1 for you, 50 for me...

DSC_0058

Here in the U.S., tomorrow is our Thanksgiving holiday (as I write this, at least) - the holiday that really starts off the whole holiday season with a bang (or at least with turkey and naps).  I always feel like this time of year we're supposed to reflect on all the things we're grateful for - sort of like a period of meditation before the expected New Years Resolution phase begins.  Honestly I always felt like the whole thing was a bit too... I don't know... Hallmark-y for me. But I do believe, wholeheartedly, in gratitude.  And there is not one thing, and not one soul on this earth that I am more grateful for than this guy right here.

DSC_0055

I could ramble on about all the things I love about my husband (actually, I couldn't, because when it comes to matters of the heart I get a tad bit... what's the word... verklempt) but really, it goes without saying.  So instead I'm just going to skate over that bit, and get right to brass tacks.

DSC_0041

See... Nick asked me to make him pants. Now if your husband asks you to make him pants, what do you do? You might look him straight in the eye, smile, and say, "Of course, Peaches! Just as soon as I finish whatever it is I'm doing right now" And then once you actually finish whatever you're doing right then, you put your selfish-sewing queue on hold and make your husband/wife/gf/bf/partner/whatever a damn pair of pants!! If this scenario describes you, then I say shove it well done you! Now why don't you go over there where I can't see you, mmmkay??

When Nick asked me to make him pants the first 5 times I pretended I didn't hear him. Then the next 15 times I promised he'd have them for his birthday. In June. Once his birthday came and went, and he was still asking, I just put it out there in some nebulous place of "yeaahhhh, I'll do that.... someday." Finally, it took him becoming quite distraught about the fact that his pants wardrobe is slowly dwindling and I promised to make him pants and do I want him to keep wearing the same pair of green shorts for the rest of his life? for me to hold up my end of the bargain. So almost a year later, I looked him straight in the eye, smiled, and said "Of course, Peaches! Just as soon as I finish whatever I'm doing right now." And once I finished whatever I was doing right then, I actually made him pants. Just kidding. I don't call Nick "Peaches"...

DSC_0068

Part of the hold up is to be blamed on the utterly dismal state of men's sewing patterns. I mean... gross you guys.  And because of this, Nick really wanted me to copy a pair of existing Banana Republic trousers that he owns, and, well... that just sounded hard. Not impossible, but like more work, time, and money than I was willing to put into something I wasn't even sure if he would like. Well thank goodness that in the yawning stretch of time from when he first started asking until now I became introduced to Thread Theory via the blog world.  I think all of us ladies who occasionally sew for men (and I'm sure some real live men, too) were rejoicing once we came upon these patterns.  Thank the heavens! Men's sewing patterns that look contemporary, yet classic, and aren't pajama pants! 

DSC_0027DSC_0027
Please excuse the ridiculous amount of dog hair on these... this fabric is seriously like a magnet!
So I decided to make the Jedediah Pants for Nick, which are an interesting design - somewhere between a classic trouser, with the side-slash pockets and waistband finishing - and a jean, with their patch pockets, back yoke, and flat-felled seams.  This made them a perfect pattern to start with, because they will be easy to adapt to a more traditional trouser (just add back welt pockets and convert the yoke to darts) or a jean (just add a curved front pocket).

Nick wasn't sure, from the pictures, if the cut of the pants would suit him, so we decided to have this first pair be more like a 'wearable muslin'.  I made them in a size 38 (my husband is a big man) out of some cheap khaki twill I bought from JoAnne's, which wrinkles like mad and collects animal hair like it's its job.  

DSC_0029

Now, those of you that have been hanging around here for awhile know that this is not my first time at the pants-sewing-rodeo.  But even though I'm pretty familiar with pants construction at this point, any time I work with a new pattern I like to follow their instructions.  The instructions for these pants were a little different than what I was used to, but overall nothing major.  They tell you to do things in a certain order that I found a bit awkward, and I'll probably do it the way I'm comfortable with in the future.  The only place I really hit a roadblock was with the fly.  No matter how many times I sew a zip fly I still need to follow instructions, and I have to say, the instructions for sewing the zip fly on the Jedediah Pants made no sense. Perhaps this was user error (or incompetence), but nevertheless I fussed and fought and couldn't make it work.  In the end I resorted to Grainline's zip-fly tutorial which I've used in the past and I feel like it gives a great result. Actually, I think from here on out I'm just going to stop second guessing and always use Grainline's method, because I just know it's going to work.

DSC_0028DSC_0028

As for the finished product? Well, aside from the fabric, I think we both feel like it's not too bad. It's a little bit big in the waist (my fault, I was being overly cautious and gave an extra half inch at the CB seam. you can see how they're bunching up underneath his belt in these pictures) and Nick feels like the rise is a bit lower than what he's used to.  We also think that the back yoke is a little large, and it makes the back patch pockets sit a little awkwardly low (on him).  I still think I'll use this pattern again to make him another pair of pants, making a few of these minor adjustments along the way. If he's lucky, he just might get a pair of jeans sooner rather than later (I mean... while I'm on a roll here...)

DSC_0037

Nick is incredibly camera-shy (most of the pictures I have of him are just a blur as he dashes out of frame) so getting him to pose for these pictures was a bit of a project! In the end, he was an awesomely good sport about it, even, perhaps, getting into it just a tiny bit. I like to think of the pose above as his "Jcrew-catalogue-man" pose.

Well, coming back to the theme of gratitude, I want to say thank you to all of you, dear readers, fellow sewing bloggers, friends, and (especially) family, for stopping by every now and then, for all your words of encouragement and praise, for letting me be a part of this awesome, supportive community, and for continually inspiring and teaching me, day after day, month after month, and year after year.  If you're celebrating Thanksgiving, I hope you have a lovely, holiday, and if you're not celebrating Thanksgiving, happy Thursday!

xx

10.21.2013

last gasp

DSC_0067

I want to thank you all, so much, for your kind words on my last fabric post! I'm having such a wonderful time experimenting with dyes and seeing where I can push them and how I might make them my own, and it's been such a joy getting to share that process with you! And you've certainly given me a ton to think about in terms of where all this fabric dyeing might lead...

DSC_0054DSC_0029

I also have to acknowledge all the crazy good suggestions you guys had for what this fabric should become! You guys seriously have amazing vision, and I wish I could have taken every. single. one of your suggestions (wouldn't that have been an awesome post!?) 

But, as you can see, I ended up sticking to the original plan and making an Anna.  One of the main reasons for this being that Heather Lou sent me this pattern as part of our hand-dyed-silk-maxi-dress-love-fest earlier this summer, and it just seemed to complete the karmic circle of good-feelings too perfectly to use this pattern with this fabric. And if there is one thing I believe in, it's karmic circles. And silk. Yes, I am a fervent member of the Church of Karma & Silk... any other believers out there?

DSC_0083DSC_0109

I also really wanted to make my Anna before our weather turned too cold for me to enjoy it, because if ever there was a pattern for Summer 2013, I believe it is the Anna.  This pattern just feels so very now (yes, I realize that for most of you in the northern hemi summer is already a distant memory, clouded over by wafts of pumpkin spice everything, but in my little corner of the world I'm still enjoying the last few gasps of warmish temps before fall finally decides to settle on us). When I was in NYC I had the wonderful privilege of getting to eyeball not one, not two, but five Anna's in the course of three days! That, my friends, is an excellent example of a pattern going viral.  And, yeah, I wanted in. So consider this my late entry onto the Anna train.

And, boyohboyohboy am I glad I boarded that train! I was actually nervous about this dress - if you can believe it.  I worried that the tummy-hugging silhouette wouldn't be particularly flattering on me, since I generally try to drape myself in volume around those middle parts. I actually made two muslins of the bodice before I cut into my silk, something I haven't done in quite awhile.  I couldn't quite make my mind up between two sizes - a US6 or a US8.  Both, technically, fit. And looked fine. But the 6... well... it left no one in doubt about where I store my chicken and waffles ifyaknowwhati'msayin... So I went with the 8, and I'm very pleased that I did.  I think the dress is still miraculously flattering and feminine and sexy while still allowing me to breathe and, ya know, have organs. 

DSC_0096DSC_0082DSC_0076

So let's talk about some of the nitty-gritty, shall we? One of the benefits of being the last person in the blogosphere to make a pattern is that you get to learn from everyone else's experience.  So even before I made my muslins I was aware that this pattern had some issues with gaping at the back neck, and I was able to use Ginger's clever little adjustment to take out excess fabric there (though the back neck still gapes a bit if I stand up 'yoga-straight'...) I also took Oona's advice and skipped the pattern facings and instead used a bias strip facing to finish the neckline.  I had also heard everyone bemoan the miles of french seams and hand finishing that this dress called for. I heard it. And I chose to ignore it. Instead I serged my edges (I know... such a rebel) and....!!! Get this... I topstitched my thigh-split! Say What?!?! It's true. And before you all come at me with pitchforks and buckets of tar, lemme just say: It. Works. Fine. I would especially recommend this if you are making your Anna out of a solid colored fabric. Total time saver. Perhaps not the invisible finish some might desire, but dudes, I finished this dress in a day. 

Cue the horrible construction shots in heinous indoor lighting... 

DSC_0030DSC_0031DSC_0032

The one area where I did go a bit overboard on was the zipper.  I hate the feel of zipper tape against my skin, so I debated drafting a facing for the back opening, but I felt like that would really only work neatly if I included all the facings, and I had already decided to go the bias route. So instead I cut strips of my silk and bound the zipper tape in those before I inserted it into the dress. Now, no scratchy zipper tape ruining the delicious feeling of all that silk against my skin! As for my invisible zipper experience as a whole? I have no complaints. Inserting zippers into super lightweight fabrics like this silk is always a bit funky. But I interfaced the seam allowances around the zipper and it went in like a charm, and, I think, looks just about as neat and clean as can be expected.

DSC_0101

Nick took these pictures for me, which is always a bit of an adventure.  I usually end up with some absolutely stunning shots, and then I get some funny ones like the shot above. I can only assume he was getting bored with my posing and preening and the distraction of a really big boat was just too tempting! (P.S. Thank you, Nick! You're such a good sport! I love you!) 

Well, since finishing this dress I've already worn it to two events and plan to wear it to another this week. It's actually pretty amazing how this dress can go super fancy or more daytime-casual with just the slightest change of shoes and accessories. Love it! But now I think it's time for me to focus on some fall weather sewing... sigh. It's time. Goodbye summer!

xx

5.13.2013

crescent

DSC_0032

Lucky Me got to be a pattern tester for Megan Nielsen's Crescent Blouse! How lovely is the new line of patterns, you guys? So lovely. I've gotta get my hands on that Cascade skirt - I was all ready to pounce on the sewing kit because I'm literally dying over the fabric used in the look book, but they're all sold out!!  I'll just have to put my fabric dyeing pants on and get crafty...

DSC_0029

But anyway! Here is my Crescent Blouse!! I was super excited to test this pattern - it's such a fun, unique design.  As soon as I saw the line drawing that Megan sent me I knew I wanted to try some sort of color-blocked scheme with it.  In my mind's eye I was envisioning a gradation of blue-y-turquoises, but of course those colors didn't exist at my local fabric store (why does that always happen??) so I just had to start playing around with what was there until I found three colors that I thought worked well together.  All three are a medium weight silk crepe, which worked really well for this pattern.

DSC_0058DSC_0088

I really wanted to make this blouse sort of feminine and 'date-night-ish'.  Typically I shy away from sweet little collars like this one, but there was something about pairing it with the bare shoulder, and the echoing of all the curves throughout this design, that made me feel like I just had to go for it.  There's a nice balance of sassy and sweet in the Crescent Blouses' design. So I decided if I was going to do a feminine collar, than I was gonna do it up!  I decided to try my hand at beading.  You know, because I'm sure that's something you can just pick up... (wink) I bought purple and silver seed beads, did a "how to: beading" google search (which, surprise surprise... turned up some very strange things...) and went to Bead Town!

And then I left Bead Town. Because, turns out, beads are heavy! Even these teensy tiny seed beads! The three rows that I did already started to pull the collar down, showing the grey binding on the inside.  Also, it was time-consuming, and a bit boring. So I stopped. I figured it was fancy-fied enough!

DSC_0046DSC_0084

This was my first time working with one of Megan's patterns, and it was an absolute joy.  Her instructions were thorough and easy to understand, and she was full of useful little tips (like trimming all those curved seam allowances with pinking shears instead of clipping/notching to get a nice, smooth line). This blouse may look a little intimidating at first with the shoulder cutouts and all the bias binding, but it's actually quite simple to sew.  Megan did a wonderful job of making this an accessible pattern for less-experienced sewists, and even those who suffer from bias-binding-phobia, like me!

I only have one, itty bitty complaint about this top - and it's a really curmudgeon-y one, at that. It requires me to wear... a strapless bra (looooonnngggg suffering sigh...) And anytime I'm required to wear a strapless bra I'm reminded that the only one I own is way too big for me (thus the odd lumps and pulling apparent in my boob region in these photos) and I really need to buy a new strapless bra.  I'm sure this is not an issue for anyone that has a relatively grown up underwear drawer, but the general state of pathos that my underthings have been in for, oh, I don't know, the last seventeen years means that me and strapless bras are not on good terms...

Also... I wish I would have made the top half some other color besides this dusty-rose pink. While a lovely color all on it's own, it's not exactly pleasing to my complexion... But! That's why there's always a next time, am I right?!

DSC_0042

I coerced my husband to take these pictures of me the other night since our camera remote has decided to go it's separate way... Nick's always a sport about taking my blog photos, but I always find myself more self-conscious about posing when he's behind the camera!

As we were walking around the neighborhood trying to find decent light (and, you know, the perfectly disheveled looking abandoned house - because there's so many to choose from!!) we walked by our little neighborhood handmade ice cream joint.  Gotta love beach towns! Ice cream is never too far out of reach! So I suggested an impromptu ice cream date. After all, I was wearing my 'date-night' top... I mean... how could he resist this face?

DSC_0105

Until next time!!

xx

1.09.2013

because, i mean, why not?


Yes, yes, yes, I know that we are now a full week into 2013 and all this New Years Reflection bullshit is soooooo last week... but what can I say? I'm a chronically late person? Or just slow? Ah well, better late than never I say!

There is actually quite a lot that I am proud of in 2012, and I'd like to take a second to recognize a few of the good things that have come my way in the past year, sewing related and non. After all, New Year's is the time for self-reflection, even if the time for reflection is reaching the end of its shelf-life and starting to stink up the fridge...

Let's start with some life reflections, shall we??

Almost exactly a year ago I began working at a new job here in Galveston, TX. This has made a huge difference in my life. One of the reasons I've been so slow about writing a post about my job is that it is actually kind of difficult to explain what I do. The relatively straight-forward explanation is that I am the program manager for a small art non-profit here on the island. We are a fully funded artist residency and we also have a small project/gallery space, which I am in charge of along with the director. In fact, the director and I are in charge of everything, because we are the only employees (the director is also the co-founder) so basically we run a very small, but ambitious operation.  I'm incredibly grateful that I get to work in an extremely creative environment, with someone I enjoy, and that my work is varied and meaningful to me. I've worked a lot of terrible jobs in my time (that stint as a secretary at a tax firm was a particularly low point...no offense to secretaries, or tax accountants, and, besides, I'm pretty sure the feeling was mutual...) so I'm particularly grateful that I am actually challenged and excited by my work, rather than feeling like I'm just slogging through the week in order to get to the weekend. As I said, the difference it has made in my personal life throughout the last year is huge.

This past August my husband and I moved house, yet again. This time just to a different neighborhood, same city, but it still marks the 4th time I've moved in the last 6 years (since my undergrad) never staying anywhere for more than two years. I really sort of love Galveston in all of it's weirdness and I'm happy to be staying here for the foreseeable future. Our new place is spacious and wacky and charming and ugly all at the same time, and Nick and I have been having a good time making it feel like home, even on a shoestring budget.

Which leads me to - Nick! I could write a novel here, or say nothing at all. I'll try not to be toooo sappy (for his sake). He's really my backbone, the one who's holding this bag of tricks together. We've been married every single day of 2012 (our first FULL year of marriage! Yay!) and it's our relationship, more than anything else, more than the job, or sewing, or the blog, that has made me feel so very grateful for this full and loving life I get to live. 

Now are you ready for some good sewing/blogging reflections? I feel like I can be a bit more succinct with these...(ppfftt!!! Who am I kidding??)

As I was putting together the images for this post I had a lot of fun thinking about how sewing has changed my life, like really had a major impact on my life in a very real way.

- I buy way less and am a far more discerning consumer when I do. 

- Looking at the images above I really like how you can see my own personal style begin to develop and become stronger.  I feel like through sewing I've been able to really focus on clothes that make me feel good, that help me to feel like my absolute best version of myself. This is something I hope to really continue to nurture in 2013.  

- This is kind of piggybacking on the previous thought, but I feel like making my own clothes has really helped me conquer some body-image issues I've had in the past. I always hesitate to talk about this because it is so personal (ppfft!! This is already an insanely personal post!) but it's also something that I feel very strongly about. Oddly enough, since I began sewing my wardrobe I've become far less critical of myself physically and I feel more at home in my own skin than I've ever been. You could certainly chalk this up to getting older, or being in a loving, stable, healthy relationship - but I really suspect sewing has had a hand in this (as well). 

- I feel like this past year I conquered a few of my goals for sewing. I tried with all my might to sew a hard-working, practical wardrobe, and all in all, out of 21 (really 22 but I haven't got around to posting the last make of 2012...woops) garments made I really feel like the majority of them get a fair amount of rotation in my wardrobe. The all star, of course, is my jeans. Those babies get worn at least 5 days out of the week. I'm wearing them right now. I wear them all the time. So much, in fact, that I believe I need to make a new pair in 2013. I also began experimenting with dyeing and handpainting my own fabric, which was a long time goal of mine. I enjoy adding that extra personal touch to my clothing, and I hope I can find a way to improve on my methods in the upcoming year.  I'm also proud that, really, looking at all those clothes up there, all of them are wearable, finished beautifully on both the inside and out, very few corners were cut, and most have stood up to repeated washings and wearings. Way to go, handmade wardrobe. Way. To. Go.

- 2012 is the first full year that my blog has been a big part of my life. I sort of started it half-heartedly back in 2010 (I think...?) not really sure what I wanted it to be and eventually I gave it up.  Once I became more engrossed in sewing it just became natural for me to want to share it and connect with a community and so I started up the blog fresh in the fall of 2011, decidedly more sewing-centric. I know everyone says this, but I am just so amazed by all the wonderful people I've been able to connect with over the past year.  Many of you I care about just as much as any of my friends that I get to see in the flesh, and I sincerely hope that our paths will cross in 2013! (Oh how I'd love a blogger meetup!!!) So to all of you, dear readers, I don't say it enough, but thank you thank you thank you! I'm so grateful to have discovered your blogs, shared in your stories, oohed and ahhed over your beautiful creations, and connected with people who share my same passion. 

You guys, I'm feeling a bit mushy!! I wanted to list out some real hard practical goals for 2013, but I seemed to get lost in all my reflections! No matter how old and moldy they might be! And I think this post is long enough for today. Congratulations if you made it all the way to the end. Your medal is in the mail (just kidding). 

Thank you again for a great year, and here's to 2013!! Woot! Woot! Can't wait to see what you all have in store. 

All my love,

Sallie


7.15.2012

nick's dress

DSC_0040

gosh! the weather has been so dreary here lately that this late afternoon sunshine left me feeling slightly giddy. like someone just told me i got to have chocolate for dinner...

i'm calling this dress "nick's dress" even though it would probably be more appropriately known as simplicity 1880, or perhaps the "2-in-1 dress" or hell even "sunni's dress".  because this dress is, obviously, all those things. but i'm going to call it "nick's dress" because my husband picked out the fabric, and because he likes it. iron clad reasoning. 

DSC_0033DSC_0060

i have to admit that i don't usually consider myself a purple person - actually i believe this dress stands alone as the one and only purple item in my closet. but while at a fabric store in houston - when we were picking out fabric for my husband's shirt - i mentioned that i wanted fabric to make some easy summer dresses. we happened to be standing by the bolts of linen and i believe i lazily stroked one and said "linen might be nice...or maybe a lawn..." and my husband, sensing what i'm sure was about to be an endless back and forth and hemming and hawing that could, really, last hours, grabbed this slubby purple number and said "how about this?!! this would look really good on you!" and you know what... i agreed. so good eye, nick. i know you just picked it to get me out of the store faster, but it just may be my new favorite color.

DSC_0037DSC_0036

this dress is a little different for me. it may not look like it, but its far more vintage-y than what i would normally wear. you see i have a long standing struggle with vintage and retro styles. i love them, but they don't always love me (can i get a hell yeah from any other thick waisted sisters out there who can feel my pain??!?!) but this dress didn't seem so literally vintage and i do love me a wrap dress (even a faux wrap - as the case may be) and maybe, really, this was all in my head anyway...

so i made the damn dress. i lurked sunni's sew-along in the most lurky-lurksome ways and made the damn dress. the construction is so thoroughly covered in the sew-along i won't go into any of it here, but i made a straight size 10 without making a muslin (eek!! totally living on the edge over here at sallieoh...) i had measured all the pattern pieces before hand and had an inkling that the waist might be a smidgen tight (see above, re: thick waisted) and lo and behold! it was. but only a smidgen. so i sewed each of the side seams at the waist with a 1/4 inch seam allowance and tapered it back to 5/8 inch. the waist is still snug, but not in an uncomfortable way. just in a squish-you-in-to-make-you-look-like-you-have-curves sort of way.  i'd like to make this dress again (because despite all my bitching, i really really love it) and when i do i'll make sure to add 1/2 an inch to the waist in the flat pattern.

DSC_0045DSC_0046DSC_0050
i never noticed that weird wrinkle above the zipper until i looked at these photos! doh! also - can you tell which foot no longer has a big toenail?

the only snag i hit during construction was with the zipper. i installed this pretty little purple invisible zipper and it was weirdly hard to get in (a problem i don't normally have) and then when i went to zip it up the zipper pull got stuck at the waist seam (what is it about waists today?) and i pulled and pulled and pulled and broke the effing thing off!! so pissed. however i gave myself a break and then groped through my stingy notions stash and found a long ass white invisible zipper i had probably got for some forgotten project and put that guy in there figuring, hey, its invisible. and it is. except for the pull (and where it gets a bit tight at the waist but lets just ignore that for the sake of my vanity) so now it looks like i got some armpit jewels. its all the rage...

DSC_0018DSC_0016
ignore that part where the bias binding doesn't meet the waist. just ignore it!

i got a little crazy in the notions aisle of jo-ann's searching for hemming tricks and bias binding for the neckline. and by crazy i mean i bought something in a contrasting color! holy beans! she's lost her mind! i had just enough fabric to cut out the dress minus facings so bias binding around the neck was my only option. i don't have a lot of experience hemming this circle-y of a skirt and i think i didn't want to fiddle around with a narrow hem (and the resulting burnt fingers) so i bought some hem lace in the same teal color as my binding and hand stitched it down, which didn't take as long as i feared it would. i rather like the prettiness it lends to the inside. 

i wore this dress to a recent opening at my gallery and felt like quite the lady all night. even the part where i was shoving my face with barbeque. total lady.  but this story doesn't have a completely happy ending. i'm very sad to report that the little citrine crystal necklace i'm wearing in these pictures met its demise while bending over my tripod (and catching the necklace on something and jerking my head up quickly. i can't tell you how many necklaces have died this way). this makes me very sad because, while i don't really really believe that crystals have powers or anything - there was something about this one that gave me a certain energy... 

and now that you all think i'm a crazy i'll say goodbye. i'm going to go have chocolate for dinner. 

xo