Showing posts with label around town. Show all posts

5.13.2013

crescent

DSC_0032

Lucky Me got to be a pattern tester for Megan Nielsen's Crescent Blouse! How lovely is the new line of patterns, you guys? So lovely. I've gotta get my hands on that Cascade skirt - I was all ready to pounce on the sewing kit because I'm literally dying over the fabric used in the look book, but they're all sold out!!  I'll just have to put my fabric dyeing pants on and get crafty...

DSC_0029

But anyway! Here is my Crescent Blouse!! I was super excited to test this pattern - it's such a fun, unique design.  As soon as I saw the line drawing that Megan sent me I knew I wanted to try some sort of color-blocked scheme with it.  In my mind's eye I was envisioning a gradation of blue-y-turquoises, but of course those colors didn't exist at my local fabric store (why does that always happen??) so I just had to start playing around with what was there until I found three colors that I thought worked well together.  All three are a medium weight silk crepe, which worked really well for this pattern.

DSC_0058DSC_0088

I really wanted to make this blouse sort of feminine and 'date-night-ish'.  Typically I shy away from sweet little collars like this one, but there was something about pairing it with the bare shoulder, and the echoing of all the curves throughout this design, that made me feel like I just had to go for it.  There's a nice balance of sassy and sweet in the Crescent Blouses' design. So I decided if I was going to do a feminine collar, than I was gonna do it up!  I decided to try my hand at beading.  You know, because I'm sure that's something you can just pick up... (wink) I bought purple and silver seed beads, did a "how to: beading" google search (which, surprise surprise... turned up some very strange things...) and went to Bead Town!

And then I left Bead Town. Because, turns out, beads are heavy! Even these teensy tiny seed beads! The three rows that I did already started to pull the collar down, showing the grey binding on the inside.  Also, it was time-consuming, and a bit boring. So I stopped. I figured it was fancy-fied enough!

DSC_0046DSC_0084

This was my first time working with one of Megan's patterns, and it was an absolute joy.  Her instructions were thorough and easy to understand, and she was full of useful little tips (like trimming all those curved seam allowances with pinking shears instead of clipping/notching to get a nice, smooth line). This blouse may look a little intimidating at first with the shoulder cutouts and all the bias binding, but it's actually quite simple to sew.  Megan did a wonderful job of making this an accessible pattern for less-experienced sewists, and even those who suffer from bias-binding-phobia, like me!

I only have one, itty bitty complaint about this top - and it's a really curmudgeon-y one, at that. It requires me to wear... a strapless bra (looooonnngggg suffering sigh...) And anytime I'm required to wear a strapless bra I'm reminded that the only one I own is way too big for me (thus the odd lumps and pulling apparent in my boob region in these photos) and I really need to buy a new strapless bra.  I'm sure this is not an issue for anyone that has a relatively grown up underwear drawer, but the general state of pathos that my underthings have been in for, oh, I don't know, the last seventeen years means that me and strapless bras are not on good terms...

Also... I wish I would have made the top half some other color besides this dusty-rose pink. While a lovely color all on it's own, it's not exactly pleasing to my complexion... But! That's why there's always a next time, am I right?!

DSC_0042

I coerced my husband to take these pictures of me the other night since our camera remote has decided to go it's separate way... Nick's always a sport about taking my blog photos, but I always find myself more self-conscious about posing when he's behind the camera!

As we were walking around the neighborhood trying to find decent light (and, you know, the perfectly disheveled looking abandoned house - because there's so many to choose from!!) we walked by our little neighborhood handmade ice cream joint.  Gotta love beach towns! Ice cream is never too far out of reach! So I suggested an impromptu ice cream date. After all, I was wearing my 'date-night' top... I mean... how could he resist this face?

DSC_0105

Until next time!!

xx

10.22.2012

a self-stitcher goes shopping


So here's a story for you...

Yesterday I decided I needed to venture off the island to buy myself some lining fabric for the dress I'm making out of my hand-painted fabric. I wasn't really feeling up to making the long trek allll the way to civilization (Houston, in my book - and where the only mildly decent fabric stores are) so I settled for the JoAnne's conveniently situated at the halfway point. 

First of all, JoAnne's was in total, full-out, Halloween cray-cray mode and I was slightly terrified, but I soldiered on because I'm brave like that. Turns out that the majority of their fabric, including their skeptical selection of lining fabrics, was on a 50% off sale! Awesome! So I pawed through the polyesters, setting my "natural fiber" bigotry aside for the time being. I mean, a sale is a sale. Unfortunately (or fortunately, depending on how you look at it) I'm pretty incapable of impulse buying these days - especially on mystery fabric - and so I pretty easily talked myself down from purchasing anything other than what I came there for: white rayon lining fabric - the bemberg variety.

Well they were out. Completely. They had orange and black, but... you know. 

So I'm feeling a bit deflated because this means I'm going to have make the long haul up to Houston anyway. But, alas, I wasn't going to do it this day. However, there I was, in the midst of this huge shopping complex, and I decided to do something that used to cheer me up in my pre-sewing days - I decided to go clothes shopping. 

Now this wasn't a total coincidence - word on the street had it that the Houston area is finally home to an H&M, and it just so happens to be at my halfway point - right across the street from my JoAnne's. Once upon a time I used to love me some H&M. It fit my graduate school budget and it catered to literally every look and occasion. Trendy? Check. Office appropriate? Check. Hipster? Check. Bohemian? Check, check, check....

I have grown up some since those college days (thank god) and so have my tastes in clothing - helped along mainly by the fact that I've sewn every major new garment that's been added to my wardrobe since 2010.  I'm far more pickier about fit, fabric and quality than I used to be. And I'm a fair bit more educated on the, shall we call them "dangers" of fast and cheap consumption, especially within the clothing industry. But despite all this, a morbid curiosity drew me in. And I'm glad I went, because otherwise I would have never known that Kelly Clarkson was still making music (where have I been?!?)

Truthfully, I knew from the outset that I was not going to buy anything (see above, re: impulse buying).  But I figured this might be a fun opportunity to try on some trends I've been thinking about and see if they would actually work on me.  The looks I wanted to try? Oversized sweaters, leather leggings, wild prints.

So without further ado, here are some of the outfits I put together on this pretend shopping spree:


Glitter sweater and faux leather pants.

I first became aware of my desire for faux leather leggings while trolling one of my favorite style blogs, sea of ghosts.  The inspiration to pair them with an oversized sweater perhaps came from Pinterest? Not really sure. Anyway - these H&M faux leather leggings were not very stretchy. I grabbed them in a size 6 and a size 8, not really sure what my size is in that store and mainly eyeballing the waist. The size 6 fit the best, but oddly. Tight in the waist, baggy in the crotch. I'm not sure why I was surprised by how... squeaky these were... but there you go. Squeaky pants. The sweater was acrylic and cozy, but I probably wouldn't actually pair these two in real life (I think I can come up with a better top for leather leggings, don't you?)


Cable knit sweater and crazy print, cropped trousers.

I was very drawn to this whole display of stuff in this wild, floral digital print. There was a ton of it. Apparently Lucky magazine put this stuff as its "top pick" because there were signs all over the place! So these trousers are a size 2, to give you an idea of the crazy sizing. They only had a size 2 left, and I decided to give it a go. They fit, but they are what a friend of mine once fondly termed "yeast infection pants" - meaning the crotch seam was where no crotch seam had a right to be! So I'd probably size up in the pants and size down in the sweater (there's oversize, and then there's sloppy...)


Crazy print dress

This dress was the most ill-fitting of the bunch. It was made from a stretchier fabric than the pants.  It was rather loose in the upper chest, and real tight over my belly and butt. The waist line also kept wanting to hike up. And it was short! Like, whoa! When I first spotted this dress I thought that if it fit it might actually make a fun work dress, but it would need at least 6 inches!


Another crazy print dress.

This was the last dress I tried on. This was a thinner fabric than all the rest, pretty silky to the touch at first, but even for the short time I had it on it became kind of scratchy.  It's a simple A-line shift dress, but I liked the way the pattern was placed. There was even a bit of tricky seaming that happened at the shoulder to keep the illusion going - an unexpectedly thoughtful detail.

All in all, I have to admit that the quality wasn't as terrible as I thought it would be! Of course there is no telling how any of these things would hold up with repeated wearing and washing.  In the end, I came away from this little pretend shopping spree with some ideas for fall/winter sewing, and feeling like my style mojo might have just got a kick in the pants. This isn't to say that I intend on copying these looks, but sometimes you need to step out of your daily routine to get the old wheels a-turnin' !

Does anyone else go pretend shopping when they need a bit of inspiration? I'd love to hear about it!

xx

5.07.2012

basic uniform


in my heart of hearts and in my soul of souls i am a jeans and tee kind of girl. who isn't? unfortunately, its not always easy to find a good pair of jeans. until this recent pair of jeans, i owned two pairs that i wore in heavy-ish rotation. one was my colette clovers, which i don't think really count as jeans since the styling is more trouser-like. the second was a pair of high-waisted skinny jeans from jbrand that i bought a bit big and the waist has a habit of scooching down from its high-rise heights which leaves me with a saggy crotch problem. not very comfortable! 

so it was time to make a new pair of jeans. not the most glamorous sewing - but necessary! i had this stretch denim from mood leftover from my denim clovers. it was just enough to eek out this pair of jeans! i used the simplicity built by wendy pattern that came with the book, sew u (it looks like the pattern is now out of print, but maybe it still comes with the book?) i've had this book since i was a teenager, but this is the only pattern i've ever made from it.


i cut these in a straight size 6 but after sewing up the inseam and basting the rest of the legs together i had to take them in a whole lot. i think the 4 would have fit better, although i may still have had to take it in a bit. the jeans look a bit baggy in these pictures because, well i've been wearing them non-stop since i made them! time for a washing!! 

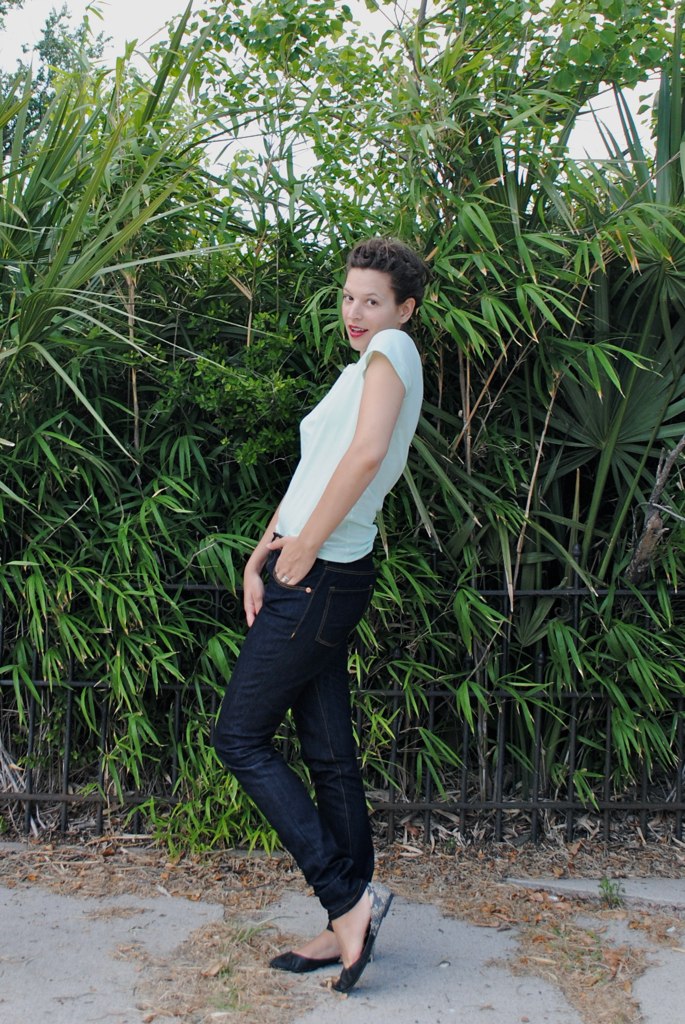
this pattern has a really modern fit. a low (but not too low, no butt-cracks please!) waist and a very straight-through-the-hip cut. which is great for me since i'm also kind of straight-through-the-hip! i obviously changed the leg, narrowing them to the knee and then keeping 'em straight and skinny to the ankle, leaving the length long so they bunch up at my foot. 

the built by wendy pattern isn't necessarily a jeans pattern. as a matter of fact, you don't really need a specific "jeans" pattern to make jeans! because when it comes to jeans, the devil is in the details.  when i sat down to sew these i had my pair of jbrands by my side and another super old pair of levi's. i kept opening up both pairs and checking out how the fly was inserted, where were the bar tacks, how the belt loops were attached, and most importantly, what was topstitched and what wasn't.


the topstitching (and perhaps also the pocket shape) are really what says "jeans" on a pair of pants. i've noticed that the "fancier" the jean, the less topstitching it has, and the more casual the jean the more topstitching it has. but almost all jeans have some sort of topstitching around the fly, pockets (back and front) and waistband. some have two lines down the inseam, my jbrand pair has none. i made this pair with a single line of topstitching down the inseam. my double needle broke after using it once around the fly when i tried to ease it over the zipper teeth (woops!) and so i was left to eyeball the rest of the topstitching with more or less accuracy!

and speaking of details - what's a jean without the rivets! again, this is a totally optional detail - some jeans have them, some don't. i bought my small rivets and rivet button for the waistband from taylor tailor - who makes some pretty awesome jeans! i'm not gonna lie - they were a tad bit harder for me to get in than taylor makes it out to be in his tutorial! I did a lot of pounding to get them to stay put... but i think it was worth it because it is those little details that makes these look a bit more professional.


since i was on a built by wendy kick i decided to open her other book, sew u home stretch, and make up the crew neck tshirt from the pattern provided. i compared the paper pattern to a favorite tshirt of mine from american apparel and saw that my shirt was about an inch narrower than the smallest size on the pattern. i made the necessary adjustments and what seriously seemed like two seconds later, i had this new mint green tshirt! the fabric is the minted cream organic cotton knit from tessuti that i bought on a whim with my last purchase. it sort of looks like i bought it at american apparel...go figure... 

also! i replaced my twin needle aaandd... twin needles for finishing knits! who knew, right?!?! oh...everyone but me? oh. ok then. well i'm happy to be joining the club!


xx

2.11.2012

sloping and revelry


you guys. its mardi gras.

fun fact: galveston has the second largest mardi gras celebration in the u.s. after new orleans, of course. i'm pretty sure its a distant second, but still...

not so fun fact: mardi gras is happening right outside of my window. and it goes on for twelve freaking days! wtf!! so. much. revelry! truthfully we don't get the revelers-in-the-midst-of-revelry outside of our window as much as we get the revelers-stumbling-to-their-hotels-and-cars. so. much. broken. glass. if you live anywhere near the downtown galveston area you will find your daily routine... impeded.


i think the world might be divided into mardi gras-ers and curmudgeons. i fall into the second camp. i've found myself putzing around my apartment and muttering to myself "don't these people have jobs?" more often than i care to admit. and yes - i realize that is the same thing that the grumpy 90 year old ww2 vet is doing too. i may also sigh and say "kids these days..." under my breath too. i always did feel a kinship with the over 60 crowd...

so to drown out the sound of blaring classic rock and drunken raucousness i've been doing what any sane sewista would do. i've buried myself up to my eyeballs in my patternmaking book, surrounded myself with measuring tape and pattern paper and colored pencils and erasers and rulers and muslin, in an effort to draft a sloper.


fellow sewers, do you slope? do you find it helpful to have this basic, made-to-your-measurement pattern on hand?

i am curious because i've always somehow felt that if i actually sit down and draft a sloper (or pattern block, whichever term you prefer - i don't really know if one is more correct than the other...) that it would magically open the door of designing to me. like all i needed was this flat pattern and then the world would be my oyster (sartorially speaking).

but the actual drafting of the sloper seemed so.... boring to me. first, you take your measurements. and these measurements aren't for the faint of heart. we measure things like bust arc and shoulder slope and new strap length (whatever the hell that is - i certainly don't know - but i measured it). you need these measurements for your front AND back. and this is where it gets tricky. unless you are skilled in the ways of dislocating your shoulders - getting accurate back measurements is impossible to do on your own. i asked my husband to help take my back measurements as i stood as naturally as possible while still craning my head in the mirror to see if he was doing it right.

then you do a little magic with your pencil and ruler and a little while later - you have a flat pattern of your upper torso. or so you think. i had to fudge some of my back measurements a bit because somehow my across waist measurement was bigger than my across back. i may not have the sveltest of waists, but even i was pretty sure this was a measuring error and not some quasimodo like proportions.


and this is where it gets deathly dull. because even though you thought you were all careful with your measurements and stuff - you have to test it. so you sew your sloper up in muslin. this is, without a doubt, the most boring garment sewing ever. but whatever, at least it goes fast. then you try on your sloper to see how it fits.

prepare yourself for awful photo booth pictures (and say hi to my messy apartment and winter belly - hi!)


this is my second test fit. the first was a good 2 inches too big all around. not sure how that happened - but rather than remeasure and redraft i just pinched and tucked out the excess then transferred those markings back to my flat pattern.


i'm pretty happy with the fit of the front. i may trim off a teensy amount in the shoulders to fit the slope of my shoulders more accurately. you can see the little bit of drag lines from the neck to the armpit in the first photo. when i lifted the shoulders just a smidgen (we're talking maybe 1/4 inch) the drag lines disappeared.

but this...

edit: perhaps you can see the wrinkles better in this equally bad photo?

is the back... i mean... whats going on back there? ignore the weird flipped up bottom. i'm running into the same problems fitting my back as i did trying to get measurements. unfortunately, my husband (bless him) isn't really much help in this matter. last night i thought perhaps i could talk him through helping me fit the back. it didn't go so well.

me: can you see where the big wrinkles are?
him: yes.
me: can you maybe locate where they are the worst?
i got an impromptu back scratch. perhaps to signify they were everywhere?
me: can you maybe find the big ones and pinch them out?
he pinched my butt.

well fine. this is why i have the internet. fellow sewinas (i just made that up) can you help me figure out whats wrong with the back of my sloper? is it too long back there? is it just too big all over? how do you fit the back of your garments? and most importantly - does anyone else use photo booth to help them assess fit?

if you're into mardi gras - may you have a fun filled and safe twelve days - and for gods sake keep it down!

xx