Showing posts with label leather. Show all posts

2.26.2014

a winter coat just in time for spring

Mood Fabrics wool & leather coat

Hi Ya'll! I'm very excited to show you my newest make for the Mood Sewing Network! I know everyone is clamoring for spring, and the last thing you want to look at is another reminder that it's still, alas, winter, but bear with me here because I'm really excited about this coat! Get ready for a looonnng post and picture overload! (P.S. if you want the short version, head on over to the MSN post!)

DSC_0009

I know I didn't do a big post about my goals for 2014, but that doesn't mean that I didn't make any goals! For instance: learn to knit in 2014. check! make better use of your time and be more productive in 2014.... erm.... check minus?? Anyway. You get the point. Well on that list of goals was "make a coat in 2014". (check!!) This wasn't so much an aspirational goal as much as it was a 'this-is-getting-ridiculous' kind of necessity goal. See, when I moved to Texas I got rid of all my winter coats. A bit drastic, I know, but you gotta understand, for a girl from the northeast, Texas winters felt like a joke. At first. Then they started to feel cold again. Also, I bike to and from work everyday.  The past two years or so I have started collecting an odd assortment of winter weather layers, that consist primarily of a $10, thin, unlined, nylon, rain jacket procured from the local sporting goods store (the kind that folds up into a tiny pouch), an aztec print poncho/blanket type thing (shown here) from some cheap, trendy store (this was pre-sewing days) that I tend to wrap around myself like a giant muffler, an array of hoodies, some gloves picked up from the drugstore for $1.99, and now, my hand knitted hats. As you might imagine... it's not the most flattering look.

This year, I decided it was time to step up my outermost layer of clothing. No more being confused for a homeless person! (Although I will miss all the extra change people throw at me... just kidding... that never happened...)

Mood Fabrics wool and leather coat

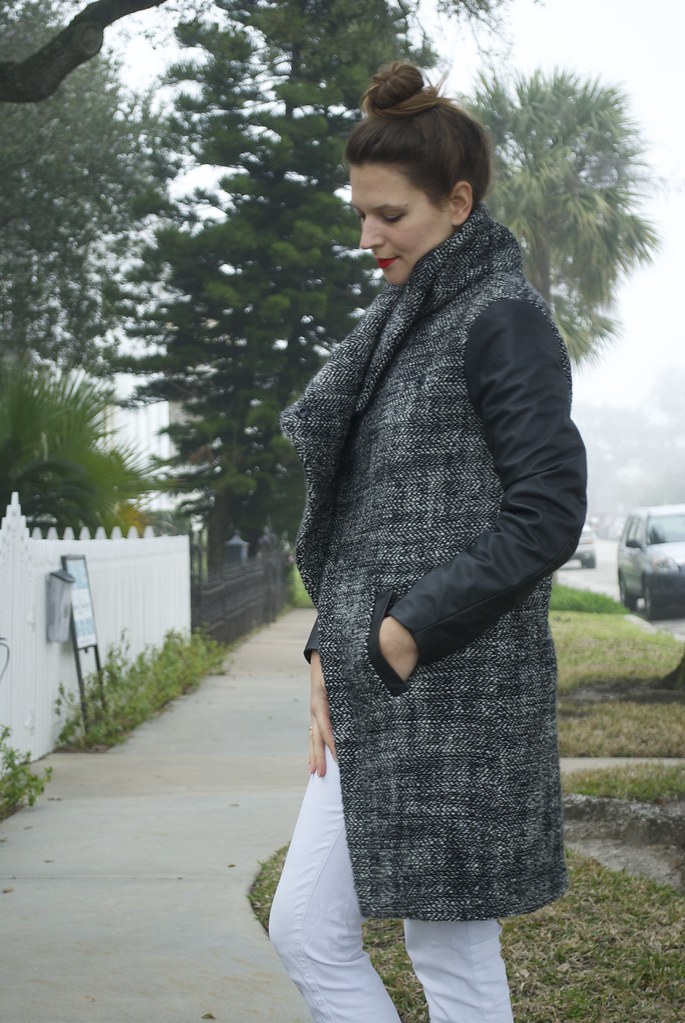
This is one of those makes where I'm not really sure which came first, the fabric or the pattern. Or perhaps it all just miraculously happened in one, giant, big-bang-like, divine-intervention-esque, stroke of inspiration. But for the sake of keeping things coherent, let's start with the fabric. I actually spotted and fell in love with this Oscar de la Renta wool coating from Mood Fabrics' online store before I became a Mood Sewing Network blogger.  I even asked for, and received, the necessary yardage to make a coat as a Christmas present (thanks Mom and Dad!!) It's basically my dream coat fabric. It's double faced, so it has a gorgeous weight to it, and it's plenty warm for the southern winters I'm dealing with.  And I just think the large-scale, salt and pepper herringbone has such a luxurious texture to it.

Mood Fabrics wool and leather coat
DSC_0013

I really wanted to use this fabric to make a coat that felt both architectural and soft. I know that seems like a contradiction - but trust me, it can exist! I decided to use Vogue 8933 for the pattern, because I loved the large, dramatic collar, and the asymmetrical front.  Also, this was a relatively un-fussy pattern, perfect for my first go at making a coat. I made a size 10 based on the finished garment dimensions (always wise to use the finished garment dimensions when working with a Big Four pattern company!) The one thing that I was sort of bummed about when it came to this pattern was the sleeves. The pattern uses a regular, straight, one-piece sleeve. Since I wanted this coat to feel softly tailored I felt like a two-piece sleeve would just be a more elegant option. So I used the one-piece sleeve as a base to draft a two-piece sleeve. I used this Threads tutorial.  It worked pretty well, although if you do this, I strongly recommend making a muslin (or two, or three) just to be sure that all your markings line up and the sleeve hangs correctly.  I ended up having to move where my seamlines fell, and taking out an odd little chunk of fabric out of the underarm. Drafting sleeves are basically my nightmare, but in the end I think these turned out all right.
DSC_0029

And speaking of sleeves, since this Oscar de la Renta wool has such a gorgeous texture, I thought it would be fun to really highlight it with an opposing texture for the sleeves. You can disagree, but I'm pretty certain that this nubby wool paired with this buttery soft black leather is like the 'chocolate & peanut butter' of the textile world - tactile soul mates. I bought this leather hide, and let me tell you, it was a bargain! I feel like the quality was great and I got a great amount of square footage for the price. I still have a nice, hefty amount left over (hmm... what to use it for....?) plus, shipping was fast. After working with leather a few times now I'm starting to get a nice feel for it. It really isn't a complicated material to work into your sewing, and I, obviously, highly recommend it. I was thinking of putting together a post of a few of my 'tips' (if you want to call them that... it's definitely not anything official) for working with leather... would anyone be interested in that?

DSC_0028

Since I was on a roll with making this coat as much of a sensory delight as one can make a coat, I decided to throw another oh-my-god-I-can't-stop-touching-it fabric into the mix: silk charmeuse.  I'm not going to lie, I completely stole this idea from some other brilliant and fabulous sewists (namely Lauren and Erica). It just looked so incredibly ... what's the word ... rich! And since it's always fun to add a bit of 'over the top-ness' with linings, I opted for this lovely magenta silk charmeuse - although I might call it fuchsia rather than magenta. I like that it adds just a touch of "Dynasty" to the coat, without  going full blown Joan Collins.

DSC_0004DSC_0001

It's been awhile since I made a garment that required so much hand stitching.  I had to brush off my technique from my red jacket days (remember those days.... oh how time does fly...) Granted, I didn't go to nearly the extent that I went to on that red jacket, but there was still a nice amount of fell stitching and catch stitching involved.  And, hence, lots of getting caught up on the most recent season of 'Downton Abbey' (is it just me, or is that show getting even more ridiculous plot-wise?) Anyway, I attached the lining to the collar by hand, because that pivot point was driving me insane on my machine, and also attached the sleeve lining to the coat lining by hand because... well I just wanted to.  The bottom hem of the coat and the lining hang free from each other, so each raw edge was finished separately, pressed up and catch stitched in place. There are little thread bars that hold the lining in place at the side seams. You can also see my little leather hanging loop that I threw into the collar of the coat. I'm so pleased with this little touch! 

Mood Fabrics wool and leather coat

I debated adding a back vent to the jacket. At first I thought this might be a nice 'tailored touch', like the two-piece sleeve. However in the end I decided against it. Since the front has such a wide split, the coat doesn't need it functionally, and visually I felt like a back vent might break up the bottom hem too much. And since it didn't meet the criteria for form or function that idea got ousted. I think this was a good call.

DSC_0038

Since I was trying to maintain some softness with the fabric, I didn't go full tilt with the tailoring. I used fusible horse hair canvas in the facings, and to reinforce the pocket openings, and underlined the leather sleeves with cotton batiste. I also constructed a back stay from the cotton batiste... aaanndd.. that's really it! I think because this wool is double faced it already has a bit more heft than single ply fabrics and I didn't want the coat to get too bulky, or stiff and lose the drape of the collar.

DSC_0003

The coat is closed by a series of coat snaps, sewn on in the very last step. In a world where we go all swoony over a perfectly executed bound buttonhole, this is certainly not the sexiest of coat closures, however it is very functional, and I even sort of dig the final look. A little additional hardware never goes amiss in my book. And while we're on the subject of hardware - am I not-so-secretly regretting not adding  some tough zippers to the underarm seam of my leather sleeves?  Yes. Yes I am. Hindsight you guys...

IMG_1124

I realized that I didn't get a great picture of the coat all buttoned up when I did my photo shoot, so I had Nick quick snap this iphone photo of me.  As you can tell from the majority of my photos, I love the way this coat looks open with the oversize collar doing it's own dramatic thing, but it's nice to know that should I feel a chill creeping at my neck I can button myself, literally, all the way up to my eyeballs!

DSC_0021

Phew!! Long post, you guys! Thanks for sticking with me all the way to the end! In conclusion: I'm incredibly excited about this coat! It feels great to finally have some outerwear that reflects my personal style.  Truthfully, I probably won't get a chance to wear it this year, since spring is already making itself felt down here in the south.  However, I know I will be immensely grateful for this coat come next winter! Is anyone else doing a little 'out of season' sewing?

And how pretty is this fog we've been getting in Galveston? So moody... Can anyone spot the little orange kitty that was keeping me company while I was shooting these photos?

xx

9.24.2013

art teacher


DSC_0059

I know! Two posts in one week!! Craziness! And the excitement doesn't end here... hint hint...

So, do you guys remember your art teachers growing up? I was really lucky to have some wonderful art teachers (one of whom was my Mom - hi Mom!!  I might be biased, but she was my favorite!) and while I may have found my way into a creative field all on my own, I definitely would not have had the amount of confidence and wherewithal to pursue my degrees in Painting without the support and encouragement of my art teachers.  I mean... I certainly wasn't getting any encouragement to continue on with math or science... so, I'm glad someone saw something in me!

DSC_0062

But this post isn't just a testimonial to the importance of arts education in public schools (although don't get me started...) It's about some of the other effects that art teachers had on me.  I'm talking about style here.  One of my style inspirations is always some kind of mish-mash of all my art teachers.  There's just such an amazing, eclectic mix of professional/bohemian, practical/elegant, modern/vintage vibes going on with the art educator set! Not to mention a (typically) keen eye for color, proportion, and texture.  

This jacket feels like something that one of my art teachers (or maybe just my Mom...this is a good thing) would have worn.  There were lots of sneak peeks of this make in my last post because I literally wore it every. single. day while I was in NYC.  I have to say - up to this date - this might be one of my favorite handmade additions to my closet.  It's just seriously cool.

DSC_0063

A few months ago, Colette from Tessuti contacted me to see if I'd like to review one of their patterns.  Have you guys been keeping up on the patterns that have been coming out of there? Really great stuff. Basics with a twist - definitely my kind of thing.  And also the sort of garments that would be flattering on a wide range of women, both age-wise and body-type.  I chose to make the Tokyo Jacket - a loose, unstructured, kimono-inspired jacket that works well in lighter, drape-ier fabrics.  I could just tell immediately from the line-drawings and the pictures on their site that this would be my kind of thing.  I love clothing with a somewhat Japanese aesthetic, and a dramatic fit. I will also be ordering the Suzy Pant as soon as payday comes... hello favorite new fall pant!

It took me a little while to get around making this jacket - mainly because I couldn't quite wrap my head around making a jacket, no matter how lightweight, when the temperatures were over 100 degrees! But with the approach of fall I decided it was time to delve in, and boy am I glad I did! This seems to go with everything in my closet!


This was one of those times that I had a really clear idea about what kind of fabric I wanted to pair with the pattern.  I knew as soon as I had the pattern in my hands that I wanted to make this out of some kind of shibori-dyed fabric, to highlight the kimono silhouette.  I used some silk noil (the same stuff I used to make this dress) and tried a itajime-shibori technique.  This basically means that the fabric was folded and then used some kind of shape-resist to prevent the dye from penetrating all the way through.  I was dyeing about 2 1/2 yards... you guys... that was a lot of folding! I can't totally say if my process was legit-shibori (I'm an internet learner) but I loved the outcome!

I didn't use a traditional indigo dye bath, but instead just used my trusty Dharma procion dyes.  Believe it or not, this dye color was supposed to black! That just goes to show you how unpredictable dye colors can be! It turned out more of a gray-ish blue with (though you can't see it in these pictures) an almost pink-ish haze around the blue.

DSC_0076

My yardage of this silk noil was pretty narrow, so I had to fold it on the cross-grain in order to cut the pattern pieces.  My one regret with this jacket is that I did not follow my gut and cut the back piece on the fold (the instructions were to cut two).  There was just no way I was going to get the pattern to match up at that center back seam otherwise.  But like many things, this felt like a bit of a bummer at the time, but after wearing it around for a whole weekend, it really doesn't bother me (we'll call it a 'design feature').  Next time...

So the pattern! I requested a paper pattern because I was feeling a bit burnt out on all the printing and taping of digital patterns, but these patterns are available both ways.  They have a handmade look to them which is pleasant - like a pattern your friend drafted for you.  Everything matched up perfectly and the fit was spot on. I made a size S based on my measurements.  Obviously this jacket is very roomy so I probably could have made an XS, but when a garment like this is designed to have excessive ease I like to follow the designers size suggestions so it fits how they envision (interestingly enough, this is the total opposite to when I'm making a more fitted garment - then I base everything off of the finished garment measurements).

DSC_0079

The instructions were impeccable! So, so thorough.  I didn't run into any problems sewing this up! The pattern says it is for Intermediate to Super-Advanced sewers, but honestly, based on how descriptive the instructions are I think a beginner-intermediate sewer could handle this, no problem. The trickiest part (in my opinion) was the pockets, and this was simply because they come together in a way I have never quite seen before, but I just trusted Tessuti and followed the instructions and lo-and-behold! Perfect pockets! 

I had the bare minimum of my yardage to make this  jacket, so I opted to do the cuffs and pocket trim in a contrast fabric.  This was one of the other reasons it took me a while to finally make this jacket - I was searching for the perfect trim fabric. You know, that mythical fabric that will just magically take this jacket from "awesome" to "amaze-balls"..? Well I found it, but it wasn't in any of my local stores.  


You see, I really wanted to have this jacket ready for my trip to New York, so I ended up rooting around in my scraps until I found something that struck my fancy - leather! I had left-over cream lamb-skin from making this jacket, and leftover black pleather from making these pants, and after a brief consultation on Instagram I followed the overwhelming advice to go with cream and I was off and away! And, wow, you guys I am  so glad  I took your advice and went with the cream leather! It just looks, and feels (and smells) so luxe! I added a small ribbon of trim along the collar to separate the collar from the body of the jacket, and to balance the other leather accents.  Those little bits of leather are really what makes this jacket extra-special to me. I just love the combined textures of the nubby silk-noil and buttery soft leather... mmmm.... Side note: this has totally renewed my love of sewing with leather... I am already scheming... many schemes...

DSC_0080

So yeah! I'm super excited about this jacket!! A huge 'thank you' to Colette for sending me this pattern, and for always being such a huge supporter of this sewing-blog community! 

And now... for something extra exciting!! Tessuti is giving away one Tokyo Jacket pattern to one of my readers!! If you're in the Northern hemisphere, this jacket will make a great layering piece for fall - and if you're about to enter spring, this is the perfect lightweight layer to throw on over a sleeveless shirt (or, in my case, jumpsuit!) Basically - transitional weather perfection! 

Leave a comment with an email address where I can reach you - extra points if you make me laugh - and I'll choose a winner at random... oh... say... next Monday, September 30th at 8pm?  Sounds like a great way to cap off September! 

xx

3.19.2012

innards


since this jacket made its debut on the blog last friday it has already seen a fair amount of wear this weekend. even though its leather, and you'd think it might be heavy and hot, its actually the perfect light layer for the cooler nights and windy days we've been having.

as promised, i've collected some more detailed shots of the jacket for you - since i know as sewing bloggers we love to peek at the insides and see the stitches and seams up close!


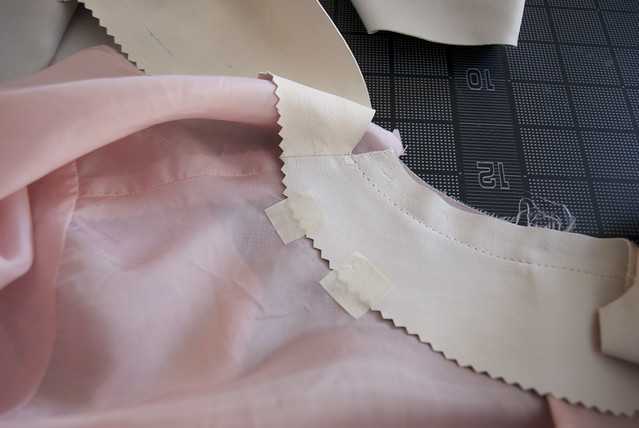
there's that pink bemberg lining! if i had to do one thing differently on this jacket it would be the lining. here's why: i sewed the lining a little big (instead of using a 1/2 inch seam allowance like i did on the jacket, i used 3/8 inch) which is what i did for my red jacket. however i inserted this lining using the bagged method rather than the hand sewn method i used for the red jacket and i think it looks a bit too big. i know you want extra room in a lining for ease of wearing, but this looks a bit fluffy to me. it doesn't affect the wear of the jacket - no bunching or twisting or anything - but when i look at it inside out it does look a bit floofy.

i pinked the edges of the front draped part and the back facing as a decorative element. i've always had a soft spot for the way a pinked edge looks and since the leather doesn't actually fray it doesn't serve any functional purpose (except the function of making me smile a little - its like a little ray of sunshine back there...)


here you can see how the drape in the front works. its basically just an equilateral triangle thats been tacked on - although its much more secure than that! it doesn't roll around the neck like a traditional lapel, instead it falls from the side of the neck at the shoulder seam.


i used topstitching both as a decorative element and to give strength to certain areas of the jacket. i especially used it around the draped lapel to help ease any strain there. you can also see the sleeve seams here. i didn't use any sleeve heads or shoulder pads in this jacket because i really wanted it to be soft and unstructured. i suppose i could have used some muslin or organza or something in there just to fill out those dimples, but i'm not too fussed about it.


and here's my nemesis... the set in sleeve. as i mentioned in an earlier post - this sleeve draft isn't perfect, but i just needed to move on. the sleeve gets a few funny wrinkles when i wear it, but i can also lift my arms above my head, type on a keyboard, drive, and basically use my arms for whatever i need to use my arms for - like flag twirling. just kidding. i don't twirl flags. but i could in this jacket! so i'll take a few weird wrinkles. will i use this sleeve draft when i make a jacket again? probably not. i'll probably try and draft a new one. but i definitely feel like i've learned a bit about sleeves...much to my chagrin...

so i wanted to say a quick word about some blog administration stuff (snooze fest, i know). after getting yet another comment about how difficult it is to comment on my blog i decided to change my commenting platform. this commenter was kind enough to suggest i download disqus, and i took the suggestion, because honestly, while i know that blogger has the worst setup for comments ever (i mean, can anyone read those obnoxious security words??) i really had no clue that i even had another option! so thank you, theperfectnose - your wise words were much appreciated.

that being said - after importing all my past comments into disqus, my replies are now all out of order! i love reading the comments on my blog and the fact that you all take the time to say hi and leave some kind words here just means the world to me. its really important to me to let you know how much i appreciate your comments by replying - but now all my replies are out of order and not matched up with the right comment!! so if it looks like i didn't reply to your comment, that may not be so! it just might be out of order and floating around amongst the other comments.

anyway, i hope this will make commenting on the blog easier for everyone from here on out!

xx

3.16.2012

color story


leeeeaaaattthhhhheeerrrrrrrrrrrrrrrrr

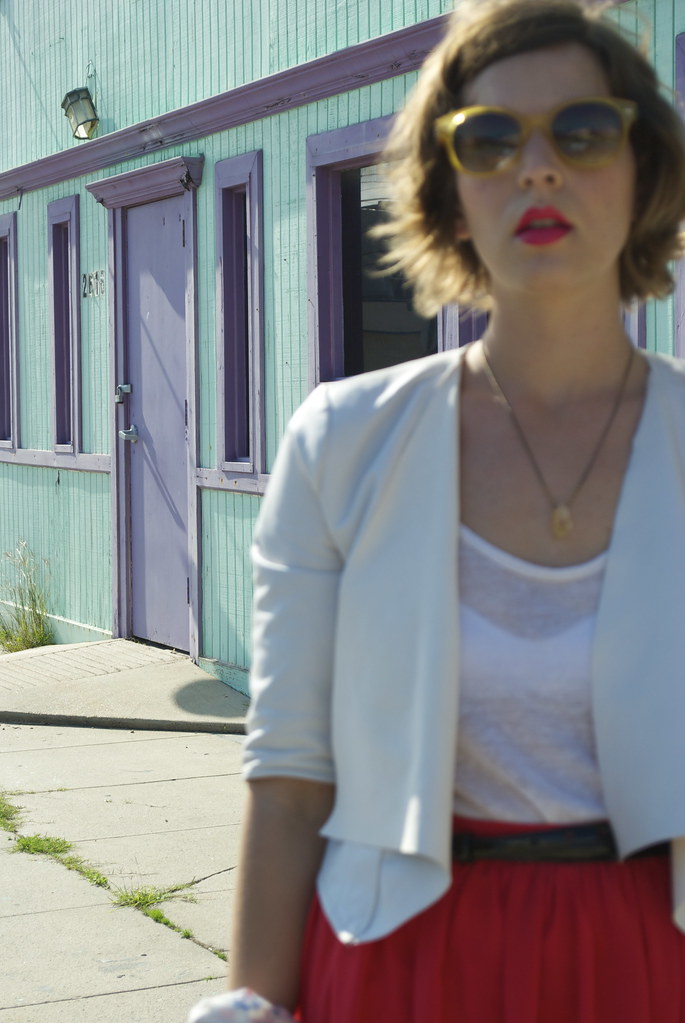
well here she is! (definitely a she) my draped leather jacket. this may be one of my favorite garments i've ever made. it just feels so good to wear! i wanted to wait to take these pictures until i finished this skirt (one of my "bonus" projects from my spring wardrobe). sometimes i get the outfit and the blog pictures in my mind and that alone dictates what i sew. for example: this exact outfit combination had to be paired with this particular abandoned-easter-egg-building with creepy blacked-out windows (once a strip club?). please tell me i'm not the only one that does this (the outfit/blog/picture planning - not posing like a dorkasaurus in front of sketchy abandoned buildings in shady parts of town. i know i'm not the only one that does that!)...


so...i figured a simple gathered dirndl skirt... should be able to whip it out one evening after work, right? no. no thats not right at all. because apparently i can tackle leather and hand tailoring and boning and all those things people think are "advanced" like it ain't no thang - but when it comes to the most basic skirt construction i'm totally flummoxed. flummoxed people!

i won't bore you with the details. just know that there were broken needles involved, a lot of swearing, and i kinda want to cry if i look at the waistband for too long. but no matter, thats what belts are for, amiright?! when its all said and done i actually don't particularly care that i've got a crooked waistband because really, this skirt is so fun to wear!!! all swishy and light. plus i really love the color. the entire time i was sewing it i was trying to place what the color reminded me of. well the entire time that wasn't consumed with shouting expletives! anyway, i kept conjuring up some flavor that i've linked to summer as a kid. and finally i placed it - its the exact color of watermelon bubblegum (bubblicious brand)! it may not look like it in the pictures, but trust me, watermelon bubblegum. these sensory associations don't lie. memories are so weird... now i think i can smell it...


i decided to take a page out of my sister's book and paired my leather jacket and silk skirt with a simple white t-shirt. well, my version of a white t-shirt. i made this about a year ago, its one of the patterns from the japanese drape drape books. not sure which one and frankly i'm too lazy to get up, walk over to my bookshelf, and thumb through them to find out (its friday, guys). so if anyone is burning of curiosity just shout it out in the comments and i guess i can take the five steps to figure it out for you...

regardless, its obviously a drapey t-shirt. i made it out of some slubby linen knit type stuff. and thats my bra underneath it. i'm probably wearing underpants underneath my skirt too. i think...

edit: haha!! i just realized it looks like i'm wearing a teeny purple hat in this picture... good god, what was i thinking...

okay, i'm obviously in a bit of a goofy mood and should probably cut it off here before this really starts going down the toilet (pffft! toilets!) i've already typed more random sentences about my underwear and i want to quit while i still have the good sense to delete them.

truthfully, i think i'm out of things to say since i already covered so much of the construction stuff in my last post. have no fear though, i have some up close detail shots of the jacket innards and stitchery and such coming, but i gotta space out the good stuff!

xx

3.13.2012

an unusual array of tools


hi everyone! i hope you all had a lovely weekend! my husband is out of town this week so that means that i will be clattering away at the sewing machine during my evenings, trying to make decent headway on my spring wardrobe. it also means that i'll be nerding out with harry potter audio books - which i practically have memorized - all week long!!!

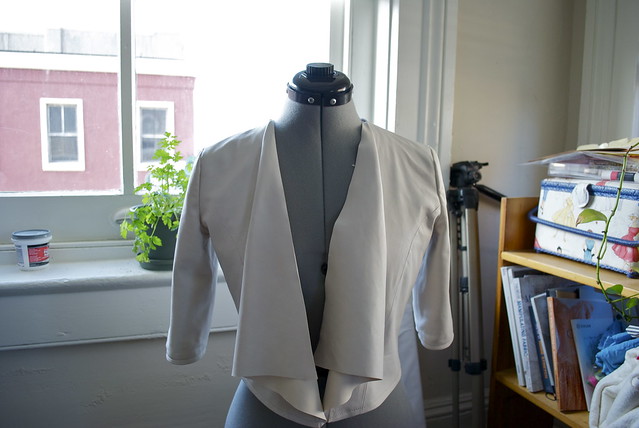
change of subject! you guys seemed pretty intrigued by my plans for the "draped leather jacket" so i thought i would share some of the behind-the-scenes action. i'd like to share some of my "design process" for this jacket, since i drafted the pattern myself, and also some of my experiences in working with the lambskin (i think in my last post i called it sheepskin, but its actually lambskin).

first - a disclaimer: you guys. i am not a designer. i have zero background in this stuff. i've never even taken a class. i have one pattern making book that i've had for less than three months and i'm the queen of google searches. thats the extent of my knowledge. so please don't think of any of this as some sort of tutorial, or of me as some voice of authority. i don't know what i'm doing! this is just more of a chronicle of my experimentation, and, despite the fact that i don't know the right way to do a lot of this stuff, i'm happy with the results - for me! the same is true of working with leather. this was my first time handling the stuff so it was all a learning experience...

now that i got that off my chest, lets talk about my fumbling experience with pattern drafting...


i started with my sloper. this was the finished state of it after many hair wrenching re-drafts. actually i think the sleeves on this guy are still sucky, but i gave up. also, please ignore the fact that all these muslins are a wrinkled mess - they've been living in a ball on the edge of my sewing table. aaaand please ignore the ripped "v" at the neck. in a state of fitting frustration i tore open the muslin - incredible hulk style - only to realize that it solved the majority of my fitting woes... sometimes channeling a bit of roid rage has its benefits...


using my sloper i was able to make a torso block (which is basically the same thing as the bodice in the first picture, except that it extends down to hip level) and from that i drafted a basic two-dart jacket. i added ease and extended the shoulders. this first try was really big all around so i pinched out excess fabric at the front and back darts and the side.


the next go-around was a bit more flattering, but i still had some excess in the front (you can see how i pinned it out). i also experimented with the construction on this one, sewing the sleeves in flat and then sewing up the side seam and underarm seam in one go. this worked really well for me.


this next version was sewn up in some creepy polyester stuff thats been hanging around for way too long. (side rant - why can't i get polyester to press flat? also, why does it smell like a 70's basement when i press it? that stuff is just icky...) here i converted all my darts to princess seams - which i had to take in because apparently i'm not as busty as i thought. i was pretty happy with this muslin and considered using it as my final draft.... except for the sleeves!!!

a word about sleeves... again (deeeep siiighhhh) so for this jacket i was very worried about the sleeve ease because i knew i was going to be sewing it out of leather and, well, leather doesn't ease. so i drafted a sleeve and armhole that had zero ease.

you guys. i'm sure a lot of you have read the article on fashion incubator about sleeve ease being unnecessary and its all about the shape of the sleeve cap/armhole? if not, you can read it here. but i caution you. after i read it i felt like i had entered myself into the extreme sports of sewing. all of a sudden it was like "sallie just parachuted into an active volcano - but can she draft a sleeve without ease?!?" i think it caused more problems for me than if i had just worked with the stupid looking sleeve draft that was in my book.

here's the thing - again, from my limited experience. to make a sleeve that had zero ease i had to extend the shoulder seam about 1/2 inch. and it worked. and it looked... okay. but i just felt that, design wise, the wide shoulder wasn't the most flattering. as you can imagine, it made my shoulders look wide. so i decided to shorten the shoulder seam again and add sleeve cap height to compensate for the roundness of the upper shoulder. i figured my leather would be able to handle some gathering, as long as it wasn't excessive. and... it worked! so while i think that perhaps sleeve cap ease can be eliminated it will alter the design of your look. i just can't figure out how you'd make a sleeve with zero ease work without having a wider shoulder. reading this post helped me disqualify myself from the extreme sports of sewing and just freaking make it work!!

so, the conclusion of my sleeve saga: don't get caught up in chasing the mythological sleeve. its not worth it and you'll end up trying to prove something to yourself, which is, in the end, pointless. just make a sleeve that works and move on with your damn life! my final sleeve? meh. i'm not in love, but it looks okay to me.


for this muslin i worked with the sleeve ease and shorter shoulder seam and found that it resulted in a very comfy sleeve (armhole looks weird here because i pressed it weird - promise). i almost started going down the rabbit-hole of fitting (over-fitting?) only to stop myself. i decided i liked the look of this jacket. it may not be the most "correct" fit in the world, but it fit the way i wanted it to and so i decided to focus my attention on drafting the draped front that i wanted. this was really the fun part. to do this i just cut a few triangles and pinned them together until i got the sort of shape that i had in mind. its certainly not an earth-shattering design, but it was fun to figure out.


a whole mess of discarded patterns and one dorky kitty

at this point i made all the final changes to my paper patterns and wrote out some instructions for myself to i could walk myself through the construction in my head.

then i cut out the leather.....


yes that is a brick up there on the right. it is my most favorite of pattern weights...

as i mentioned, this was my first time working with leather. i blame it all on amy from cloth habit for casually mentioning that she was going to be making this fabulous coat with leather trim. before this - i had never even dreamed of sewing with leather. but because of her the idea impregnated itself in my brain, and - after the usual gestation period - i now have a leather jacket baby!

here's some of my thoughts on working with leather - in no particular order:
  • this stuff is awesome!
  • really, a dream to work with!!
  • imagonna make everything out of leeaaathhhherrrrrrrr!!!!!
so yeah. i liked it.

i traced my pattern pieces onto the leather hides (it took 4 hides to make my jacket) i followed this advice, once again from fashion incubator, on how to lay out your pattern pieces. then i just cut the pieces with my rotary cutter. no weird shifting, no fraying... easy peasy lemon squeezy.


i did a few tests with some scraps, figuring out needles and stitch length and top stitching. since the leather i was working with was pretty thin and drapey my regular universal needles worked okay, but the leather needle made a cleaner hole and i think it handled thicker layers better.


i had read in a bunch of places on ye olde worlde wide webb that a teflon foot was recommended for sewing leather. i didn't have one and didn't feel like buying one so i used my even feed walking foot. worked like a charm.


the same world wide web told me that pinning leather was not advisable since it will leave permanent holes in the leather. a few sites suggested to clip the leather pieces together with bulldog (binder) clips instead. i tried this but found that the clip would get caught on the edge of my throat plate on my sewing machine and yank the leather as it was being fed through. so instead i decided to just use plain old masking tape and taped my seams together. also (shhh) i used pins. yeah. i did. freaking rebel over here. i just made sure to pin in the seam allowance.

pressing seams was another switch up from your standard fabric sewing. i didn't even try to iron the leather, i just assumed it wouldn't work. so i bought this little ink roller (brayer) and rolled it over the seams to flatten them a few times, then used a thin layer of rubber cement to tack my seam allowances down. fun!

some other firsts for me on this project - working with rayon bemberg (ambience stuff) and bagging a jacket lining (had to modify this a bit since i left the front edge of the jacket unfinished because leather doesn't fray!!!).

really, the whole thing came together quite quickly and without any drama. maybe its because i essentially sewed the jacket 3 times before i set to work with the leather, or maybe it was just an easy pattern. but whatever. i finished the jacket last night (at the same time i finished listening to deathly hallows for the 455th time... me and harry potter, we're so in sync!) and i really like it!

i'll post pictures this week - scouts honor!

xx