

Hi Ya'll! I'm very excited to show you my newest make for the Mood Sewing Network! I know everyone is clamoring for spring, and the last thing you want to look at is another reminder that it's still, alas, winter, but bear with me here because I'm really excited about this coat! Get ready for a looonnng post and picture overload! (P.S. if you want the short version, head on over to the MSN post!)

I know I didn't do a big post about my goals for 2014, but that doesn't mean that I didn't make any goals! For instance: learn to knit in 2014. check! make better use of your time and be more productive in 2014.... erm.... check minus?? Anyway. You get the point. Well on that list of goals was "make a coat in 2014". (check!!) This wasn't so much an aspirational goal as much as it was a 'this-is-getting-ridiculous' kind of necessity goal. See, when I moved to Texas I got rid of all my winter coats. A bit drastic, I know, but you gotta understand, for a girl from the northeast, Texas winters felt like a joke. At first. Then they started to feel cold again. Also, I bike to and from work everyday. The past two years or so I have started collecting an odd assortment of winter weather layers, that consist primarily of a $10, thin, unlined, nylon, rain jacket procured from the local sporting goods store (the kind that folds up into a tiny pouch), an aztec print poncho/blanket type thing (shown here) from some cheap, trendy store (this was pre-sewing days) that I tend to wrap around myself like a giant muffler, an array of hoodies, some gloves picked up from the drugstore for $1.99, and now, my hand knitted hats. As you might imagine... it's not the most flattering look.
This year, I decided it was time to step up my outermost layer of clothing. No more being confused for a homeless person! (Although I will miss all the extra change people throw at me... just kidding... that never happened...)

This is one of those makes where I'm not really sure which came first, the fabric or the pattern. Or perhaps it all just miraculously happened in one, giant, big-bang-like, divine-intervention-esque, stroke of inspiration. But for the sake of keeping things coherent, let's start with the fabric. I actually spotted and fell in love with this Oscar de la Renta wool coating from Mood Fabrics' online store before I became a Mood Sewing Network blogger. I even asked for, and received, the necessary yardage to make a coat as a Christmas present (thanks Mom and Dad!!) It's basically my dream coat fabric. It's double faced, so it has a gorgeous weight to it, and it's plenty warm for the southern winters I'm dealing with. And I just think the large-scale, salt and pepper herringbone has such a luxurious texture to it.


I really wanted to use this fabric to make a coat that felt both architectural and soft. I know that seems like a contradiction - but trust me, it can exist! I decided to use Vogue 8933 for the pattern, because I loved the large, dramatic collar, and the asymmetrical front. Also, this was a relatively un-fussy pattern, perfect for my first go at making a coat. I made a size 10 based on the finished garment dimensions (always wise to use the finished garment dimensions when working with a Big Four pattern company!) The one thing that I was sort of bummed about when it came to this pattern was the sleeves. The pattern uses a regular, straight, one-piece sleeve. Since I wanted this coat to feel softly tailored I felt like a two-piece sleeve would just be a more elegant option. So I used the one-piece sleeve as a base to draft a two-piece sleeve. I used this Threads tutorial. It worked pretty well, although if you do this, I strongly recommend making a muslin (or two, or three) just to be sure that all your markings line up and the sleeve hangs correctly. I ended up having to move where my seamlines fell, and taking out an odd little chunk of fabric out of the underarm. Drafting sleeves are basically my nightmare, but in the end I think these turned out all right.
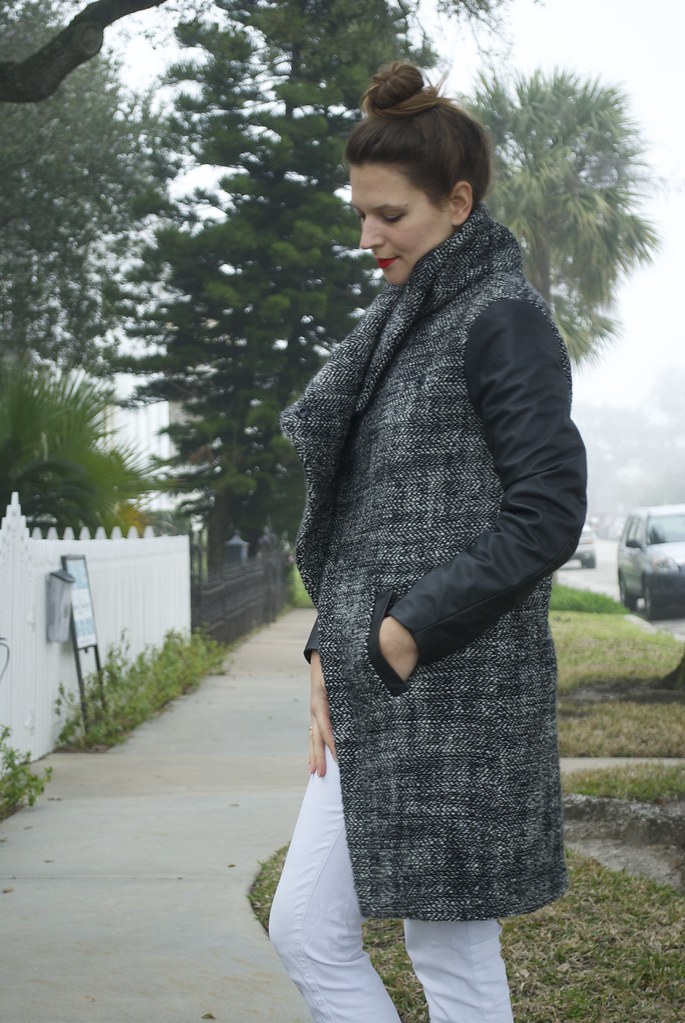
And speaking of sleeves, since this Oscar de la Renta wool has such a gorgeous texture, I thought it would be fun to really highlight it with an opposing texture for the sleeves. You can disagree, but I'm pretty certain that this nubby wool paired with this buttery soft black leather is like the 'chocolate & peanut butter' of the textile world - tactile soul mates. I bought this leather hide, and let me tell you, it was a bargain! I feel like the quality was great and I got a great amount of square footage for the price. I still have a nice, hefty amount left over (hmm... what to use it for....?) plus, shipping was fast. After working with leather a few times now I'm starting to get a nice feel for it. It really isn't a complicated material to work into your sewing, and I, obviously, highly recommend it. I was thinking of putting together a post of a few of my 'tips' (if you want to call them that... it's definitely not anything official) for working with leather... would anyone be interested in that?

Since I was on a roll with making this coat as much of a sensory delight as one can make a coat, I decided to throw another oh-my-god-I-can't-stop-touching-it fabric into the mix: silk charmeuse. I'm not going to lie, I completely stole this idea from some other brilliant and fabulous sewists (namely Lauren and Erica). It just looked so incredibly ... what's the word ... rich! And since it's always fun to add a bit of 'over the top-ness' with linings, I opted for this lovely magenta silk charmeuse - although I might call it fuchsia rather than magenta. I like that it adds just a touch of "Dynasty" to the coat, without going full blown Joan Collins.


It's been awhile since I made a garment that required so much hand stitching. I had to brush off my technique from my red jacket days (remember those days.... oh how time does fly...) Granted, I didn't go to nearly the extent that I went to on that red jacket, but there was still a nice amount of fell stitching and catch stitching involved. And, hence, lots of getting caught up on the most recent season of 'Downton Abbey' (is it just me, or is that show getting even more ridiculous plot-wise?) Anyway, I attached the lining to the collar by hand, because that pivot point was driving me insane on my machine, and also attached the sleeve lining to the coat lining by hand because... well I just wanted to. The bottom hem of the coat and the lining hang free from each other, so each raw edge was finished separately, pressed up and catch stitched in place. There are little thread bars that hold the lining in place at the side seams. You can also see my little leather hanging loop that I threw into the collar of the coat. I'm so pleased with this little touch!
It's been awhile since I made a garment that required so much hand stitching. I had to brush off my technique from my red jacket days (remember those days.... oh how time does fly...) Granted, I didn't go to nearly the extent that I went to on that red jacket, but there was still a nice amount of fell stitching and catch stitching involved. And, hence, lots of getting caught up on the most recent season of 'Downton Abbey' (is it just me, or is that show getting even more ridiculous plot-wise?) Anyway, I attached the lining to the collar by hand, because that pivot point was driving me insane on my machine, and also attached the sleeve lining to the coat lining by hand because... well I just wanted to. The bottom hem of the coat and the lining hang free from each other, so each raw edge was finished separately, pressed up and catch stitched in place. There are little thread bars that hold the lining in place at the side seams. You can also see my little leather hanging loop that I threw into the collar of the coat. I'm so pleased with this little touch!

I debated adding a back vent to the jacket. At first I thought this might be a nice 'tailored touch', like the two-piece sleeve. However in the end I decided against it. Since the front has such a wide split, the coat doesn't need it functionally, and visually I felt like a back vent might break up the bottom hem too much. And since it didn't meet the criteria for form or function that idea got ousted. I think this was a good call.

Since I was trying to maintain some softness with the fabric, I didn't go full tilt with the tailoring. I used fusible horse hair canvas in the facings, and to reinforce the pocket openings, and underlined the leather sleeves with cotton batiste. I also constructed a back stay from the cotton batiste... aaanndd.. that's really it! I think because this wool is double faced it already has a bit more heft than single ply fabrics and I didn't want the coat to get too bulky, or stiff and lose the drape of the collar.

The coat is closed by a series of coat snaps, sewn on in the very last step. In a world where we go all swoony over a perfectly executed bound buttonhole, this is certainly not the sexiest of coat closures, however it is very functional, and I even sort of dig the final look. A little additional hardware never goes amiss in my book. And while we're on the subject of hardware - am I not-so-secretly regretting not adding some tough zippers to the underarm seam of my leather sleeves? Yes. Yes I am. Hindsight you guys...

I realized that I didn't get a great picture of the coat all buttoned up when I did my photo shoot, so I had Nick quick snap this iphone photo of me. As you can tell from the majority of my photos, I love the way this coat looks open with the oversize collar doing it's own dramatic thing, but it's nice to know that should I feel a chill creeping at my neck I can button myself, literally, all the way up to my eyeballs!
The coat is closed by a series of coat snaps, sewn on in the very last step. In a world where we go all swoony over a perfectly executed bound buttonhole, this is certainly not the sexiest of coat closures, however it is very functional, and I even sort of dig the final look. A little additional hardware never goes amiss in my book. And while we're on the subject of hardware - am I not-so-secretly regretting not adding some tough zippers to the underarm seam of my leather sleeves? Yes. Yes I am. Hindsight you guys...
I realized that I didn't get a great picture of the coat all buttoned up when I did my photo shoot, so I had Nick quick snap this iphone photo of me. As you can tell from the majority of my photos, I love the way this coat looks open with the oversize collar doing it's own dramatic thing, but it's nice to know that should I feel a chill creeping at my neck I can button myself, literally, all the way up to my eyeballs!

Phew!! Long post, you guys! Thanks for sticking with me all the way to the end! In conclusion: I'm incredibly excited about this coat! It feels great to finally have some outerwear that reflects my personal style. Truthfully, I probably won't get a chance to wear it this year, since spring is already making itself felt down here in the south. However, I know I will be immensely grateful for this coat come next winter! Is anyone else doing a little 'out of season' sewing?
And how pretty is this fog we've been getting in Galveston? So moody... Can anyone spot the little orange kitty that was keeping me company while I was shooting these photos?
xx
And how pretty is this fog we've been getting in Galveston? So moody... Can anyone spot the little orange kitty that was keeping me company while I was shooting these photos?
xx


