Showing posts with label sleeves. Show all posts

3.19.2012

innards


since this jacket made its debut on the blog last friday it has already seen a fair amount of wear this weekend. even though its leather, and you'd think it might be heavy and hot, its actually the perfect light layer for the cooler nights and windy days we've been having.

as promised, i've collected some more detailed shots of the jacket for you - since i know as sewing bloggers we love to peek at the insides and see the stitches and seams up close!


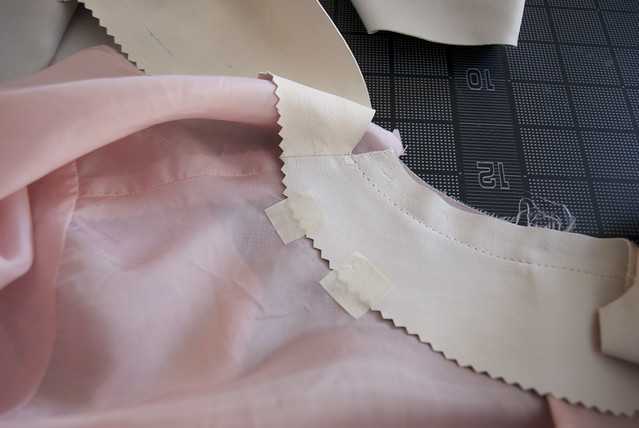
there's that pink bemberg lining! if i had to do one thing differently on this jacket it would be the lining. here's why: i sewed the lining a little big (instead of using a 1/2 inch seam allowance like i did on the jacket, i used 3/8 inch) which is what i did for my red jacket. however i inserted this lining using the bagged method rather than the hand sewn method i used for the red jacket and i think it looks a bit too big. i know you want extra room in a lining for ease of wearing, but this looks a bit fluffy to me. it doesn't affect the wear of the jacket - no bunching or twisting or anything - but when i look at it inside out it does look a bit floofy.

i pinked the edges of the front draped part and the back facing as a decorative element. i've always had a soft spot for the way a pinked edge looks and since the leather doesn't actually fray it doesn't serve any functional purpose (except the function of making me smile a little - its like a little ray of sunshine back there...)


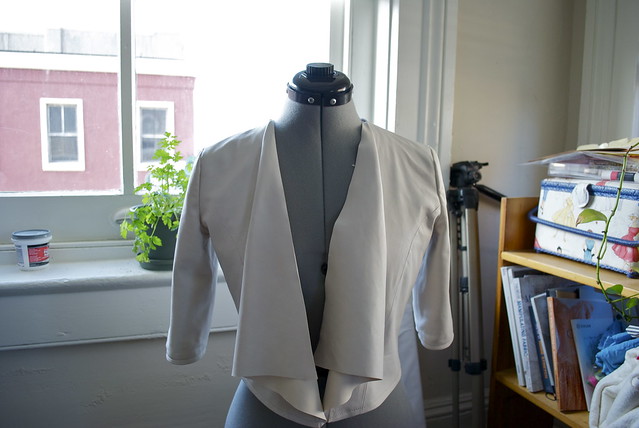
here you can see how the drape in the front works. its basically just an equilateral triangle thats been tacked on - although its much more secure than that! it doesn't roll around the neck like a traditional lapel, instead it falls from the side of the neck at the shoulder seam.


i used topstitching both as a decorative element and to give strength to certain areas of the jacket. i especially used it around the draped lapel to help ease any strain there. you can also see the sleeve seams here. i didn't use any sleeve heads or shoulder pads in this jacket because i really wanted it to be soft and unstructured. i suppose i could have used some muslin or organza or something in there just to fill out those dimples, but i'm not too fussed about it.


and here's my nemesis... the set in sleeve. as i mentioned in an earlier post - this sleeve draft isn't perfect, but i just needed to move on. the sleeve gets a few funny wrinkles when i wear it, but i can also lift my arms above my head, type on a keyboard, drive, and basically use my arms for whatever i need to use my arms for - like flag twirling. just kidding. i don't twirl flags. but i could in this jacket! so i'll take a few weird wrinkles. will i use this sleeve draft when i make a jacket again? probably not. i'll probably try and draft a new one. but i definitely feel like i've learned a bit about sleeves...much to my chagrin...

so i wanted to say a quick word about some blog administration stuff (snooze fest, i know). after getting yet another comment about how difficult it is to comment on my blog i decided to change my commenting platform. this commenter was kind enough to suggest i download disqus, and i took the suggestion, because honestly, while i know that blogger has the worst setup for comments ever (i mean, can anyone read those obnoxious security words??) i really had no clue that i even had another option! so thank you, theperfectnose - your wise words were much appreciated.

that being said - after importing all my past comments into disqus, my replies are now all out of order! i love reading the comments on my blog and the fact that you all take the time to say hi and leave some kind words here just means the world to me. its really important to me to let you know how much i appreciate your comments by replying - but now all my replies are out of order and not matched up with the right comment!! so if it looks like i didn't reply to your comment, that may not be so! it just might be out of order and floating around amongst the other comments.

anyway, i hope this will make commenting on the blog easier for everyone from here on out!

xx

3.13.2012

an unusual array of tools


hi everyone! i hope you all had a lovely weekend! my husband is out of town this week so that means that i will be clattering away at the sewing machine during my evenings, trying to make decent headway on my spring wardrobe. it also means that i'll be nerding out with harry potter audio books - which i practically have memorized - all week long!!!

change of subject! you guys seemed pretty intrigued by my plans for the "draped leather jacket" so i thought i would share some of the behind-the-scenes action. i'd like to share some of my "design process" for this jacket, since i drafted the pattern myself, and also some of my experiences in working with the lambskin (i think in my last post i called it sheepskin, but its actually lambskin).

first - a disclaimer: you guys. i am not a designer. i have zero background in this stuff. i've never even taken a class. i have one pattern making book that i've had for less than three months and i'm the queen of google searches. thats the extent of my knowledge. so please don't think of any of this as some sort of tutorial, or of me as some voice of authority. i don't know what i'm doing! this is just more of a chronicle of my experimentation, and, despite the fact that i don't know the right way to do a lot of this stuff, i'm happy with the results - for me! the same is true of working with leather. this was my first time handling the stuff so it was all a learning experience...

now that i got that off my chest, lets talk about my fumbling experience with pattern drafting...


i started with my sloper. this was the finished state of it after many hair wrenching re-drafts. actually i think the sleeves on this guy are still sucky, but i gave up. also, please ignore the fact that all these muslins are a wrinkled mess - they've been living in a ball on the edge of my sewing table. aaaand please ignore the ripped "v" at the neck. in a state of fitting frustration i tore open the muslin - incredible hulk style - only to realize that it solved the majority of my fitting woes... sometimes channeling a bit of roid rage has its benefits...


using my sloper i was able to make a torso block (which is basically the same thing as the bodice in the first picture, except that it extends down to hip level) and from that i drafted a basic two-dart jacket. i added ease and extended the shoulders. this first try was really big all around so i pinched out excess fabric at the front and back darts and the side.


the next go-around was a bit more flattering, but i still had some excess in the front (you can see how i pinned it out). i also experimented with the construction on this one, sewing the sleeves in flat and then sewing up the side seam and underarm seam in one go. this worked really well for me.


this next version was sewn up in some creepy polyester stuff thats been hanging around for way too long. (side rant - why can't i get polyester to press flat? also, why does it smell like a 70's basement when i press it? that stuff is just icky...) here i converted all my darts to princess seams - which i had to take in because apparently i'm not as busty as i thought. i was pretty happy with this muslin and considered using it as my final draft.... except for the sleeves!!!

a word about sleeves... again (deeeep siiighhhh) so for this jacket i was very worried about the sleeve ease because i knew i was going to be sewing it out of leather and, well, leather doesn't ease. so i drafted a sleeve and armhole that had zero ease.

you guys. i'm sure a lot of you have read the article on fashion incubator about sleeve ease being unnecessary and its all about the shape of the sleeve cap/armhole? if not, you can read it here. but i caution you. after i read it i felt like i had entered myself into the extreme sports of sewing. all of a sudden it was like "sallie just parachuted into an active volcano - but can she draft a sleeve without ease?!?" i think it caused more problems for me than if i had just worked with the stupid looking sleeve draft that was in my book.

here's the thing - again, from my limited experience. to make a sleeve that had zero ease i had to extend the shoulder seam about 1/2 inch. and it worked. and it looked... okay. but i just felt that, design wise, the wide shoulder wasn't the most flattering. as you can imagine, it made my shoulders look wide. so i decided to shorten the shoulder seam again and add sleeve cap height to compensate for the roundness of the upper shoulder. i figured my leather would be able to handle some gathering, as long as it wasn't excessive. and... it worked! so while i think that perhaps sleeve cap ease can be eliminated it will alter the design of your look. i just can't figure out how you'd make a sleeve with zero ease work without having a wider shoulder. reading this post helped me disqualify myself from the extreme sports of sewing and just freaking make it work!!

so, the conclusion of my sleeve saga: don't get caught up in chasing the mythological sleeve. its not worth it and you'll end up trying to prove something to yourself, which is, in the end, pointless. just make a sleeve that works and move on with your damn life! my final sleeve? meh. i'm not in love, but it looks okay to me.


for this muslin i worked with the sleeve ease and shorter shoulder seam and found that it resulted in a very comfy sleeve (armhole looks weird here because i pressed it weird - promise). i almost started going down the rabbit-hole of fitting (over-fitting?) only to stop myself. i decided i liked the look of this jacket. it may not be the most "correct" fit in the world, but it fit the way i wanted it to and so i decided to focus my attention on drafting the draped front that i wanted. this was really the fun part. to do this i just cut a few triangles and pinned them together until i got the sort of shape that i had in mind. its certainly not an earth-shattering design, but it was fun to figure out.


a whole mess of discarded patterns and one dorky kitty

at this point i made all the final changes to my paper patterns and wrote out some instructions for myself to i could walk myself through the construction in my head.

then i cut out the leather.....


yes that is a brick up there on the right. it is my most favorite of pattern weights...

as i mentioned, this was my first time working with leather. i blame it all on amy from cloth habit for casually mentioning that she was going to be making this fabulous coat with leather trim. before this - i had never even dreamed of sewing with leather. but because of her the idea impregnated itself in my brain, and - after the usual gestation period - i now have a leather jacket baby!

here's some of my thoughts on working with leather - in no particular order:
  • this stuff is awesome!
  • really, a dream to work with!!
  • imagonna make everything out of leeaaathhhherrrrrrrr!!!!!
so yeah. i liked it.

i traced my pattern pieces onto the leather hides (it took 4 hides to make my jacket) i followed this advice, once again from fashion incubator, on how to lay out your pattern pieces. then i just cut the pieces with my rotary cutter. no weird shifting, no fraying... easy peasy lemon squeezy.


i did a few tests with some scraps, figuring out needles and stitch length and top stitching. since the leather i was working with was pretty thin and drapey my regular universal needles worked okay, but the leather needle made a cleaner hole and i think it handled thicker layers better.


i had read in a bunch of places on ye olde worlde wide webb that a teflon foot was recommended for sewing leather. i didn't have one and didn't feel like buying one so i used my even feed walking foot. worked like a charm.


the same world wide web told me that pinning leather was not advisable since it will leave permanent holes in the leather. a few sites suggested to clip the leather pieces together with bulldog (binder) clips instead. i tried this but found that the clip would get caught on the edge of my throat plate on my sewing machine and yank the leather as it was being fed through. so instead i decided to just use plain old masking tape and taped my seams together. also (shhh) i used pins. yeah. i did. freaking rebel over here. i just made sure to pin in the seam allowance.

pressing seams was another switch up from your standard fabric sewing. i didn't even try to iron the leather, i just assumed it wouldn't work. so i bought this little ink roller (brayer) and rolled it over the seams to flatten them a few times, then used a thin layer of rubber cement to tack my seam allowances down. fun!

some other firsts for me on this project - working with rayon bemberg (ambience stuff) and bagging a jacket lining (had to modify this a bit since i left the front edge of the jacket unfinished because leather doesn't fray!!!).

really, the whole thing came together quite quickly and without any drama. maybe its because i essentially sewed the jacket 3 times before i set to work with the leather, or maybe it was just an easy pattern. but whatever. i finished the jacket last night (at the same time i finished listening to deathly hallows for the 455th time... me and harry potter, we're so in sync!) and i really like it!

i'll post pictures this week - scouts honor!

xx

2.28.2012

wildcat


mee. yow.

so i may have spent a good chunk of this past weekend watching cleopatra on netflix instant. which is basically like spending four hours of your life being seduced by elizabeth taylor. not a bad way to spend a sunday, i'd say. her eyes are largely responsible for the seducing in that film. okay, well her eyes are, like, 5% responsible and the rest goes to her cleavage - which is outstanding! i mean, all perviness aside, her cleavage deserves a mention... as does the costuming which did such a fabulous job enhancing her... assets.

so minus the cleavage, my look today was somewhat influenced by liz taylor circa cleopatra. i may have achieved more of a mrs. robinson look, but oh well... must be something in the air...


you probably wouldn't believe it from looking at it, but this little box dress took me the better part of two weeks to make. two weeks?!? good god, sallie, what did you do? weave the damn fabric?! no. no i did not. in fact if you think you saw this fabric before on this blog - you did. this is the same rayon challis i used to line my red jacket. i liked it so much i bought extra yardage to make a dress. actually, now might be a good time to tell you that this print is not actually leopard print (gasp!! the lies!!) according to the roll at the fabric store, its jaguar print... duh.


okay, so why did it take me so long to sew three seams and stick some sleeves on 'em? because this was the result of my first experimentation in drafting a pattern based off of my sloper (which is still a work in progress, but more on that later). really, it was the sleeves that was the major hold up. my first draft revealed some unforeseen problems with the armholes of my bodice. the second go around had too much sleeve cap ease. i'd like to say that i was just having a case of the goldilocks and that the third try was just right, but thats not the case. i went from too much ease, to too little ease, to a forward thrusting sleeve, to a tight bicep, to not enough cap height... i am so sick of sleeves!

the version that finally made it onto this dress is still far from perfect. the armholes are a bit tight and, though you can't see it in the pictures, the sleeves swing forward a bit and there is an annoying little "puff" right at the shoulder line. between the sleeves and the fact that the muslin for this dress was so very very unflattering (think amish) its amazing this dress even got made! but i had a hunch that the busyness of the jaguar print and the drapey quality of the rayon challis would cure most evils. and lo and behold - it did!

pattern drafting = fail!

fabric choice = win!


here i am with my trusty steed. believe it or not, but this little dress passed the biking test. meaning i can physically bike in this dress. whether or not it passed the public decency test is another story...

i had a lot of fun with the camera today. we've been getting these crazy fogs that roll in around 4pm that are so thick and heavy and give such an ominous feeling to the place. i tried playing around with my depth of focus and settings, trying to capture that. mostly i just ended up with some blurry pictures, but hey, i'll take what i can get!


i was particularly fond of this picture. it looks like a still from some b horror film! something bad is definitely about to happen! what do you think? abducted by aliens? i seem kind of okay with that...

well, friends, this was my last and final hurrah for winter-ish sewing. from here on out i will have my nose to the grindstone with one thing in mind: spring!

xx

1.10.2012

on sleeves


and the saga of the red jacket continues.

actually - there really isn't much saga to it. i just tend toward the overly dramatic. this weekend i got my butt in gear and tackled those erroneous sleeves like someone was paying me to do it.

when i first realized that the sleeve cap was too large for my armhole i felt like my world just caved in (ahem. overly dramatic). fixing this seemed like the most difficult thing in the world and at the time i just couldn't wrap my head around it. before you judge me, let me just restate that i was running on very little fuel and pushing myself towards a deadline which, in all honesty, it was clear a good week ahead of time, i was not going to make. so i consider it a blessing for this little jacket that the holidays came when they did and i was forced to take a break - before someone (or something) got hurt.

i mentioned in my previous post that i received some sewing related gifts this christmas. chief among them was this book. i have been wanting a big ol' fat patternmaking book for some time - but just couldn't cough up the dough for one. thus - a perfect gift! i truly believe that this book will pay for itself in no time, since after barely flipping through the first few chapters i already gleaned the solution to my sleeve cap problem.

now - adjusting a sleeve cap isn't a hard pattern adjustment to make. in fact, its stupidly easy and if i had given it any normal amount of thought i probably could have figured it out on my own. however i was having some sort of massive (trauma induced, i'm sure) blockage on this issue, so seeing it illustrated was a wonderful, cartoonish, lightbulb-y, a-hah!!! moment for me.

fast forward to this weekend. as i set about to slice and dice my sleeve pattern my mind wandered to this blog and thought that perhaps i'm not the only one whose brain farts out on them over the simplest of alterations. which is why i decided to bring you my illustrated instructions on how to simply and easily reduce your sleeve cap size.

do not be fooled by these wibbly wobbly illustrations - i have an mfa in painting peeps (thats right i said painting - which explains my utter ineptitude with technology designed to make these things easier, like, say, adobe illustrator)

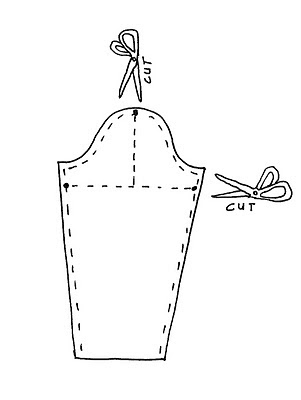
so this is something along the lines of what a standard sleeve pattern looks like:
it has actually been my experience that many commercial patterns have too much sleeve cap height for my taste. generally speaking, you want your sleeve cap to be about 1 1/4" to 1 3/4" larger than your bodice armhole. its best to check this on the paper pattern so you can easily make adjustments early in the game. if you find that your pattern calls for more ease (and a puffed/gathered sleeve is not part of the design) you may want to make your sleeve cap smaller by reducing both height and width. this is how you do it:

step one - slice your pattern at the cap line (about an inch below the top two corners) do not cut through the seam allowance! and cut a vertical line from the cap line, all the way up through the sleeve cap and its seam allowance.


bonus points if your scissors look like evil, maniacal birds!!!

step 2 - you should now have two wing-y pieces. rotate these in towards the center of the sleeve, overlapping in the middle and at the bottom.

step 3 - weigh down your wing-y pieces with some pattern weights. re-measure your sleeve cap and adjust as needed. when you get it to the right measurement, tape down your wing-y pieces and retrace your pattern (or just trim off the excess and redraw your seam allowance lines, smoothing out as you go - a french curve helps if you're not comfortable eye-balling)

and voila! a smaller sleeve cap!

easy. peasy. lemon. squeezy.

xx

edit: lizz, of agoodwardrobe, left an excellent question in the comments - and i thought it would be good to add a clarifying little illustration (and because making little drawings of patterns is really fun!). she wondered where exactly you measure your pattern to determine the amount of ease. you just measure over the curved part of the pattern:

in addition - to measure your armhole, lay your bodice front and backs together, matching up the sewing line at the armhole (you want to exclude the seam allowance in your measurement) and measure around the curve:

those seam allowances should be overlapped - but you get the idea!!

hope that helps clear things up!

over and out.