1.19.2012

tutorial: fun with clovers - part one

many moons ago, when i was just a young buck, in the days before i knew of such things as "red jackets" and "couture techniques", when life was, dare i say, a bit more innocent...

i had a vision. a vision that one day i would bring my knowledge to this blog and share it with all who wished to share it with me. that we might learn together. is this a utopian ideal?

no. this is sewing with sallie.


thats right! i am pleased to introduce my first ever official tutorial (besides the tutorial i scribbled on a random napkin as an afterthought one day. that one doesn't count)

in the back of my brain, in between red jacket madness, job changes, christmas and the like, i've been rolling around the idea to share how i made my changes to the colette clover pants pattern.

in case you missed it, i blogged about these pants (and shirt) here. i love taking a great, versatile pattern, like clover, and finding a way to make it my own. i already feel like this pattern will have future iterations - but for now, i'd like to show you how i took the clover pattern, a simple, elegant, slim fitting, side zip pant, and gave them a more masculine edge with some trouser details. i will be splitting these tutorials into as many posts as it takes - for my own sanity. i'm thinking right now it will take about 4.

in these tutorials, i will show you how to:
  • draft and sew a front zip fly
  • draft and sew side pockets
  • convert the clover waistband to a button/tab closure at center front

the pants i made above also have single welt pockets on the rear, however i won't be showing you how to do that in my tutorial since i think there are already a lot of great tutorials lurking around the internet on how to do that. like this one. or this one.

so lets begin, shall we?

materials you will need:
  • your clover pattern with all fitting adjustments made
  • tracing paper - or whatever pattern paper you fancy
  • pen/pencil/marker
  • ruler
  • french curve, or your eyeballs
now if you are anything like me, by the time you managed to get your clovers to fit you satisfactorily, your pattern may look a little something like this:

kinda gnarly. so the first step will be to:

1. trace your adjusted clover pants pattern onto a clean piece of tracing paper, transferring all marks, grainlines, etc. since we are only making adjustments to the front pattern piece you can just trace that if you prefer.

2. to draft the front fly, begin by drawing a straight horizontal line from the circle on the hip over to the CF (center front) crotch. label the point where your line and CF meet point A.

3. working from the sewing line - not the outside of the seam allowance - extend the top edge from the CF to the right by 2 inches. label this point B.

4. make a mark 1 1/4 inches to the left of your CF seam. label this point C.

5. draw a vertical line from point B down to point A, curving your line toward CF about an inch above A. use a french curve to help you if you are uncomfortable eyeballing the curve. the length of this line will vary depending on the length of your crotch depth/front rise.

6. draw a line from point C to point A - mirroring the curve of line B - A. As you can see from my example, I didn't quite like the angle of my first line, and so changed it to be more parallel to the angle of my CF line. To be perfectly honest, it doesn't really matter - but for accuracy sake its nice for those two lines to be parallel. I also attempted to mask out my seam allowance line because I was finding it distracting. As you can see... it didn't do much.

7. draw a dashed line 1/4" to the right of line C - A. this will mark where you will be topstitching (should you choose to topstitch).

8. mark a point 1/2 inch above where line A intersects the CF seam.

9. make a note to "baste" from the top of your pants on the CF seam to your dot you just marked.

10. to draft your pants right fly extension (don't worry about what this is at this point - all will be revealed in good time!) you will need to find a clean piece of paper. draw a line approximately 4 1/2 inches long.

11. measure out to the right of this line 2 3/4 inches. draw a line.

12. square a line down from this line - extending it approximately 5 1/2 inches.

13. connect the two parallel lines along the bottom with a gently curved line. use your french curve for guidance if you don't feel comfortable eyeballing.

14. make a note on the left hand side of this piece (the shorter side) to "cut on fold". you will only need to cut one of these pieces. no need to add seam allowances.

*note* the measurements for this piece were based off of my own clover pattern - if your front rise is significantly longer than mine your right fly extension piece may need to be longer. please check the length of the fly you drafted onto your front clover pattern and make any changes to your right fly extension piece accordingly. (the short side of the right fly extension should be about 1/2 inch longer than the length of your fly)

congratulations! you just drafted a zip front fly! not too hard, huh? before you finish - extend those seam allowances along the top of your clover front pattern to meet up with your new fly front.

in the next post i'll show you how to draft some pockets and make changes to your clover waistband to accommodate your new zip fly.

feel free to leave any questions you may have in the comments and i'll try and answer them as best i can. and yay for fun with clovers!!!

xx


1.17.2012

and now...

time for some gratuitous construction shots!


views of the single welt pockets, (invisible) draw stitched collars with pick stitching along the edge, and fell stitched neckline.


so. much. fell stitching! plus little thread bars to hold the back pleat in the lining in place.

i would be a liar if i said this jacket is perfect. its not. not even close. but that doesn't stop me from being pleased as punch with the final outcome! it has plenty of little kinks to it - places where i may have been a bit overzealous with the steam, areas where i fudged my way through the finer details of tailoring, or got so caught up in the details i wasn't seeing their effect on the garment as a whole. does this ever happen to you?

i tell you this now, because it is with some trepidation that i show you these rather intimate images of my jacket, an object that few of you will ever examine in real life. i feel as if i'm laying it bare. exposing all my wonky little stitches - my fumbling with the fabric.

and i remind myself that it's all a process of learning - something i hate! why can't i skip over the learning part and just be an expert already?!? but it doesn't work like that, does it?

i had to laugh a bit when i was reading claire's instructions on how to attach the sleeve lining to the coat lining by hand. She says that because of the excess fullness - the lining should be smooth, but it won't be as neat as a machine stitched lining. She calls this "a true sign of a hand-made garment".

it reminds me of what my husband says when i'm freaking out over some detail thats just not quite right. He says, "honey, thats how you know its handmade"...


xx

1.15.2012

let's hear it for the boy


friends... meet the red jacket.

and prepare for photo overload.

that self-satisfied smirk is totally justified. i finally finished it! to be perfectly frank, i sort of feel like i just gave birth! (i totally reserve the right, should my future self ever actually give birth, to come back and give my present self a good slap for that comment) but really - there were times there when i thought this lovely lady would never be finished!

and she is a beauty, isn't she? this red jacket was just the thing to perk up a chilly, dreary winter day (by texas standards, ya'll).


i spent the past evenings and weekend hand stitching all the finishing touches. the upper collar was fell stitched along the neckline and draw stitched at the gorge line. the lining was fell stitched in place at the shoulders, neckline, armholes and along the front edge - all, of course, as per claire's instructions. sometimes i have serious doubts about wearing a garment hard that has predominate hand stitching, but have you ever tried to rip out fell stitches or back stitches? they are far more resilient than machine stitching! i will be posting some construction shots shortly - it was just far too dark to get decent pictures once we got home from our photo session this afternoon.


and, of course, there is that leopard print lining! the print is a bit louder than what i originally had in mind, but it was also $8 a yard, rather than the (far more tasteful) $36 a yard silks. and truthfully, its kind of grown on me. in fact, i bought extra yardage - so you'll be seeing this print pop up in a, how shall we say, less subtle way in the near future.

i used burda's 07/2011 sweatshirt sports coat for the pattern, however i redrafted the upper collar to get rid of the collar stand. the actual coat is made from wool gabardine. its underlined in white cotton batiste and then interfaced with goat hair canvas along the upper part, lower edge, lapels, collar, and sleeve caps. the lining is rayon challis - not a very typical lining fabric, but it was soo soft, and, as i mentioned - cheap(er)!

i made the executive decision at the last minute to leave out my self-made shoulder pads. while they looked nice, they gave the jacket more of a structured, formal look, and i sort of had a slightly slouchier look in mind. the difference is almost insignificant, but i feel it was the right decision. i did, however, leave the sleeve heads in, to support my dimpled sleeve caps!


here i am testing the fit of the back and shoulders. the ironclad test? weird lunge-y moves on the pier (what? thats not what you do?) there were no popped stitches, so i gave it a gold star, and moved on before i start getting real nit-picky, because, lordy, i could pick and tweak until i'm blue in the face!

my inspiration for this outfit came from one of my favorite style blogs, calivintage, who first introduced me to the term "teddy girls". i was going for a sort of mid-century, boy-meets-girl look (thus the title of this post - and also this song - a favorite from yesterday my youth). my red jacket inspires such things in me.

i would be seriously remiss if i didn't thank my husband for these photos today. and for putting up with my farting about deciding where to take them. and for making the executive decision for me to not reset the sleeves on this jacket for the 10th time, and just let them be. husband, thank you. you are the wisest of them all, and i don't know where i'd be without you.

outfit details:
jacket - self made
shirt - american apparel
jeans - j brand
shoes - urban outfitters from a long long time ago
scarf - not sure. a thrift store perhaps?

xx


1.11.2012

my favorite color is rainbow: goldilocks

all this talk about sewing has me feeling a bit single-minded. when i start to get this tunnle-vision syndrome, not seeing the forest through the trees and whatnot, there is really only one cure for it...

and that is the pure visual feast that is pinterest. the wonderful thing about pinterest is that you can truly tailor it to whatever your heart desires. i've turned mine into a bit of a scavanger hunt - organizing images by their predominant colors. of course i also try and pin outfits i like, hairstyles, etc...

so today, while perusing my pins, i felt moved by the warm, sunny hues of yellow.

yellow, gold, ochre, umber, citron, canary, flaxen... a color that can be warm and rich, opulent and extravagant, acidic, acrid, sour and sulfurous. it has been my experience that yellow is a seasonless color - there is always a shade that fits the present climate.

perhaps you can let this jaundiced hue influence your wardrobe this winter, allowing a little sliver of sunlight into your closet...


sources for all images, as well as other canary eye candy, can be found here.


xx

1.10.2012

on sleeves


and the saga of the red jacket continues.

actually - there really isn't much saga to it. i just tend toward the overly dramatic. this weekend i got my butt in gear and tackled those erroneous sleeves like someone was paying me to do it.

when i first realized that the sleeve cap was too large for my armhole i felt like my world just caved in (ahem. overly dramatic). fixing this seemed like the most difficult thing in the world and at the time i just couldn't wrap my head around it. before you judge me, let me just restate that i was running on very little fuel and pushing myself towards a deadline which, in all honesty, it was clear a good week ahead of time, i was not going to make. so i consider it a blessing for this little jacket that the holidays came when they did and i was forced to take a break - before someone (or something) got hurt.

i mentioned in my previous post that i received some sewing related gifts this christmas. chief among them was this book. i have been wanting a big ol' fat patternmaking book for some time - but just couldn't cough up the dough for one. thus - a perfect gift! i truly believe that this book will pay for itself in no time, since after barely flipping through the first few chapters i already gleaned the solution to my sleeve cap problem.

now - adjusting a sleeve cap isn't a hard pattern adjustment to make. in fact, its stupidly easy and if i had given it any normal amount of thought i probably could have figured it out on my own. however i was having some sort of massive (trauma induced, i'm sure) blockage on this issue, so seeing it illustrated was a wonderful, cartoonish, lightbulb-y, a-hah!!! moment for me.

fast forward to this weekend. as i set about to slice and dice my sleeve pattern my mind wandered to this blog and thought that perhaps i'm not the only one whose brain farts out on them over the simplest of alterations. which is why i decided to bring you my illustrated instructions on how to simply and easily reduce your sleeve cap size.

do not be fooled by these wibbly wobbly illustrations - i have an mfa in painting peeps (thats right i said painting - which explains my utter ineptitude with technology designed to make these things easier, like, say, adobe illustrator)

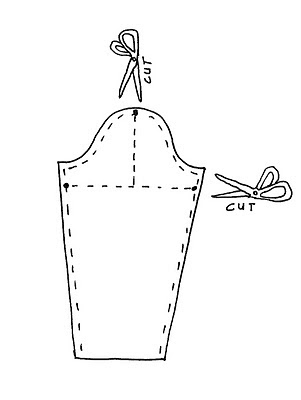
so this is something along the lines of what a standard sleeve pattern looks like:
it has actually been my experience that many commercial patterns have too much sleeve cap height for my taste. generally speaking, you want your sleeve cap to be about 1 1/4" to 1 3/4" larger than your bodice armhole. its best to check this on the paper pattern so you can easily make adjustments early in the game. if you find that your pattern calls for more ease (and a puffed/gathered sleeve is not part of the design) you may want to make your sleeve cap smaller by reducing both height and width. this is how you do it:

step one - slice your pattern at the cap line (about an inch below the top two corners) do not cut through the seam allowance! and cut a vertical line from the cap line, all the way up through the sleeve cap and its seam allowance.


bonus points if your scissors look like evil, maniacal birds!!!

step 2 - you should now have two wing-y pieces. rotate these in towards the center of the sleeve, overlapping in the middle and at the bottom.

step 3 - weigh down your wing-y pieces with some pattern weights. re-measure your sleeve cap and adjust as needed. when you get it to the right measurement, tape down your wing-y pieces and retrace your pattern (or just trim off the excess and redraw your seam allowance lines, smoothing out as you go - a french curve helps if you're not comfortable eye-balling)

and voila! a smaller sleeve cap!

easy. peasy. lemon. squeezy.

xx

edit: lizz, of agoodwardrobe, left an excellent question in the comments - and i thought it would be good to add a clarifying little illustration (and because making little drawings of patterns is really fun!). she wondered where exactly you measure your pattern to determine the amount of ease. you just measure over the curved part of the pattern:

in addition - to measure your armhole, lay your bodice front and backs together, matching up the sewing line at the armhole (you want to exclude the seam allowance in your measurement) and measure around the curve:

those seam allowances should be overlapped - but you get the idea!!

hope that helps clear things up!

over and out.

1.05.2012

a very bad blogger


ohmygoodgreengravy!! where have i been?!?! not on my blog - that's where. my sincerest apologies, and please bear with me as i play a very wordy catch-up.

so where did i leave off? oh yes... i remember.... the red jacket....

aahhhhh the red jacket... friends, family, various readers, i worked my butt off trying to get that hot little number finished before the impending holidays. seriously. sleep was lost, meals were skipped, hair went unwashed, stress acne abounded... you get the (not very pleasant) picture. and where did that get me? a big fat no where, that's where. you see, as i was desperately dragging ass to the finish line i had a very unpleasant realization. somehow, despite all my careful muslin making, the sleeve caps for my jacket were a good 2 inches too big for the arm hole. no matter how carefully i gathered and steamed those sleeve caps - there was just no way to squeeze in an extra two inches of fabric without getting some seriously poofed shoulders. le sigh...

dear ones, i wouldn't be exaggerating when i say i was in a dark, dark place. for about 30 minutes. then i picked my sorry ass off the floor and figured it was kharma or some such nonsense and that rushing to a deadline just doesn't suit me. so the sleeves will be redrafted, cut, sewn, lined and shoved in those damn armholes this weekend and we'll all (meaning me, myself, and i) move on with our lives.

so the red jacket will get its big reveal in good time. now what else have i been up to? the end of december was a very exciting and stressful time for me. in addition to my sewing debacles i also got some exciting personal news. in a few short weeks i will be fully severing ties with my current job and taking on a new position at an art nonprofit in galveston, tx. i am very excited about this new development for many reasons - and not too low on that list is the end of my hour / hour and a half daily commute. this means that i will gain 2 1/2 hours in my day to do as i please. and i often please to sew!

i traveled back east to spend the holidays with my family and in-laws. i ate, played with my nieces and nephews, ate, caught up with siblings and family, ate, received some awesome (and sewing related) presents, ate, shopped, ate, and generally unplugged from all electronics. and ate. all in all it was everything one could hope for from a family-centric holiday visit.

its very hard at this time of year to not get caught up in the spirit of new years resolutions. one can't help but feel a bit navel-contemplative-y as you gaze back at the year that has just passed, and wonder what this new cycle of time might bring. i don't think i've ever made a new years resolution (at least not out loud). my sister voiced my rather negative views best on new years day when she said, "i don't like resolutions. its just setting yourself up for disappointment." wise words, sister, wise words. similar to my abhorrence to personal deadlines, resolutions just seem like something set up to make you beat yourself up when you feel as if you fall short.

while i don't find planning for the future very useful, i do find it helpful to assess the past. i spent so much of 2011 worrying. worrying about the future. worrying about work. worrying about the wedding. worrying about money money money. and it was all so futile, because things work themselves out. as they always do.

so in 2012 i resolve would like to:
stop worrying so much.
be kinder to myself.
be kinder to my husband.
sew more.
and above all...

be a better blogger.


xo

12.05.2011

its whats on the inside that counts


wow... its already december! is this giving anyone else anxiety attacks? i feel like my life has been going in double time recently, but i guess thats just the time of the year...

well true to my word i've been spending every ounce of my time not filled with other obligations (work, commuting to work, sleeping, eating, parties and events **siiigghhhh** my life is so hard) voraciously re-watching lost and obsessively hand sewing. i think i fellstitch in my sleep...

i have a confession... i've never tailored anything before. i'm such a newbie! and for some reason i decided to follow claire schaeffer's instructions in her book couture sewing techniques - which if any of you have read you know that the instructions on tailoring are extensive, sometimes cryptic, and involve language like "spank it briskly with a clapper" (exsqueeze me?! claire please! this is a family blog... sorta).

the idea of tailoring is really appealing to me, though - through an interior structure of fabrics, tapes and stitches you're basically shaping and molding the fabric to the body. but, for a first-timer, doing this on your own can lead to some ... um ... less-than-family-friendly interior dialogue. i thought i would share with you some of the revelations, frustrations, and wtf?!?!? thoughts that have passed through my head with this recent sewing project:


1) wool. when they say "use a cool dry iron" they aren't kidding. that shit is like shrinky dinks! and we all know that what shrinky dinks do best is shrink....

2) prewashing wool suiting and goat hair canvas (purchased from this lovely lady) made my apartment smell like a barnyard. as a matter of fact - it made the whole floor of my building smell like a herd of sheep. sheep farts really...

3) i machine quilted together my cotton underlining and the hair canvas interfacing. i made neat little 1 inch squares that followed the grain line. upon reflection i think this was an absolutely useless step and i do not recommend it. but it looks fancy. and it was a great way to use up my half-finished spools of thread and random colored bobbins....

4) is pad stitching supposed to be neat or not? claire recommends "staggering" ones padstitching to avoid ridges. well i staggered - and that shit looks gnarly.


5) when following claire schaeffer's instructions - if i'm not really sure what i'm supposed to be doing i just hold my iron and my jacket pieces like they do in the picture for a few seconds, move it around a little (heat optional) and consider that step done.

6) after steaming my collar i let it dry out while pinned around my tailors ham. this kind of made my tailors ham look like a dumpy lounge singer.

7) taping the roll line and the front edge of the jacket is kind of like magic. and when magic happens i like to boast about it to my husband ("look! see how this lapel hangs straight?" "uh huh...." " and see how this one curves around the body?" "yeah..." "thats, like, totally a couture trick....." ) he's incredibly kind and always acts really impressed. best. audience. ever.

8) i think my cat knows something i don't and has been attempting to sabotage this little red jacket every chance he gets...


in conclusion - i have to admit that i'm very nervous about this jacket. i'm hoping that all the little weirdnesses work themselves out in the next few steps. i'm pretty relieved to be done with the majority of the hand sewing at this point - at least until i get to the lining.

speaking of the lining - i'm having a hard time determining what sort of print i want to use on the inside.... is leopard print too much??


xx

11.23.2011

on slowness


it is no secret that i am a rather slow paced person. early on when we were dating, my husband would call me ( in all lovingness, i'm sure) "tortuga sal". i talk slow, i eat slow, and i walk slow (though i prefer to think of it as sauntering or sashaying). i'd rather walk than run, sit rather than walk, and lay down rather than sit. some people call this "lazy" - i just call this "taking my time".

but what i've never understood is why this is such a bad thing? whats the big deal with speed? in sewing, there are certain moments that require us to slow down - to take our time and focus on the details. these are the moments that i relish. i love hand sewing. its an incredible treat for me to sit down with some music or (i'll be honest) a trashy tv show, a needle and thread and just focus on making even stitches.

slowness seems to be a bit of a "thing" nowadays. there's the "slow food movement" and i've even heard the term "slow fashion" being thrown around. i came to sewing through my love of fashion - or as i think of it - my passion for shmashion - a passion for well made, beautiful fitting, detail oriented clothes that well exceeds my wallet - but not my ability. i've never considered that making my own clothes could be a political act - a turn away from fast consumerism. because for me - slow is just how i go.

i get a bit of extra time off this week for the thanksgiving holiday here in the states. you can bet i will be filling it as much as possible doing the above - lovingly working my hand stitches as i tailor the jacket i'm working on - at a snails pace.

if you celebrate thanksgiving - i wish you a lovely holiday.

and guys - slow down.

xx


11.21.2011

inspiration for the cold that never comes


i'm not really sure what sort of lifestyle would render it possible for me to dress like this - but whatever it is... i want it. "swedish ranch hand" perhaps? "post-apocalyptic gypsy"? "mongolian sheep herder socialite"?

i just don't know.

but what i do know is that in another life i lived in a place that had cold weather. and when that cold weather hit i seriously contemplated wrapping my duvet around me, belting it, and calling it a day. maybe i'd throw on some super stylish clogs too.

but in all seriousness (sorta) its no secret that i love a little bit of drama in my looks, and there is just something about draped and layered fabric that has a certain theatricality to it. can you imagine the billowing that happens when the wind blows? when she walks? gasp! what a silhouette!

you can bet that when if the cold weather ever comes to my part of texas i will start eyeing up my navajo throw. and i suggest you do the same.

xx

11.15.2011

on the table

just some peeks at whats been happening on my sewing table. i often get so caught up in envisioning the final outcome, that i forget that whats happening along the way is pretty important too.

xx

11.11.2011

versatile blogger award!!


i was incredibly flattered the other day when i discovered that stephanie of stoutysews tagged me with a "most versatile blogger" award. thank you stephanie! i'm always slightly bewildered when i find out people actually read this blog!

so now i have to reveal seven of my most top secret secrets! get ready for some truly enlightening information....

1) i'm 26. ha! bet you didn't see that one coming!

2) my husband and i have a dog, lucille, and a cat, mister muscles. lucille is one of the sweetest, most well behaved dogs ever, but she is really my husband's dog. she was part of his life before i met him, and lucille will never let me forget it. we acquired mister muscles on our drive down to texas a little over two years ago. he's pretty good at knocking things off shelves, giving a major stink-eye, making weird gremlin noises at odd hours of the night and, you know, being a cat.

3) after much deliberation i have finally come to the conclusion that my favorite flavor of jam is marmalade. wait. does that count as jam?

4) i am an aries (pisces cusp). my chinese zodiac is an ox. a wood ox to be precise. i'm not really sure what any of this means. i don't follow my horoscope. but i'm pretty sure its all true.

5) i have a really hard time saying the name wichita (as in wichita, kansas). every time it comes up in conversation (it happens more often than you would think!) i have to pause and tell myself "its wichitaw, sallie, not wicheetah". but i do think that if it was wicheetah i'd probably want to live there. food for thought citizens of wichita, food. for. thought.

6) i once got so scared in a haunted house that i ran out the emergency exit. it turned all the lights on inside the haunted house. a zombie followed me outside to make sure i was okay. looking back on this i probably should have been way more embarrassed than i was. i was, like, 18.

7) ohmygodiloooovvveeeeharrypotttteeerrrrr! i really don't think this needs any explanation. i mean, i'm practically a wizard....


and that, dear friends, is seven useless facts about me. my favorite person. that was really fun, by the way. i like making lists.

and now i get to pass this little blog award on to others! i'm pretty sure i'm the last person to find out about... everything - so these are by no means new blogs. in fact these ladies have all been around longer than i have, they're just "new to me" blogs! if you've already been tagged by this, no hard feelings, okay?


xx

11.07.2011

for your viewing pleasure: shoe + art


so since i already spilled the beans on my rachel comey obsession i thought i'd just ride this lovefest for a bit longer. while the clothes set my heart a-pitter-pattering, my devotion is really to the shoes.

a fellow comey lover once told me that rachel studied sculpture before she began designing clothes. this struck a major chord with me, and also made total sense. her designs are incredibly sculptural - with just the right combination of toughness, timelessness, elegance and awkwardness. perhaps not the combination most people would look for in a shoe, but for me they possess something just slightly off which makes me want to keep looking at them. if ever i could make a case for adding a bit of artistry to an outfit it is in ones choice of footwear. basically i'm saying, quit being a pansy and put some sculptures on your feet!

after a trip to the philadelphia museum of art this past summer (seriously one of my favorite musuems, and its not just my philly pride thats talking...) i came away with brancusi on the brain. constantine brancusi was never one of my favorite artists. its always amazing to me when you can look at something you've seen a million times, read about and studied, and yet all of a sudden its like you're seeing it with fresh eyes. this is what happened with brancusi. its like a light went on and something i had always glossed over came into focus. i just can't get over those forms (i know... nerd alert...)

perhaps its a bit of a stretch to make a connection between rachel comey shoes and brancusi sculptures - but i don't think so. the restrained palette, the references to classicism, the elegance and awkwardness...the stacking!

all rachel comey shoes via solestruck, brancusi images via the pma, here, and here.

xx